Configure affiliations
Create user and collections nodes to build hierarchies the allow for multi-brand rollup and relationships for customers.
About this task
The Affiliations page provides functions for building and managing hierarchies, or affiliation trees, of customers represented in the platform as "nodes." There are two types of nodes that can appear in a user affiliation tree - “collection” and “user.” A collection node is represented externally only as an object containing customers and/or other collection nodes - not represented as customers themselves. User nodes, on the other hand, are synonymous with current players/customers, but they can reside in an affiliation with either a collection node or a parent user node.
Steps
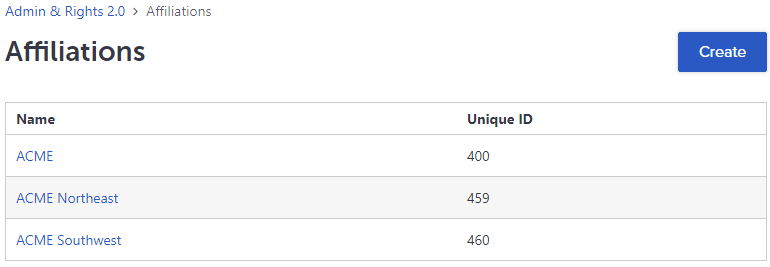
- On the Admin & Rights 2.0 dashboard, under Platform Configurations, click Affiliations. The Affiliations page opens:

- From the Affiliations page, click Create.
- In the Create Affiliation modal, specify a name and a unique ID for the affiliation node. Then click Create on the modal. The new affiliation displays on the Affiliations page.
- In the text field, name your first - or root - node, and then click Add. The new node appears with a plus sign next to it.
- Click the plus sign to add a node beneath the root node. Alternatively, you can add another root node as a peer of the first by naming it in the empty text field and then clicking Add.
- Click on the name of the newly created affiliation to open it. Now you can define the affiliation node hierarchy further in the following ways:
- Under Affiliation Hierarchy, click the first icon to open the Add Users to Collections search modal. You can use this modal to search for a customer by first name, last name, email, phone, ID, and date of birth. Then click Search to execute the query and add the user to the collection.
- Under Affiliation Hierarchy, click the second icon to open the Add Collections to Collection search modal. You can use this modal to search for a collection by its name. Then click Search to execute the query and add the collection to the collection.
- Under Affiliation Hierarchy, click the third icon to edit an existing user or collection within the active collection. When you are done, click Save. Or, if the node is not a root node, you can click Delete to remove it.
- Now if you want to define another node for a collection or users, enter the name of the category/ node and then click Add to open an additional set of fields. You can also apply any of the options discussed in step 6.
-
If you want to edit the Affiliation Name or Unique ID shown at the top of the page, click the corresponding edit icon.
Once all of your changes have been saved, you are returned to the Affiliations table on the main page.