Tour catalog management interface
This article introduces the Catalog Management interface, where you view and search the hierarchy of categories and items in the master and store catalogs. In addition, the tabs within the module allow you to work with catalog nodes - both categories and items. Tools are provided to modify node settings, create mappings between master and store catalog nodes, add or remove master catalog nodes, and publish the master catalog to all SessionM Platform modules.
In this article:
Disparate catalog UI view
In a disparate catalog scenario, the Catalog Management Module features a Master Catalog and Store Catalog tabs that enable the platform user to map store catalogs to a single master catalog. This ensures that once the mapping process takes place, differences in Item IDs that exist at the store level can be resolved back to the master catalog, which is used as the single point of reference across the platform.
Master Catalog tab
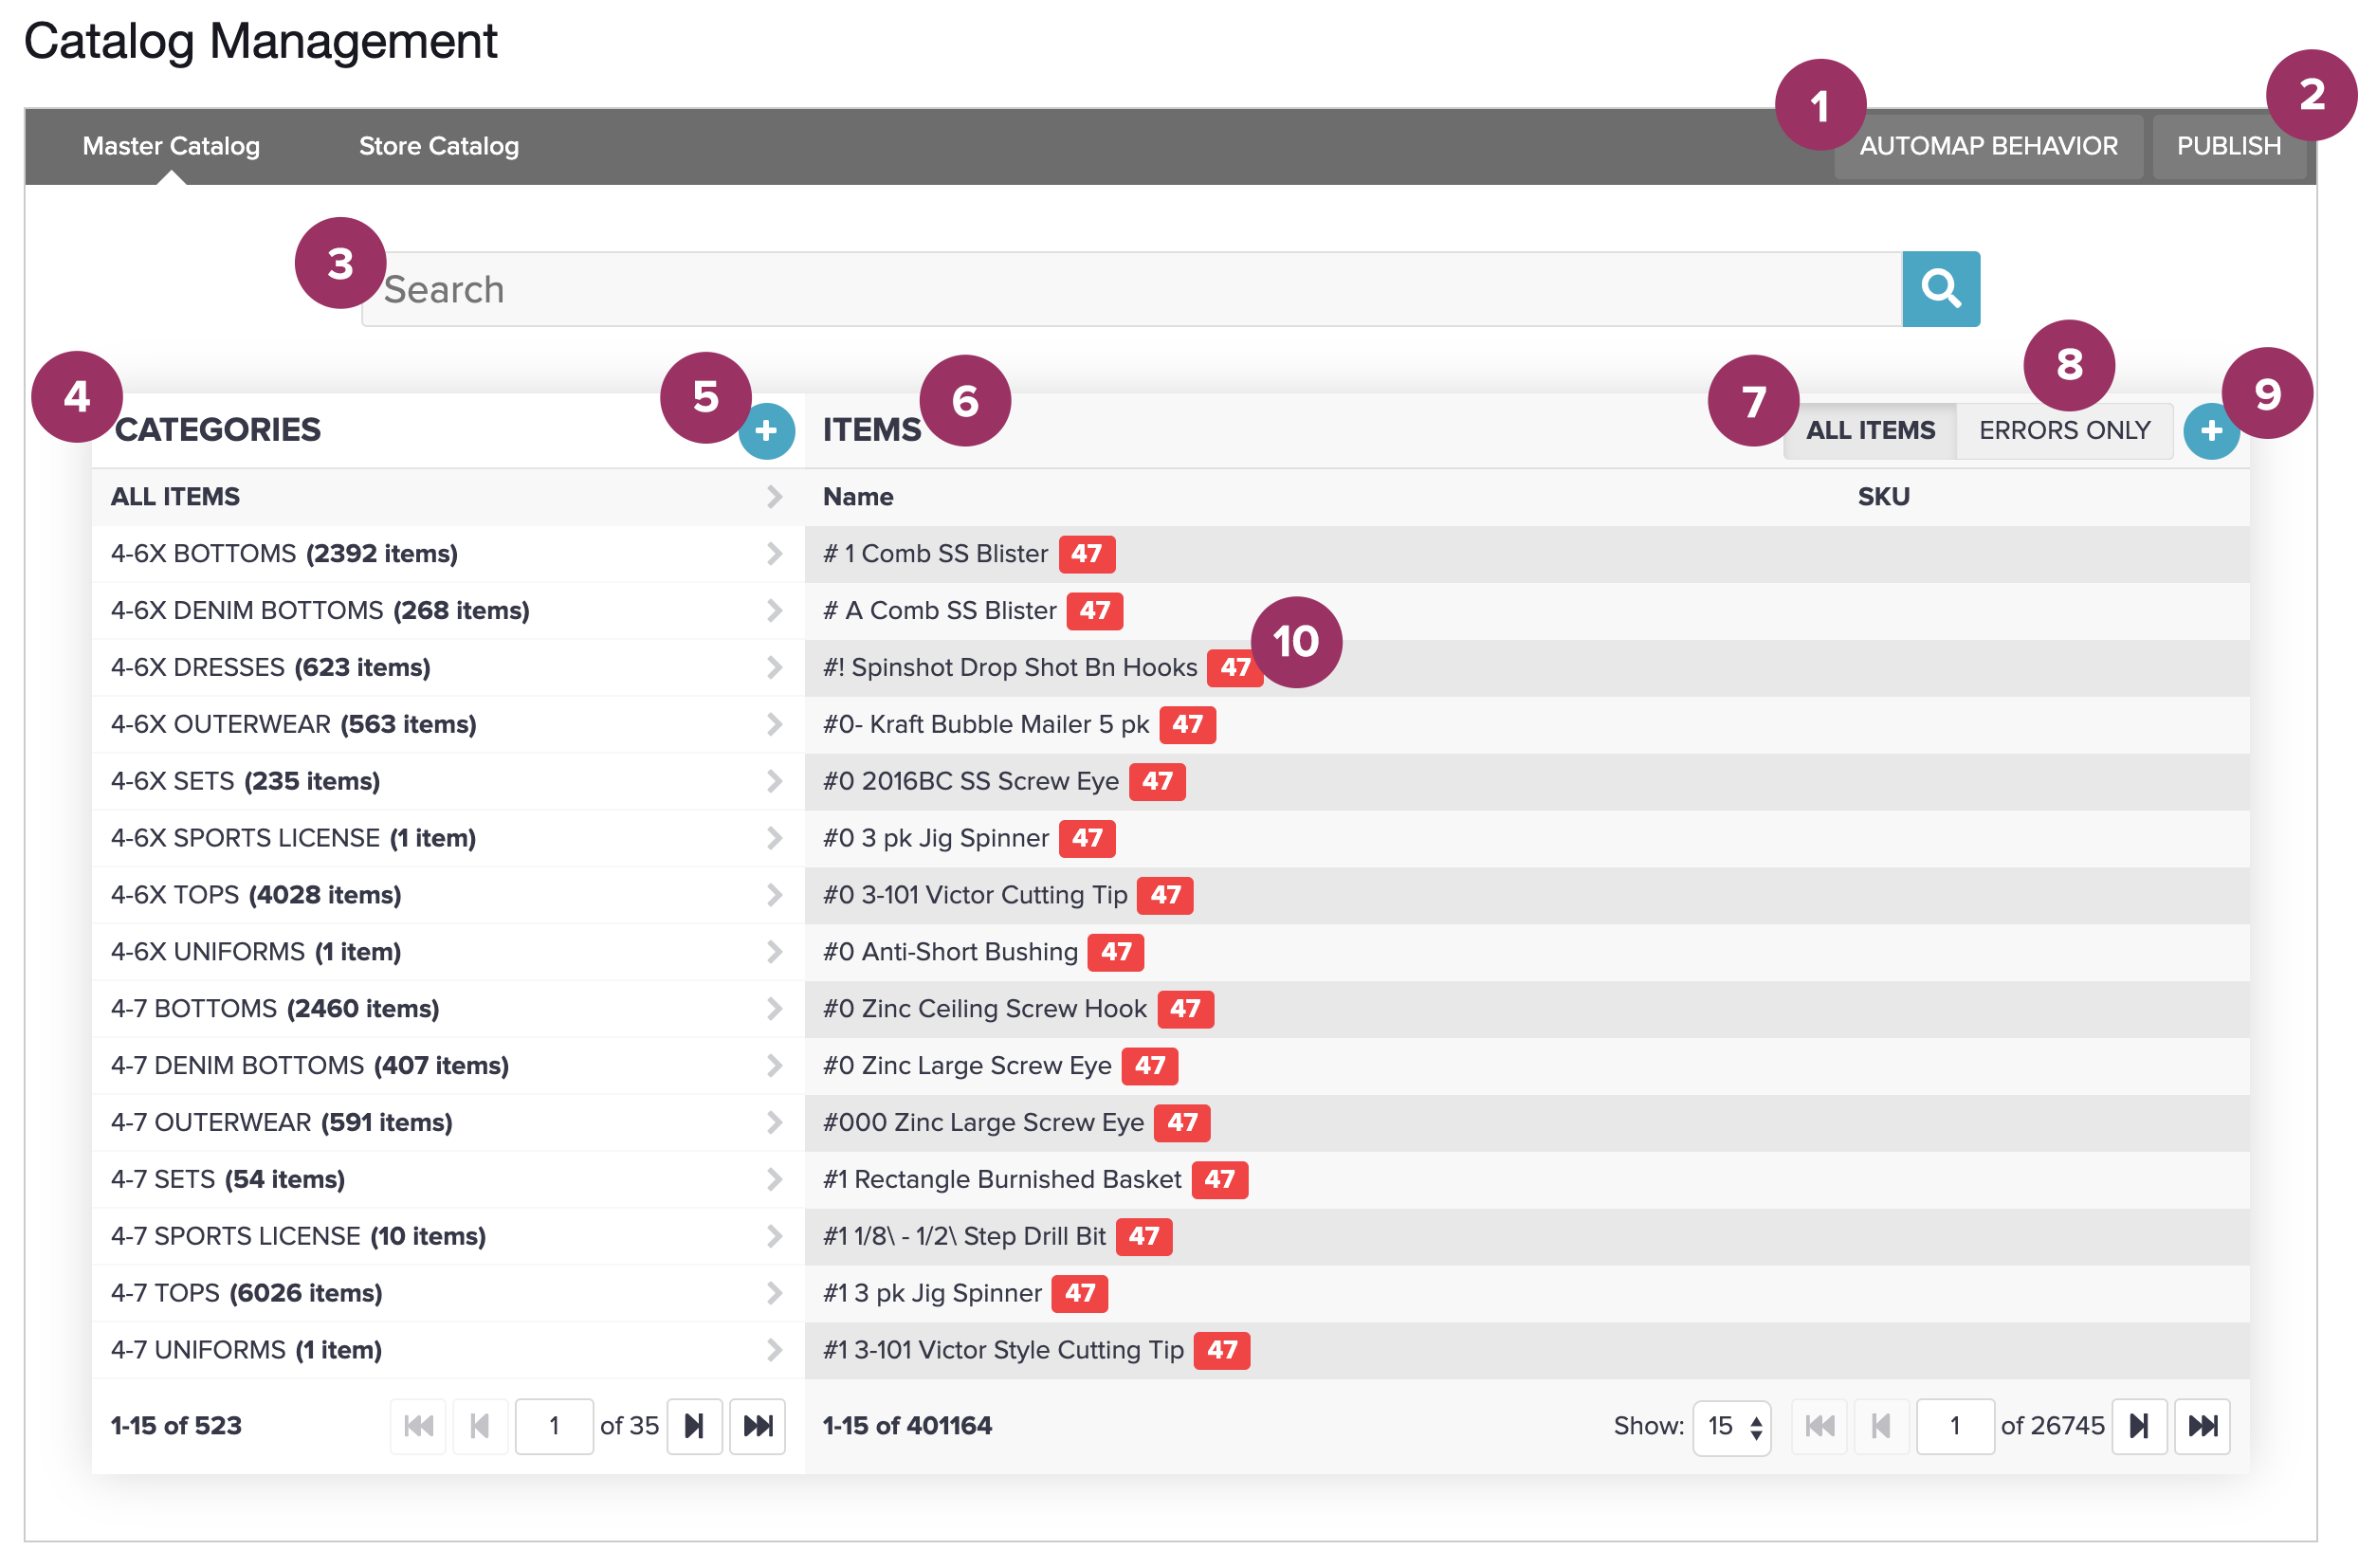
The Master Catalog tab appears in the Catalog Management Module for disparate catalogs. It allows users to view and search the master catalog hierarchy, which is comprised of both categories and items. You can modify the view to show either all items mapped to the master catalog or only those that have generated errors. In addition, you can define or edit both categories and items in the master catalog, specifying a name, description and parent for each category, or alternatively, a name, description, SKU, and parent for each item. This is also the location from which you can manage mapping relationships with the store catalog, creating, viewing,or editing mapping relationships as needed. Mappings can be handled manually or through the Automap function. Finally, using the Publish button, you can publish a master catalog to all of the SessionM Platform modules.

Each component and its function is described below:
- Automap Behavior button - Set Automap behavior to execute store-to-master automapping when the store catalog is ingested.
- Publish button - Publish master catalog to all modules.
- Search field - Search for categories or items within master catalog.
- Categories column - Listing of all master catalog categories, which can be opened to see any sub-categories and, in the Items column, any items associated with the categories.
- Categories Plus button - Button that supports adding a new category to the master catalog.
- Items column - Listing of master catalog items associated with the active category. Item names and related SKUs display. Numbers boxed in red indicate missing store relationships. As shown above, each of the master catalog items are not mapped to 47 store catalog items. Green checkmarks, however, would indicate master catalog items successfully mapped to store items or simply unmapped because the store items have been selected to be ingnored.
- All Items tab - Displays all items in the master catalog.
- Errors Only tab - Displays only items in the store catalog that generated errors.
- Items plus button - Button that supports adding a new item to the master catalog
- Items - Items in master catalog. Numbered red box indicates number of missing store relationships for the item.
Store Catalog tab
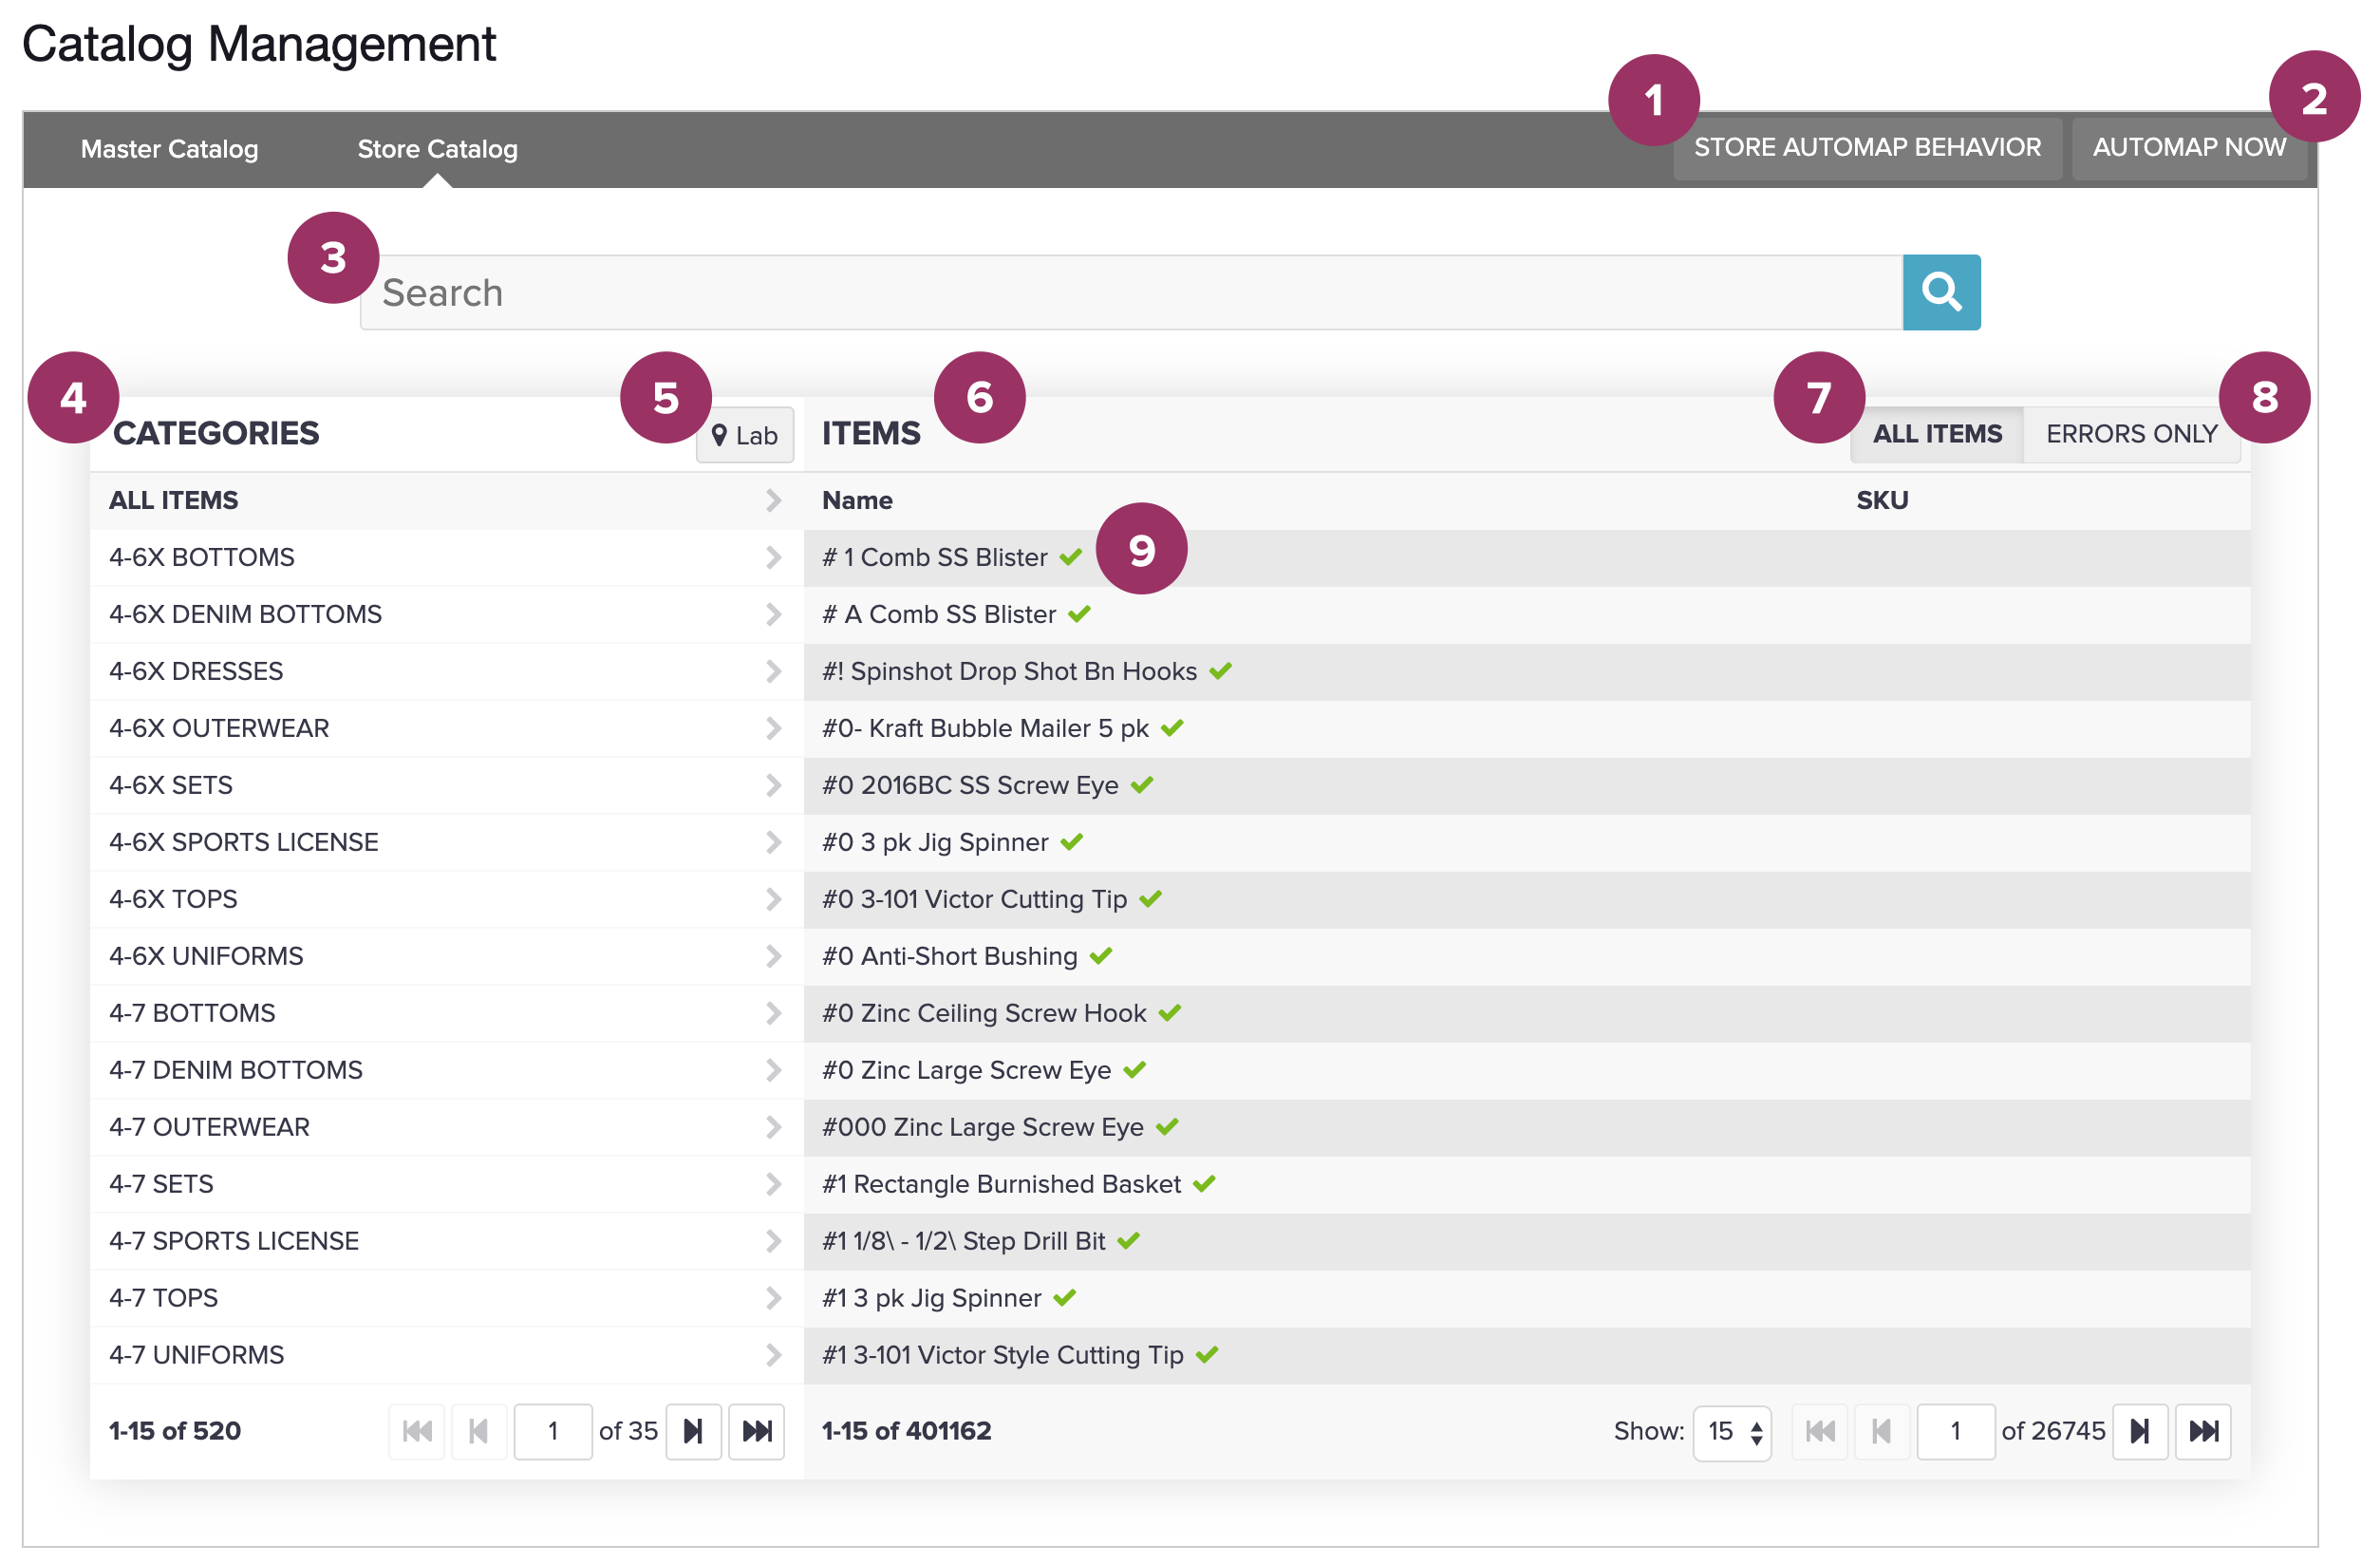
The Store Catalog tab appears in the Catalog Management Module for disparate catalogs. On this tab, you can view and search the store catalog hierarchy, which is comprised of both categories and items, and you can modify the view to show either all items in the store catalog or only those that have generated errors. This is also the location from which you can manage mapping relationships for a single master catalog, creating, viewing, or editing mapping relationships as needed. Mappings to a single master catalog ensures that once the mapping process takes place, differences in item IDs that exist at the store level can be resolved back to the master catalog, which is used as the single point of reference across the platform. Mappings can be handled manually or through the Store Automap Behavior function.
The following image numerically designates the UI components on the Store Mappings tab:

Each component and its function is described below:
- Store Automap Behavior button - Set Automap behavior to execute automapping either manually or when the store catalog is uploaded.
- Automap Now button - Manually start the Automap process, allowing the system to perform the store-to-master mappings.
- Search field - Search for categories or items within store catalogs.
- Categories column - Listing of all store catalog categories, which can be opened to see any sub-categories and, in the Items column, any items associated with the categories.
- Store location name button - Current store location name displayed. Clicking it opens the Choose Location dialog, which allows you to select a different store location.
- Items column - Listing of store catalog items associated with the active category. Item names and related SKUs display. Green checkmarks indicate an existing mapping to the master catalog.
- All Items tab - Displays all items in the store catalog.
- Errors Only tab - Displays only items in the store catalog that generated errors.
- Items - Listing of items in store catalog. Successfully mapped items show green checkmarks.
Catalog mapping modal
The Catalog Mapping modal can be accessed from the Catalog Management Module for disparate catalogs. It allows users to define or edit mapping relationships between items in master and store catalogs. The modal displays in three conditions:
- When clicking View/edit store mapping relationships (link icon) for a master catalog item. This action presents the categories and items for the active store catalog.
- When clicking the View/edit all blank missing store relationships (red box icon) for a master catalog item. This action presents the categories and items for all of the active store catalogs.
- When clicking View/edit mapping relationship (link icon) for a store catalog item. This action presents the categories and items of the master catalog.
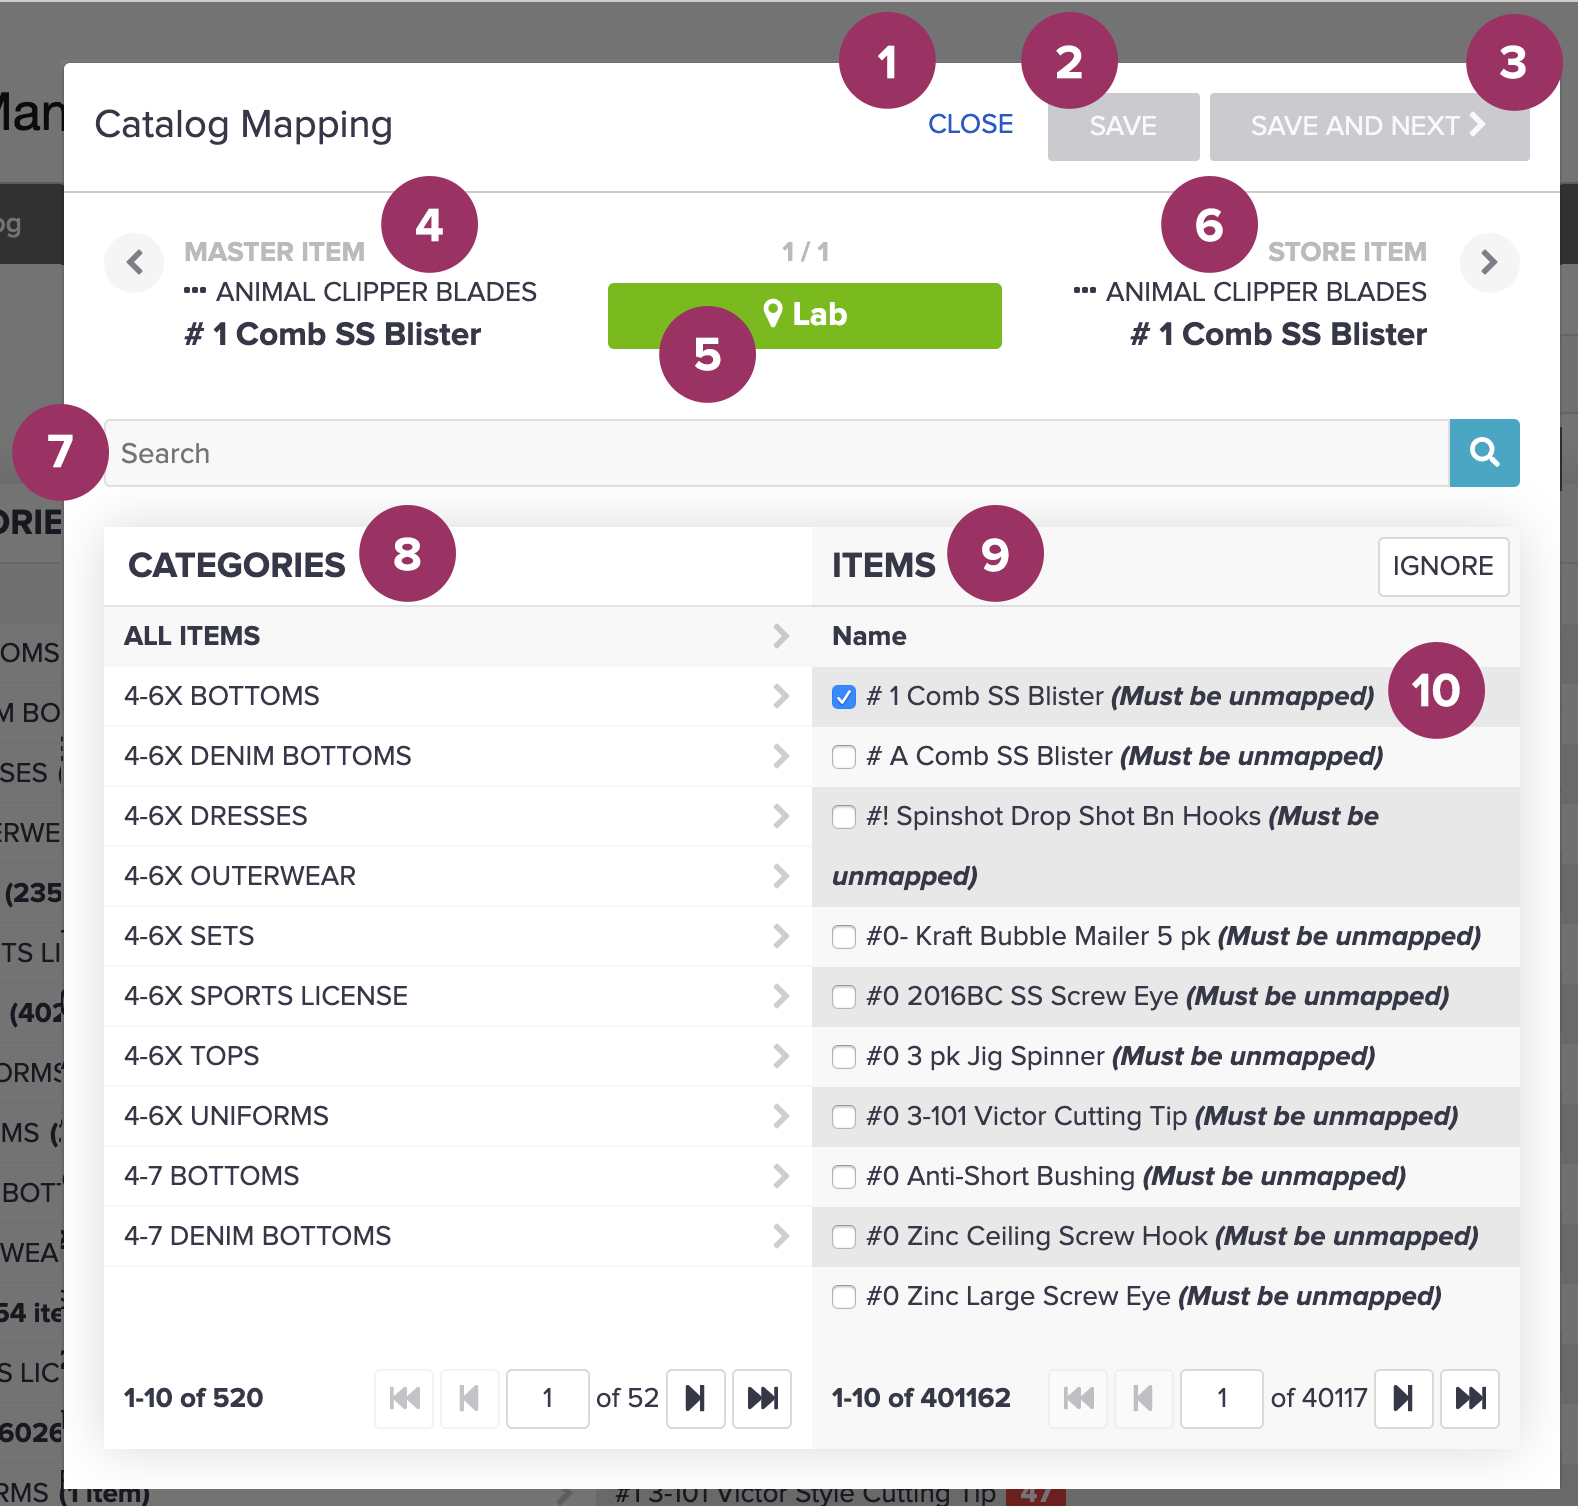
The following image numerically designates the UI components on the Catalog Mapping modal:

Each component and its function is described below:
- Close button - Closes modal.
- Save - Saves modifications to mapping data.
- Save and Next - Depending on how you access the modal, this button does one of the following:
- If you accessed the modal by clicking the link icon for an item on the Master Catalog tab, the system saves the data and then advances to the next item in the active store catalog.
- If you accessed the modal by clicking the red box icon for an item on the Master Catalog tab, the system saves the data and then advances to the next store.
- If you accessed the modal by clicking the link icon for an item on the Store Catalog tab, the system saves the data and then advances to the next item in the master catalog.
- Master Item display area - Category and name of item being mapped to in the master catalog. The arrow in this area loads the previous object displayed in any of the three conditions discussed in the preceding step.
- Store location name - Name of the store location. For example, a store called "Lab." The count above the rectangle tracks one of the following:
For master catalog items accessed via a link icon, the count reflects the number of items in the active store catalog.
- For master catalog items accessed via a red box icon, the count reflects the number of stores with missing mappings to the master catalog.
- For store catalog items accessed via a link icon, the count reflects the number of items in the master catalog.
- Store item display area - Category and name of item in store catalog being mapped to the master catalog. The arrow in this area loads the next object displayed in any of the three conditions discussed in step 3.
- Search field - Depending upon how the modal was accessed, the field searches for categories or items in a master or store catalog.
- Categories column - Listing of all categories for either a master or store catalog, depending on whether the Catalog Mapping modal was accessed from the master or the store catalog. (See this section's introduction for a discussion on the different ways the modal can be accessed.) Each category can be opened to see any sub-categories and, in the Items column, any items associated with the categories.
-
Items column - Listing of master or store catalog items associated with the active master or store catalog category. Depends on whether the Catalog Mapping modal was accessed from the master or the store catalog. (See this section's introduction for a discussion on the different ways the modal can be accessed.) "Ignore" button ensures the selected item will not be mapped and that its lack of a mapping, which is regarded as an "error," is silenced.
- Item with enabled blue checkmarks - Indicates that the item will be subject to a Catalog Mapping modal action. Often these blue checkmarks indicate that items have been mapped successfully, including cases in which an item can be mapped to multiple categories. Items that bear the helper text, "Must be unmapped," are in fact already mapped. So if you choose to change its mapping, the system will unmap them by overwriting them with the new mapping data.
Unified catalog UI view
A Unified Catalog scenario does not support the ability to build mapping data between master and store catalogs. As such, no related UI components are shown in the Catalog Management Module. This is because working off of a single catalog across all stores ensures that no mapping activity needs to take place. This single catalog will exist as the master catalog and be used across the platform. Modifications to the catalog are performed when a new store catalog is uploaded to the master. It’s also important to note that in this scenario, the Catalog Management Module cannot be used as a tool to view all of the store locations. For a discussion on the advantages of unified catalogs, see About the benefits of a unified catalog.
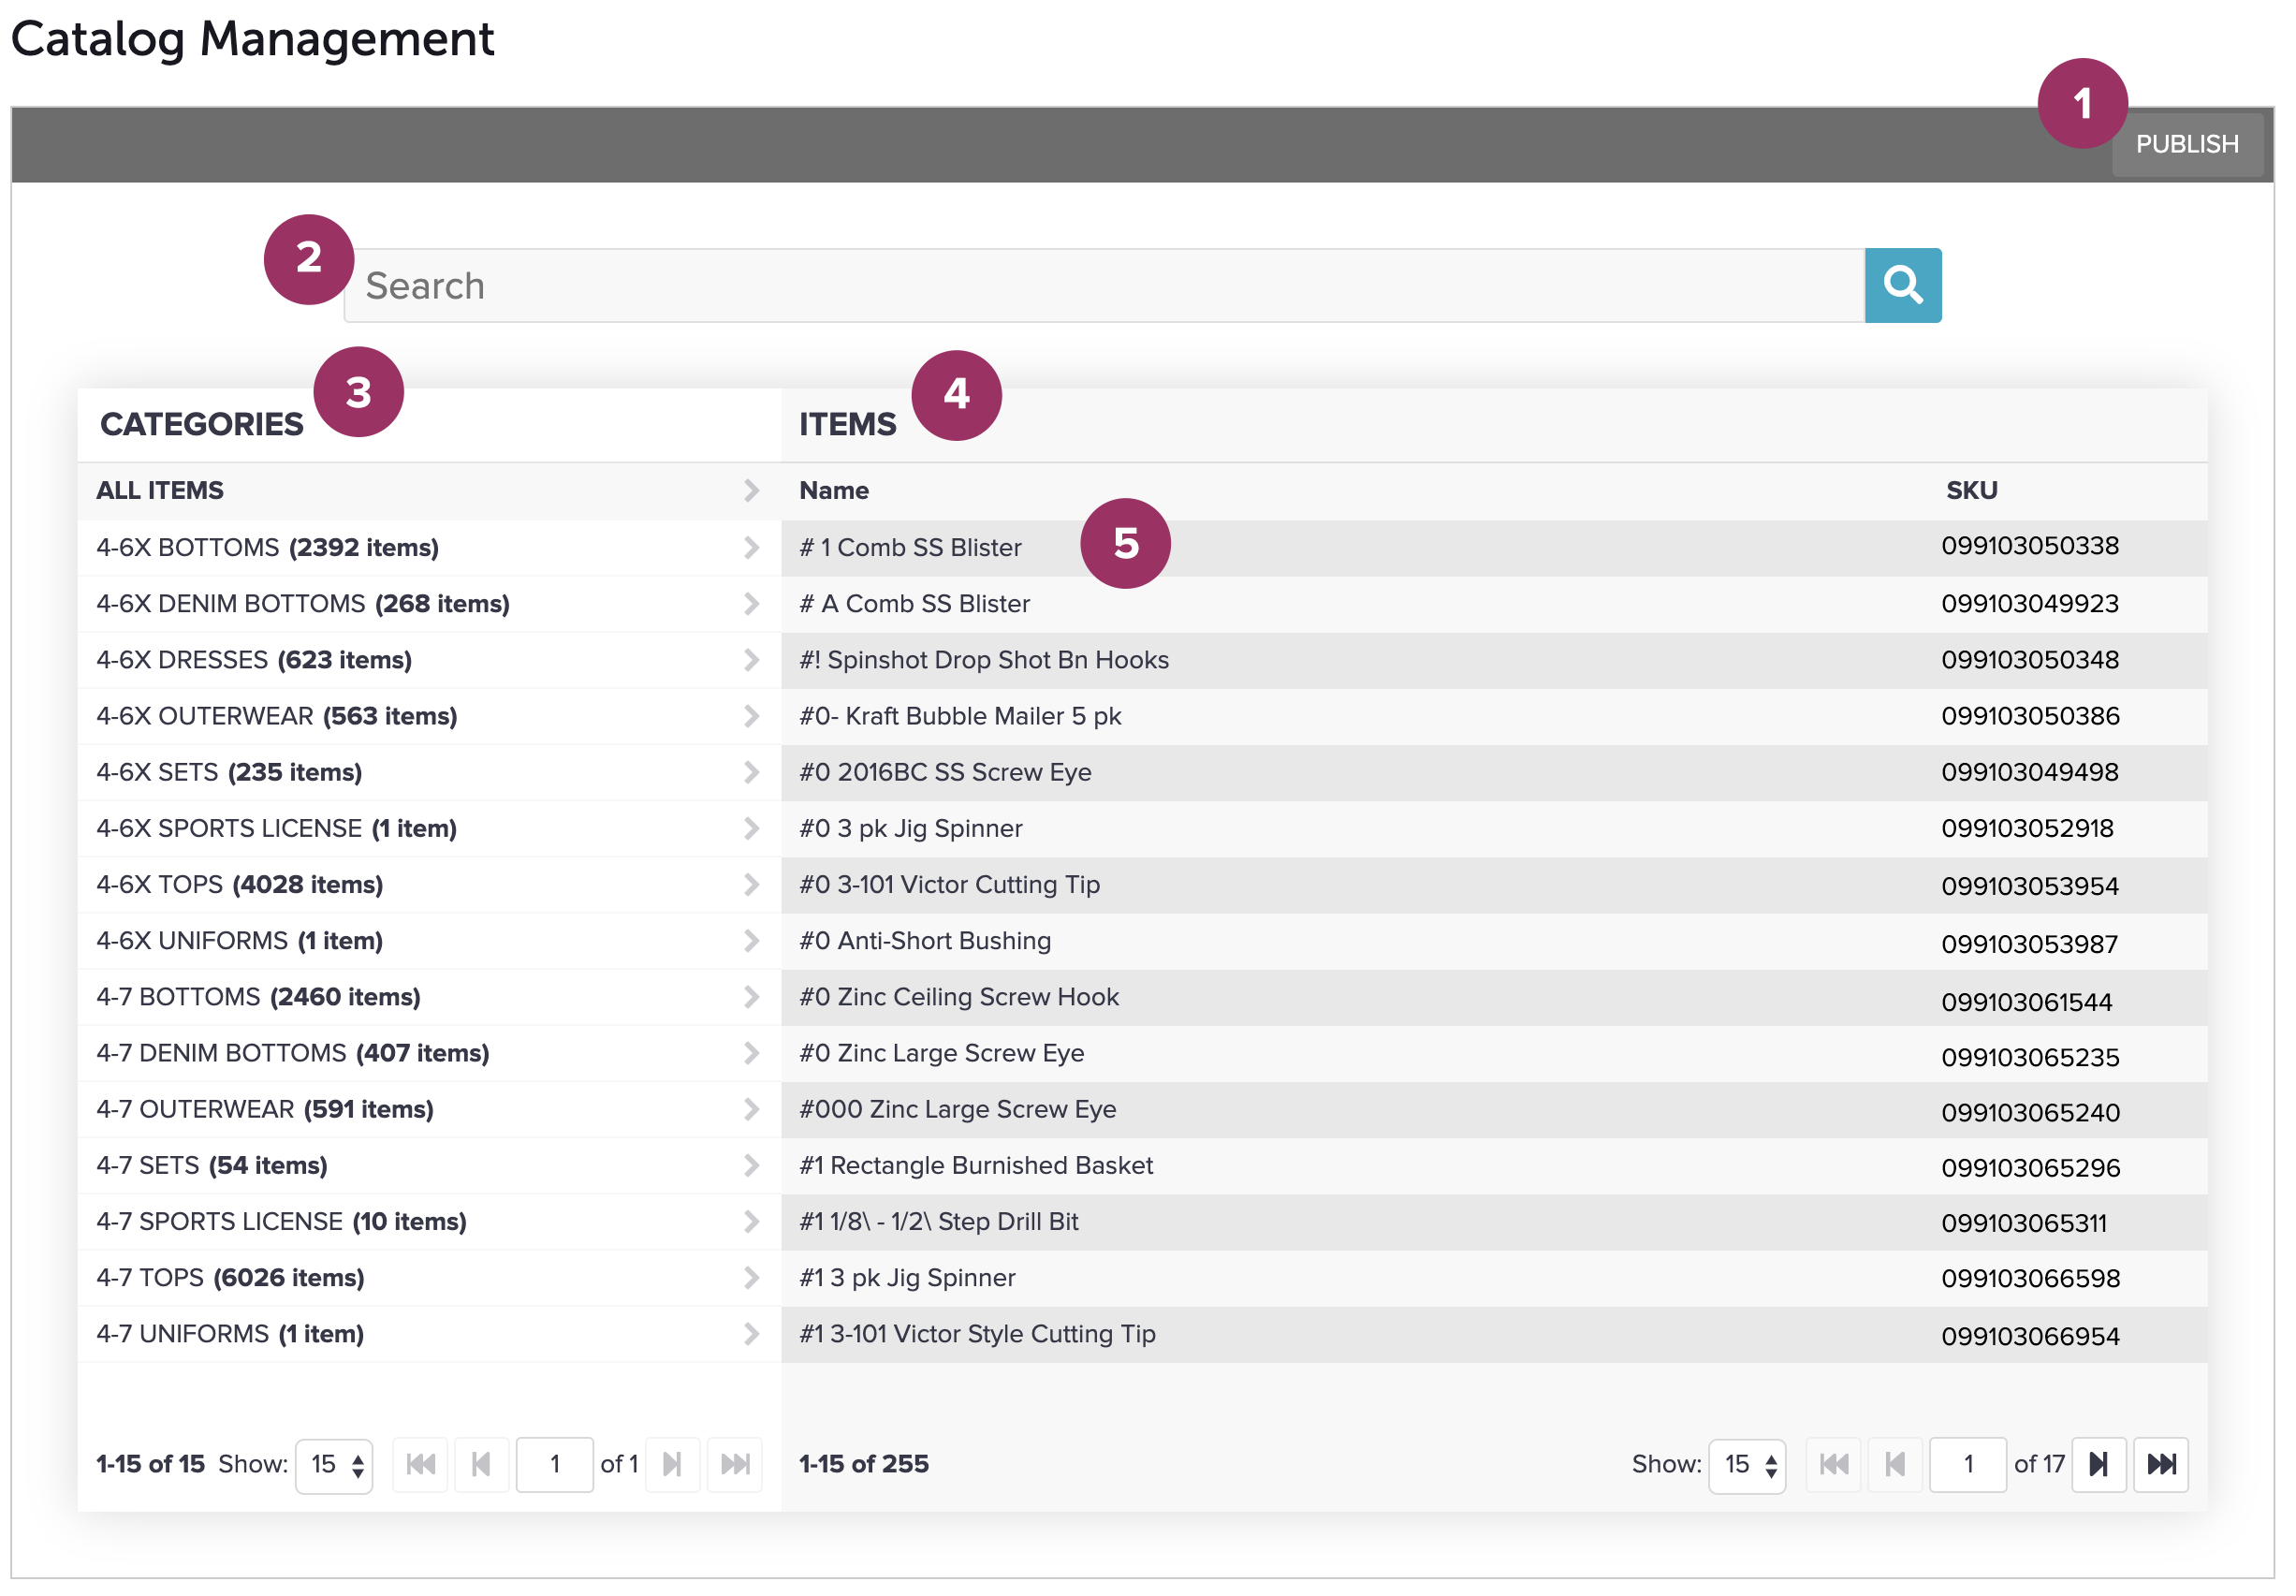
This tab allows you to view all of the categories (parent and child) in the master catalog, along with the items they contain. From it, you can search for specific categories. In addition, the tab provides the ability to publish the master catalog to the platform's other modules.
The following image numerically designates the UI components on the Overview / Rules tab:

Each component and its function is described below:
- Search field - Search for categories within master catalog.
- Publish button - Publish master catalog to other modules.
- Categories hierarchy - View category hierarchy defining master catalog.
- Items hierarchy - View items associated with selected category.
- Items - View specific items and discover whether item was mapped successfully from its original state in a store catalog.