Upload disparate catalog
Once the pre-validation assessment has taken place and the method of upload has been chosen, the steps listed below will detail how to properly ingest, manage, and ensure that the catalog data is successfully in place to proceed with client onboarding. The steps listed below are for a Disparate Catalog scenario.
Before you start
Before catalogs are ingested, stores must be configured within the SessionM Platform. A catalog cannot be upload prior to the existence of a store within the platform. For more information on uploading stores, consult with your SessionM customer success contact.
While the Catalog Management Module is built to handle these use cases in which item IDs differ per store, due to the nature of the varying catalogs time should be allocated for additional steps needed to configure catalogs in this scenario.
Step 1. Upload stores
Stores can be verified as uploaded and usable from the Catalog Management Module by navigating to the Location dropdown within the Store Mappings tab of the module.
While the catalog information for each store will be empty initially, all uploaded stores should be present when this box is dropped down.
Two important notes to keep in mind:
- Please read step 2 below before performing this step, as it will help to identify if a Test Store should be created during this process.
- If Auto-mapping will be used later on in the ingest process (which is most likely the case), toggle through each store to turn on the “Enable Auto-Mapping” checkbox. This will ensure that the mapping process takes place as soon as each store’s catalog is ingested. For more information, see the discussion on automatic mapping in Map Store Catalog to Master Catalog.
Step 2. Ingest master catalog
As explained in Disparate Cataloag vs. Unified Catalog, a Disparate Catalog approach weighs heavily on the use of a master catalog. With this in mind, the first few steps will assist with uploading and configuring this master. Before reviewing steps for ingest of a catalog to be used as the master, a few things to keep in mind:
- The master catalog should include every item that the client has across to all of their stores and channels. In short, if an item ID will be transmitted to SessionM at any point in time (offer redemption, transaction upload, etc.), that item should be included in the master catalog.
- It is highly recommended that the master catalog contain SKUs. If SKUs are assigned to items in both the master and store catalogs, the mapping process can be fully automated.
- While items can be added, master catalogs cannot be deleted once they have been created and published back to Core, as the catalogs have relationships across other modules within the SessionM Platform that would be broken if this were to occur. Accordingly, it is critical to ensure the catalog that will be used as the master is accurate prior to upload.
There are two ways to ingest an initial catalog that will become the master, and both revolve around uploading a single store catalog into the platform initially. Once ingested by following the instructions of either section below, the next step - detailed in Step 4. Create master catalog - instructs you on how to take the uploaded store catalog and promote it to the single master catalog for the client.
Create test store
When stores are initially created, an additional store can be created and use dummy information for the purpose of testing. When the catalog that will be used as the master template is uploaded, the Store ID should be that of the test store.
Use existing store
While the actual store catalogs have not yet been ingested, the master catalog can be uploaded to the platform using any of the existing created stores. It is important to note that if this path is chosen, two things must be kept in mind:
- If a store catalog exists that contains every one of the items that will be included in the master catalog, this catalog should be used and uploaded with the correct Store ID.
- If a unique catalog is used as the master (is not an actual catalog from any of the stores) it can be uploaded using any single one of the Store IDs of the uploaded stores, but the correct store catalog will need to be re-uploaded with that Store ID during the full upload of all stores.
Once the Store ID is established from the methods above, the master catalog can be uploaded using any of the methods of catalog ingest.
Step 3. Verify successful ingestion of master catalog
After ingest of this catalog, it can be verified as successfully uploaded within the Catalog Management Module by navigating to the store it was uploaded as within the Store Catalog tab and ensuring the catalog data is present.
Note - Validation should be performed not only to ensure that the catalog successfully was ingested by the platform, but to double check that all items are present and organized in the correct fashion. While a store catalog can continue to be re-ingested to fix issues that may be identified during this process, once the store catalog has been promoted to master bulk updates, edits, or deletions are not available. Due to this, verification and correction (re-ingest of accurate data to the same Store ID) should take place during this step.
Step 4. Create master catalog
Once a catalog that will be used as the master has been successfully ingested into the SessionM Platform and can be seen within the Catalog Management Module, it can be indicated as such. This step promotes the catalog to master.
This can be done within the Store Mappings tab of the Catalog Management Module. Once inside this tab, the store with the catalog that should be made master should be selected within the Store Catalog right-side pane. After ensuring this is the correct data for the master catalog, the Clone Store Catalog button should be pressed on the Master Catalog left-side pane, as shown below.
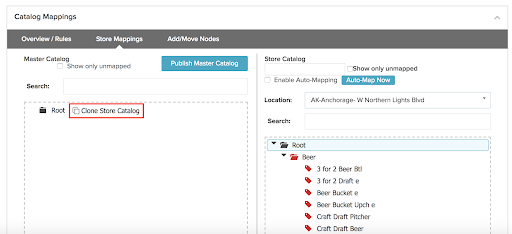
This action will create a clone of the store catalog (right side) and make it the master catalog (left side). Depending on the size of the catalog that will be used as master, this may take a few moments. The cloning process occurs in the background, but no clear indication is currently presented to the UI. The page can be refreshed every few minutes to see if the master catalog is displayed properly, indicating the clone was successful. For more information, see Create Master Catalog.
It is important to note that while a relationship between a store catalog and master catalog is created through mapping, once a store catalog is cloned to become the master the two catalogs are independant. Once the creation of master takes place, changes to either the store catalog or the master catalog are distinct to each catalog and will not be reflected across both.
A successful creation of a master catalog can be verified when the master catalog information is populated in the Master Catalog column.
Once the master catalog has been created, modifications that can be made to the master include:
- Edit Master Catalog Item/Category Details - Master catalog item details (Name, Description, and SKU) along with master catalog category details (Name, Description) can be changed by clicking the gear icon next to each item/category within the Overview/Rules tab. For more information, see Edit Categories or Items.
- Add Category or Item to Master Catalog - Data can be added on a per item/category basis by clicking the “Add Item” or “Add Category” buttons within the Add/Move Nodes tab. For more information, see Add Categories or Items.
- Change Master Catalog Hierarchy/Structure - Items and categories can be moved throughout the hierarchy by clicking and dragging the item or category to the desired placement within the catalog on the Add/Move Nodes tab. For more information, see Move Categories or Items.
As noted in prior, there is no ability to re-upload a master catalog that contains multiple items and categories, as the master catalog is used across the platform in different modules and uploading a new version would break the relationships that have been established. Due to this it is essential that the initial master catalog be uploaded properly.
Step 5. Upload all store catalogs
Using one of the ingest methods listed above, the store catalogs can now be uploaded into the SessionM Platform. Being a Disparate Catalog scenario, there are a number of tips to help with this process:
- As multiple store catalogs will most likely be uploaded due to the Disparate Catalog scenario, keep in mind that certain paths of upload (such as SM Sync) enable the upload of multiple stores at once. For more information, see SM Sync documentation.
- Reminder - Newly ingested stores will need to be mapped to the master catalog one item at a time (manually) or through pressing the “Auto-Map Now” button for each store, unless the “Enable Auto-Mapping” checkbox was checked for that store prior to ingest. For more information, see Map Store Catalog to Master Catalog.
Keep in mind that depending on the size of the catalogs, number of catalogs, and the upload method that has been taken, the upload jobs may take time. Once the upload has completed, the Catalog Management Module should be checked for verification.
Step 6. Verify store catalogs have uploaded
Using the Catalog Management Module, it will be evident whether or not a catalog has been uploaded. If this is the first time a catalog has been uploaded for a store, data will be populated for that store within the module. If this is a subsequent catalog upload, the catalog data should be checked to ensure that any changes in the new set of data have been implemented. Data population within the Catalog Management Module can be seen below:
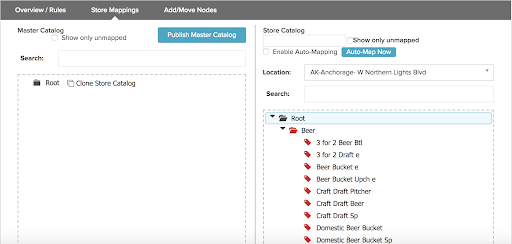
As this is a Disparate Catalog scenario, the store catalogs are able to be viewed on the right hand side of the Store Mappings tab. By changing the store location using the Location dropdown, each catalog can be viewed to verify successful upload and catalog accuracy.
Step 7. Perform store to master catalog mappings
In a Disparate Catalog scenario, mapping is essential to the proper function of many of the platform features that leverage the catalog, including building offers and establishing special point earning rules. Before diving into how to perform mappings or enable Auto-mapping, you may want to review Learn About SessionM Store to Master Mapping.
Auto-mapping
The simplest way to achieve the mapping process is to leverage Auto-mapping. This feature is able to establish the relationship between store catalog items and master catalog items without manual intervention. Auto-mapping uses two distinct properties to establish this relationship:
- SKU - While item IDs will vary across stores in a Disparate Catalog scenario, it is assumed that SKU (the client’s representation of an item across all stores) will remain the same. To auto-map by SKU, the SKU must be uploaded for each item across both the master and store catalogs and this SKU must be the same for the items that should be mapped to each other. It is recommended that SessionM work with clients in Disparate Catalog scenarios to ensure that the provided catalogs have SKUs and use SKUs in the fashion explained above to ensure a smooth and timely mapping process.
- Name - Auto-mapping can also create a relationship between store catalog items and master catalog items by the item names. While the name is not case-sensitive, it does need to be exactly the same from an alphanumeric perspective. As this is not always the case, this method is more of a fallback approach to support SKU-based Auto-mapping.
If it has been assured that one of the above properties will be the same across store and master catalogs, Auto-mapping can be performed. Whichever of the two properties listed above are used, they must be unique across the entire catalog for the mapping to be created. If two or more items exist with the same SKU or same Name, Auto-mapping will fail to map those items and they must be mapped manually.
If the below checkbox has been ticked for all stores prior to store catalog ingest, Auto-mapping should take place without intervention when the catalog is ingested:
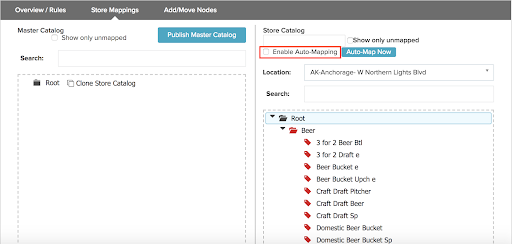
The “Enable Auto-Mapping” checkbox will continue to attempt to perform mapping between the items within the applicable store and the master catalog whenever a new or updated catalog for that store is ingested into the platform.
Note - As the mapping process is taking place upon ingest when the “Enable Auto-Mapping” checkbox has been checked, there may be a delay in the appearance of the catalog in the Catalog Management Module until this process has completed.
If the “Enable Auto-Mapping” checkbox had not been checked upon ingest of the store catalog, Auto-mapping can also be started by clicking the “Auto-Map Now” button:
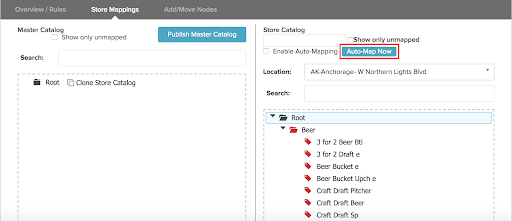
When the above button is pressed it will kick-off the Auto-mapping job between the applicable store and master catalog. A on-screen status is also provided for this mapping job while it is in progress, as shown below:
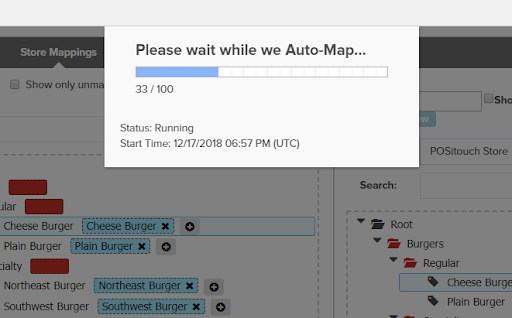
Regardless of Auto-mapping approach, it is important to validate (shown in “Mapping Validation” below) that the job was able to successfully map all of the items within each store’s catalog. If this has not taken place, the remaining items are most likely unable to be mapped by SKU or Name and must be manually mapped. For more information, see the discussion on mapping automatically in Map Store Catalog to Master Catalog.
Manual mapping
If store catalog items cannot be mapped to master catalog items automatically, the Catalog Management module enables the platform user to map items manually within the UI. This can be done within the Store Mappings tab by clicking on the unmapped item within the store catalog and dragging it over the item it should be mapped with on the master catalog, as shown below:
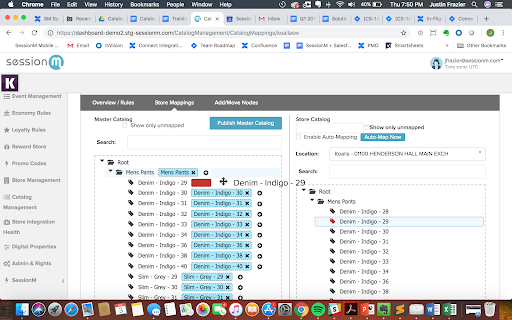
It should be ensured that the item is visible when dragged across from store to master, as shown above for "Denim - Indigo - 29", to validate that it was clicked and dragged properly. When the item has been successfully mapped it will exist in a blue box next to the master catalog item on the left hand side (as seen above on all items except the one being mapped). For more information, see the discussion on mapping manually in Map Store Catalog to Master Catalog.
Step 8. Verify store to master catalog mappings
Upon completion of the mapping process (regardless of method taken), the platform user should validate that the mapping has successfully competed across all stores in which there are not items that are actively sold across any of the client’s store catalogs that have not been mapped to an item on the master catalog. This validation is visibly displayed within the Catalog Management UI through a number of key indicators shown below:
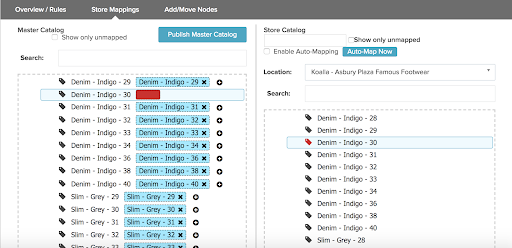
A few visual indicators within this image of a partially mapped store to master catalog scenario can be used to quickly discern if the catalog has been fully mapped:
- Master Catalog (Left-Hand Column) - The darker blue item descriptions are indicators of a successful mapping and include the item that was mapped from the store catalog within the darker blue box, while the empty red box indicates that an item has not been mapped to the item within the master catalog.
- Store Catalog (Right-Hand Column) - The grey item tags next to each item indicate that it has been successfully mapped to an item within the master catalog. If the tag is clicked, it will highlight the item it is mapped to within the master catalog by using a lighter blue box. The red item tags indicate that a store item has not been mapped to an applicable master catalog item.
In an effort to easily identify unmapped items across store and master catalogs, the “Show Only Unmapped” checkbox can be selected for the applicable catalog(s). When checked, the only items that will appear for the catalog are those that have not been mapped to master (store catalog ) or do not have a store item mapped to it (master catalog).
Notes to keep in mind when taking advantage of catalog mapping validation:
- The visual indicators described above will adjust accordingly as the platform user changes selection of store catalogs from one store to the next.
- Often times patterns can be identified in which an item that is on multiple store catalogs appears unmapped as the platform user checks across stores. This can be because there is no applicable item on the master catalog due to a lack of completeness, and can be overcome by adding the proper item to the master catalog and then performing one of the mapping methods again.
- While some of the above screenshots show mappings of store categories to master categories, this process does not need to be completed as of a recent update. It is only mandatory that store items are mapped to master items.
Once a visual validation has been completed across each store ensuring that mapping is complete and no additional items need to be added to the master catalog, the master catalog can then be published to the other applicable modules within the platform.
Step 9. Publish catalog to core
Once the catalog data has been uploaded, mapped, and verified as accurate, the master catalog must be published to the “Core Stack” to ensure that it can be leveraged by other modules, such as Campaigns. Publishing can be executed by clicking the “Publish Master Catalog” button shown below:

It is important to note that any time changes take place to the master catalog in a Disparate Catalog scenario, the Publish button should be pressed again. This will ensure the most recent catalog has been provided to other modules that are using it. For more information on how to publish, see Publish Master Catalog.
Step 10. Verify catalog was published to core
Publishing can be verified by following the below steps within the Campaigns Module:
- From the Campaigns Module, click Create Campaign.
- In the dialog, select Promotion for the campaign type and then name the campaign.
- Click Add Behavior and then Add rule.
- From the "select event" drop-down, select a type from the Purchase Events option.
- From the "select event" drop-down, choose Specific Items.
- In the Restrictions section, below Qualifying Items, click the Set button.
- Check to see if published catalog is shown in the SKU Selection window.
Once this verification has taken place, the catalog should be properly enabled across the platform and should be left intact until client catalog updates need to be made.