Upload unified catalog
Once the pre-validation assessment has taken place and the method of upload has been chosen, the steps listed below will detail how to properly ingest, manage, and ensure that the catalog data is successfully in place to proceed with client onboarding. The steps listed below are for a Unified Catalog scenario.
Before you start
Before catalogs are ingested, stores must be configured within the SessionM Platform. A catalog cannot be upload prior to the existence of a store within the platform. For more information on uploading stores, consult with your SessionM customer success contact.
Step 1. Upload stores
Even though all stores are using the same catalog in a Unified Catalog scenario, it is a best practice that all existing stores that will be providing transactions to SessionM should be uploaded to the platform prior to the catalog ingest. If needed, additional stores can be added after the catalog is loaded. New stores that are added to a client’s portfolio over time, and in turn loaded into the platform, will adopt the same unified catalog that exists for the other stores. For more information on ingestion, see Methods of Catalog Ingest.
Step 2. Upload catalog
Using one of the ingest methods listed above, the store catalog can be uploaded into the SessionM Platform. Being a Unified Catalog, there are a number of tips to help with this process:
- The single catalog that is uploaded can be associated with the Store ID of any of the stores uploaded in Step 1. The platform will automatically use this as the catalog for all stores within that client’s environment. (Future catalog uploads can also use any store.)
- There is no mapping activity that is performed with Unified Catalog. As all catalogs are the same, there is no need to establish a relationship between different item IDs and a master item.
Keep in mind that depending on the size of the catalog and the upload method that has been taken, this upload job may take time. Once the upload has completed, the Catalog Management Module should be checked for verification.
Step 3. Verify catalog has uploaded
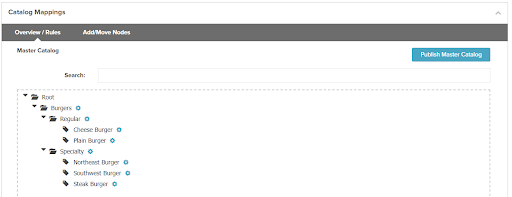
Using the Catalog Management Module, it will be evident whether or not a catalog has been uploaded. If this is the first time a catalog has been uploaded for a client, data will be populated within the module. If this is a subsequent catalog upload, the catalog data should be checked to ensure that any changes in the new set of data have been implemented. Data population within the Catalog Management Module can be seen below:

As this is a Unified Catalog scenario, there is no mapping functionality within the module. Ideally, a unified catalog has the correct information and structure upon ingest into the platform because future catalog uploads should also reflect the desired state.
Step 4. Publish catalog to core
Once the catalog data has been uploaded and verified as accurate, it must be published to the “Core Stack” to ensure that it can be leveraged by other modules, such as Campaigns. Publishing can be executed by clicking the “Publish” button.
It is important to note that any time changes take place to a catalog in a Unified Catalog scenario, whether those are changes made within the module’s UI or changes made through uploading a new catalog, the Publish button should be pressed again. This will ensure the most recent catalog has been provided to other modules that are using it. When there are multiple changes being made to the catalog within the module’s UI, it is recommended to complete and verify all of the changes before clicking the Publish button. The publishing operation can vary in time and resources based on the size of the catalog. For more information, see Publish Master Catalog.
Step 5. Verify catalog was published to core
Publishing can be verified by following the below steps within the Campaigns Module:
- From the Campaigns Module, click Create Campaign.
- In the dialog, select Promotion for the campaign type and then name the campaign.
- Click Add Behavior and then Add rule.
- From the "select event" drop-down, select a type from the Purchase Events option.
- From the "select event" drop-down, choose Specific Items.
- In the Restrictions section, below Qualifying Items, click the Set button.
- Check to see if published catalog is shown in the SKU Selection window.
Once this verification has taken place, the catalog should be properly enabled across the platform and should be left intact until client catalog updates need to be made.