Export audience or snapshot
Export an audience or previously taken snapshot of an audience. Perform this task to create and deliver a CSV file of audience data to a SFTP site target destination location (typically an SFTP site).
Before you start
-
Verify that the audience is active on the All Audiences view of the main dashboard.
- Verify that the export destination you plan to use has been defined and is listed on the Destinations tab on the Manage Exports page. If needed, define a new destination following the instructions in Add export destination.
- If you plan to encrypt the export, verify that the encryption mechanism has been defined and is listed on the Encryptions tab of the Manage Exports page. If needed, define a new encryption scheme following the instructions in Add encryption mechanism.
- If you are exporting a snapshot, verify that the snapshot has completed processing from the Static Snapshot tab in the audience.
To get started, do one of the following:
-
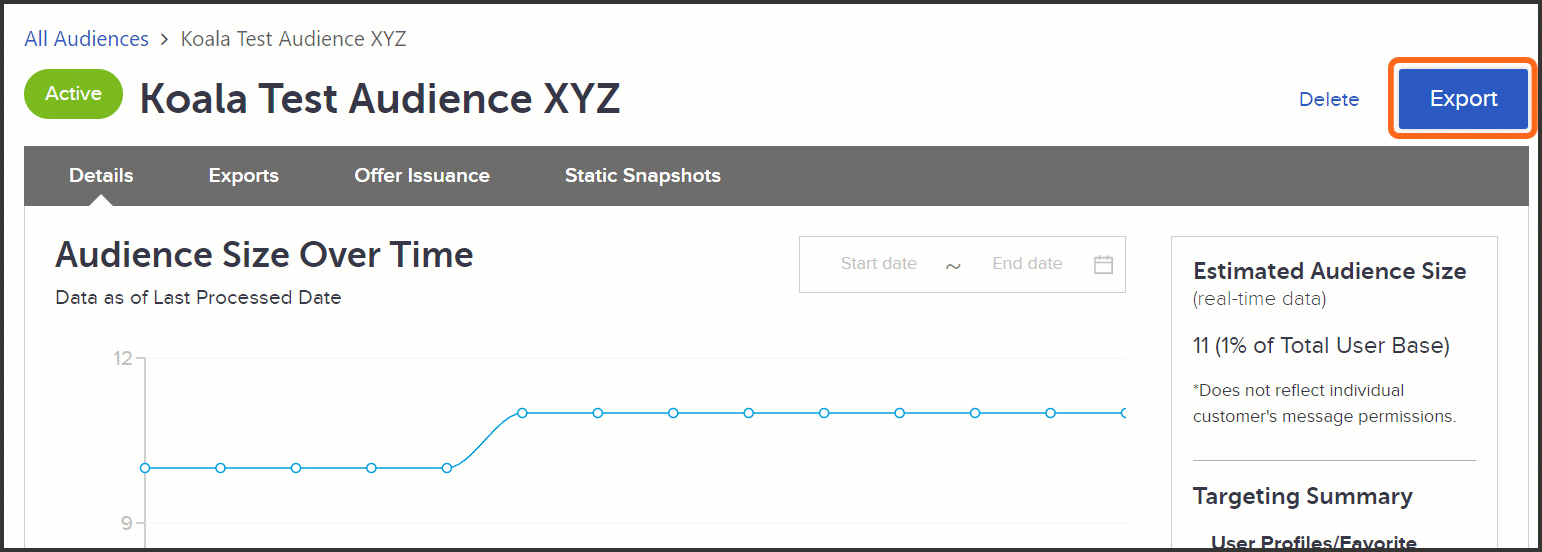
To export an audience: Click into the audience you want to export from the All Audiences table. Click Export.
-
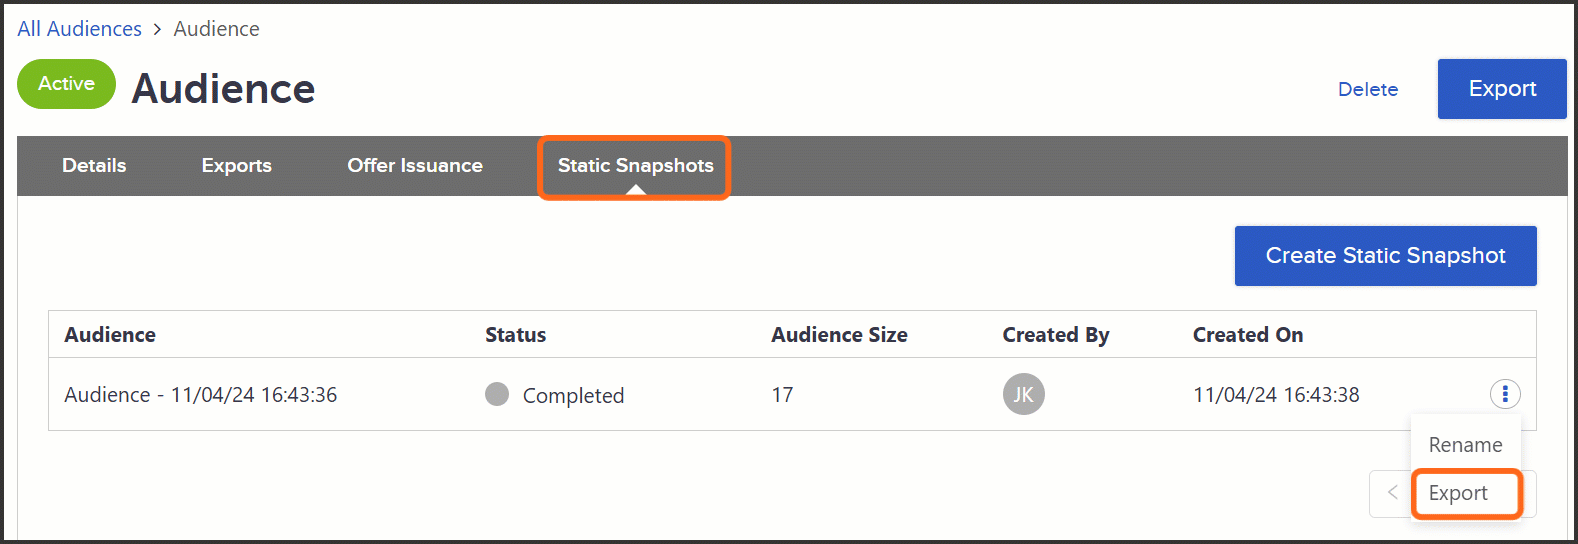
To export a snapshot: Click into the audience whose snapshot you want to export from the All Audiences table. Select the Static Snapshots tab. Locate the snapshot you want to export in the list. Click the quick action button (three vertical dots) and select Export.
Step 1. Setup tab
- On the Setup tab, configure your export settings. (All basic details fields are required.)
Attribute Description Name Name of the export in the SessionM platform. This name must be unique to all other export names.
File Name Name of the file as it will be exported. Field supports dynamic names with date/time conversions.
File name must end with the suffix of the export file type, such as ‘.csv’. For example, AudienceExport.csv.
As a best practice, do not use any spaces or special characters (/,\,%,&,#,<,>,etc.) in the file name.
File name must follow any requirements set by the system the export is being sent to (for example, some systems don’t accept file names longer than ‘X’ number of characters).
Export Active Turning this on (green) makes your export active immediately after creation. Turning this off (red) will put your export into a paused/inactive state upon initial creation. This gives you a chance to review before it processes if needed. - Set the delivery schedule.
Attribute Description Delivery Date/Time Schedule when you want the export to occur. Click on the field to open the date picker, and then use its controls to select a date and time. This field is required.
Repeat This Export Indicate whether the export should occur more than once. Selecting the Repeat This Export check box opens additional fields that you can use to configure how often the export runs.
Cancel Export How long the system should try to run the export before canceling it (if for example, the export gets stuck in a status, it freezes, etc.). The most common setting here is 1 day.
Exporting files can take up system memory. A failed export that continues to try and run may cause the platform to run slowly.
- Set the destination settings.
Setting Description Format Select the format for the export file. Currently, CSV is supported. This is a required field.
Destination Select the location to which the export delivers the data file and makes it accessible. This is a required field.
Options here will vary depending on how your environment is set up. Currently, SFTP, Facebook, and AWS S3 bucket destinations are supported. Available values for this field are configured on the Destinations tab of the Manage Exports page. See Add export destination for more information.
Encryption Indicate whether export should be encrypted. This is an optional field.
Encryption ensures the security for the audience data exports you are building. While not required to perform an export, encryption is highly recommended. To encrypt an audience export, select a pre-defined PGP encryption mechanism from the drop down list. Available values for this field are configured on the Encryptions tab of the Manage Exports page. See Add encryption mechanism for more information.
- Click Next to advance to the Attributes tab.
Step 2. Attributes tab
On the Attributes tab, define configuration settings (such as line feeds, delimiter characters and header rows) and select attributes to be included in the export.
- Set the configuration settings.
Setting Description Include Header Row Left unchecked, your export will have no header row (i.e. no labels in the first row with attribute titles). Checking this box will include a header row in your export and gives you the option to assign a custom label of your choosing to every attribute that you include.
This can be helpful in situations where your export will be uploaded to another system and the attribute needs to be named a certain way for it to be recognized. For example, you may choose to label the User ID attribute as UID instead, as that is more commonly accepted in other external platforms.
Record Delimiter Select one of the following values to set how records are separated in the CSV file:
- Line Feed (\n)
- End of Line (\r\n)
Field Delimiter Select one of the following values to indicate how fields with multiple values are separated:
- Comma (,)
- Tab (\t)
- Other. When you select Other, a second field appears where you specify a single-character delimiter.
-
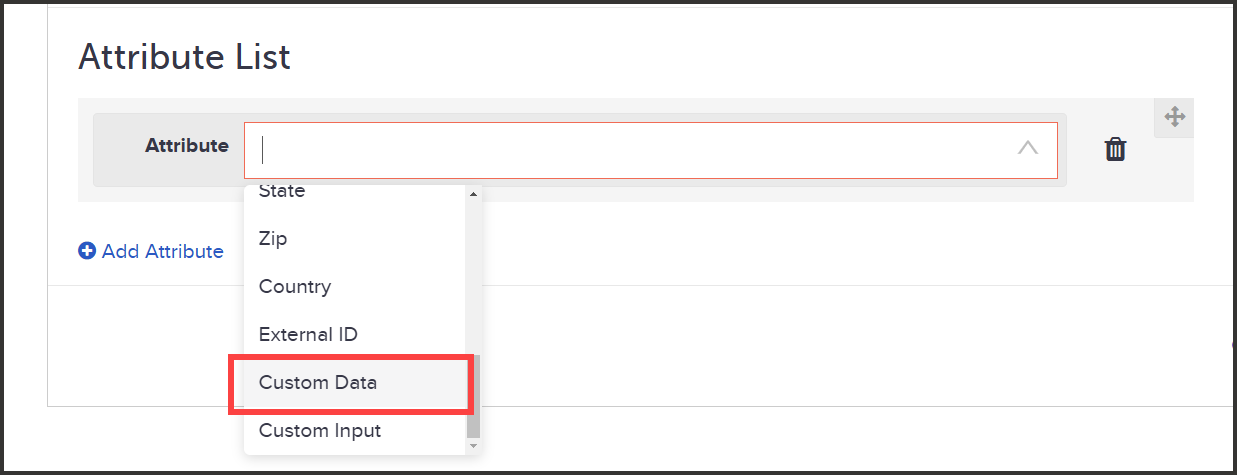
Define attributes. The attributes available to add to your export is based on the data you have in your customer profiles. You must add at least one attribute.
The Audiences module supports three types of data for export: standard attributes, custom data, and custom inputs.
 Standard Attributes
A standard attribute is out-of-the-box demographic data that you can include in an export job. The following list identifies the standard attributes available in the Audience module.
• Audience ID
• Audience Name
• User ID, which is the SessionM internal user ID
• Email
• First Name
• Last Name
• Gender
• Year of Birth (YOB)
• Account Status
• City
• Zip
• State
• Country
• External ID
To add a standard attribute for an audience export, click Add Attribute and then select a standard attribute from the Attribute drop down list. Repeat for additional attributes.
If you want to add all of the available attributes, click Add All.
Custom data attributes
Custom data will include any custom customer attributes set up in your environment. To include a custom data attribute for an audience export, click Add Attribute and then select the Custom Data option, which allows you to navigate to the custom attribute you want. See Custom data attributes for more information on how to format and modify these attributes.
 Define custom inputs
A custom input is any static or calculated value you want to include in the export. To specify a custom data input for an audience export, click Add Attribute and select the Custom Input option. Then, in the Custom Value field, specify the value you want to include in the export. See Custom data attributes for more information on how to format and modify these values.
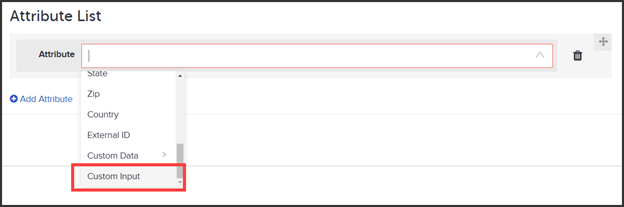
An example of a static input could be if you’re exporting an audience for another system and it needs to include something, such as an Offer ID, for all users. Adding a custom input attribute with that Offer ID value would include that value for all users in the export.
Calculated values allow you to create fields with custom calculations. It is recommended that you work with your CS team when building these out.
- After defining the attributes, click Next to advance to the Notifications tab.
If you selected to ‘Include Header Row’, you’ll be ale to assign free form labels to each attribute that you add. You can adjust the order of the attributes by clicking and dragging them to the appropriate positions in the sequence.
Step 3. Notifications tab
On the Notifications tab, specify who should be notified when the status of the export changes (export completes, export fails). This step is optional.
Add the email addresses for anyone who should receive notifications, separating emails with a comma. You should include your own email if you want to be notified.
Confirm the selections you have made across all the tabs (i.e. Setup, Attributes, Notification) and make any final changes if necessary. Once satisfied, click Save to save the changes you made across all of the tabs in the export builder and activate your export.
The export occurs following its schedule. Note that if you chose to have the ‘Export Active’ toggled off on the Setup tab, you will still need to activate the export from the Exports tab so it can begin processing. It will remain in a paused/inactive state until this is done.