
February 2025 Release Notes
SessionM platform release notes for February 2025 (release version 2025.1).
DETAILS
| Release to Staging | Release to Production | Release Version |
|---|---|---|
| Jan 15 - 16, 2025 | Feb 4 - 10, 2025 | 2025.1 |
There will be no downtime during the release.
Campaigns & Content
Campaign Templates
Feature Description for Campaign Templates
Clients have provided consistent feedback on the effort required to create, test, and launch campaigns. To solve this need, the campaigns module will now allow users to templatize and duplicate an existing campaign. The campaign duplication feature will significantly decrease the amount of time to launch campaigns and reduce probability of errors in configurations.
How it Works for Campaign Templates
The Campaigns module supports templates for different elements of a campaign (targeting, behaviors, and messages). It will now support template functionality for the entire campaign, which allows for efficient creation of campaigns.
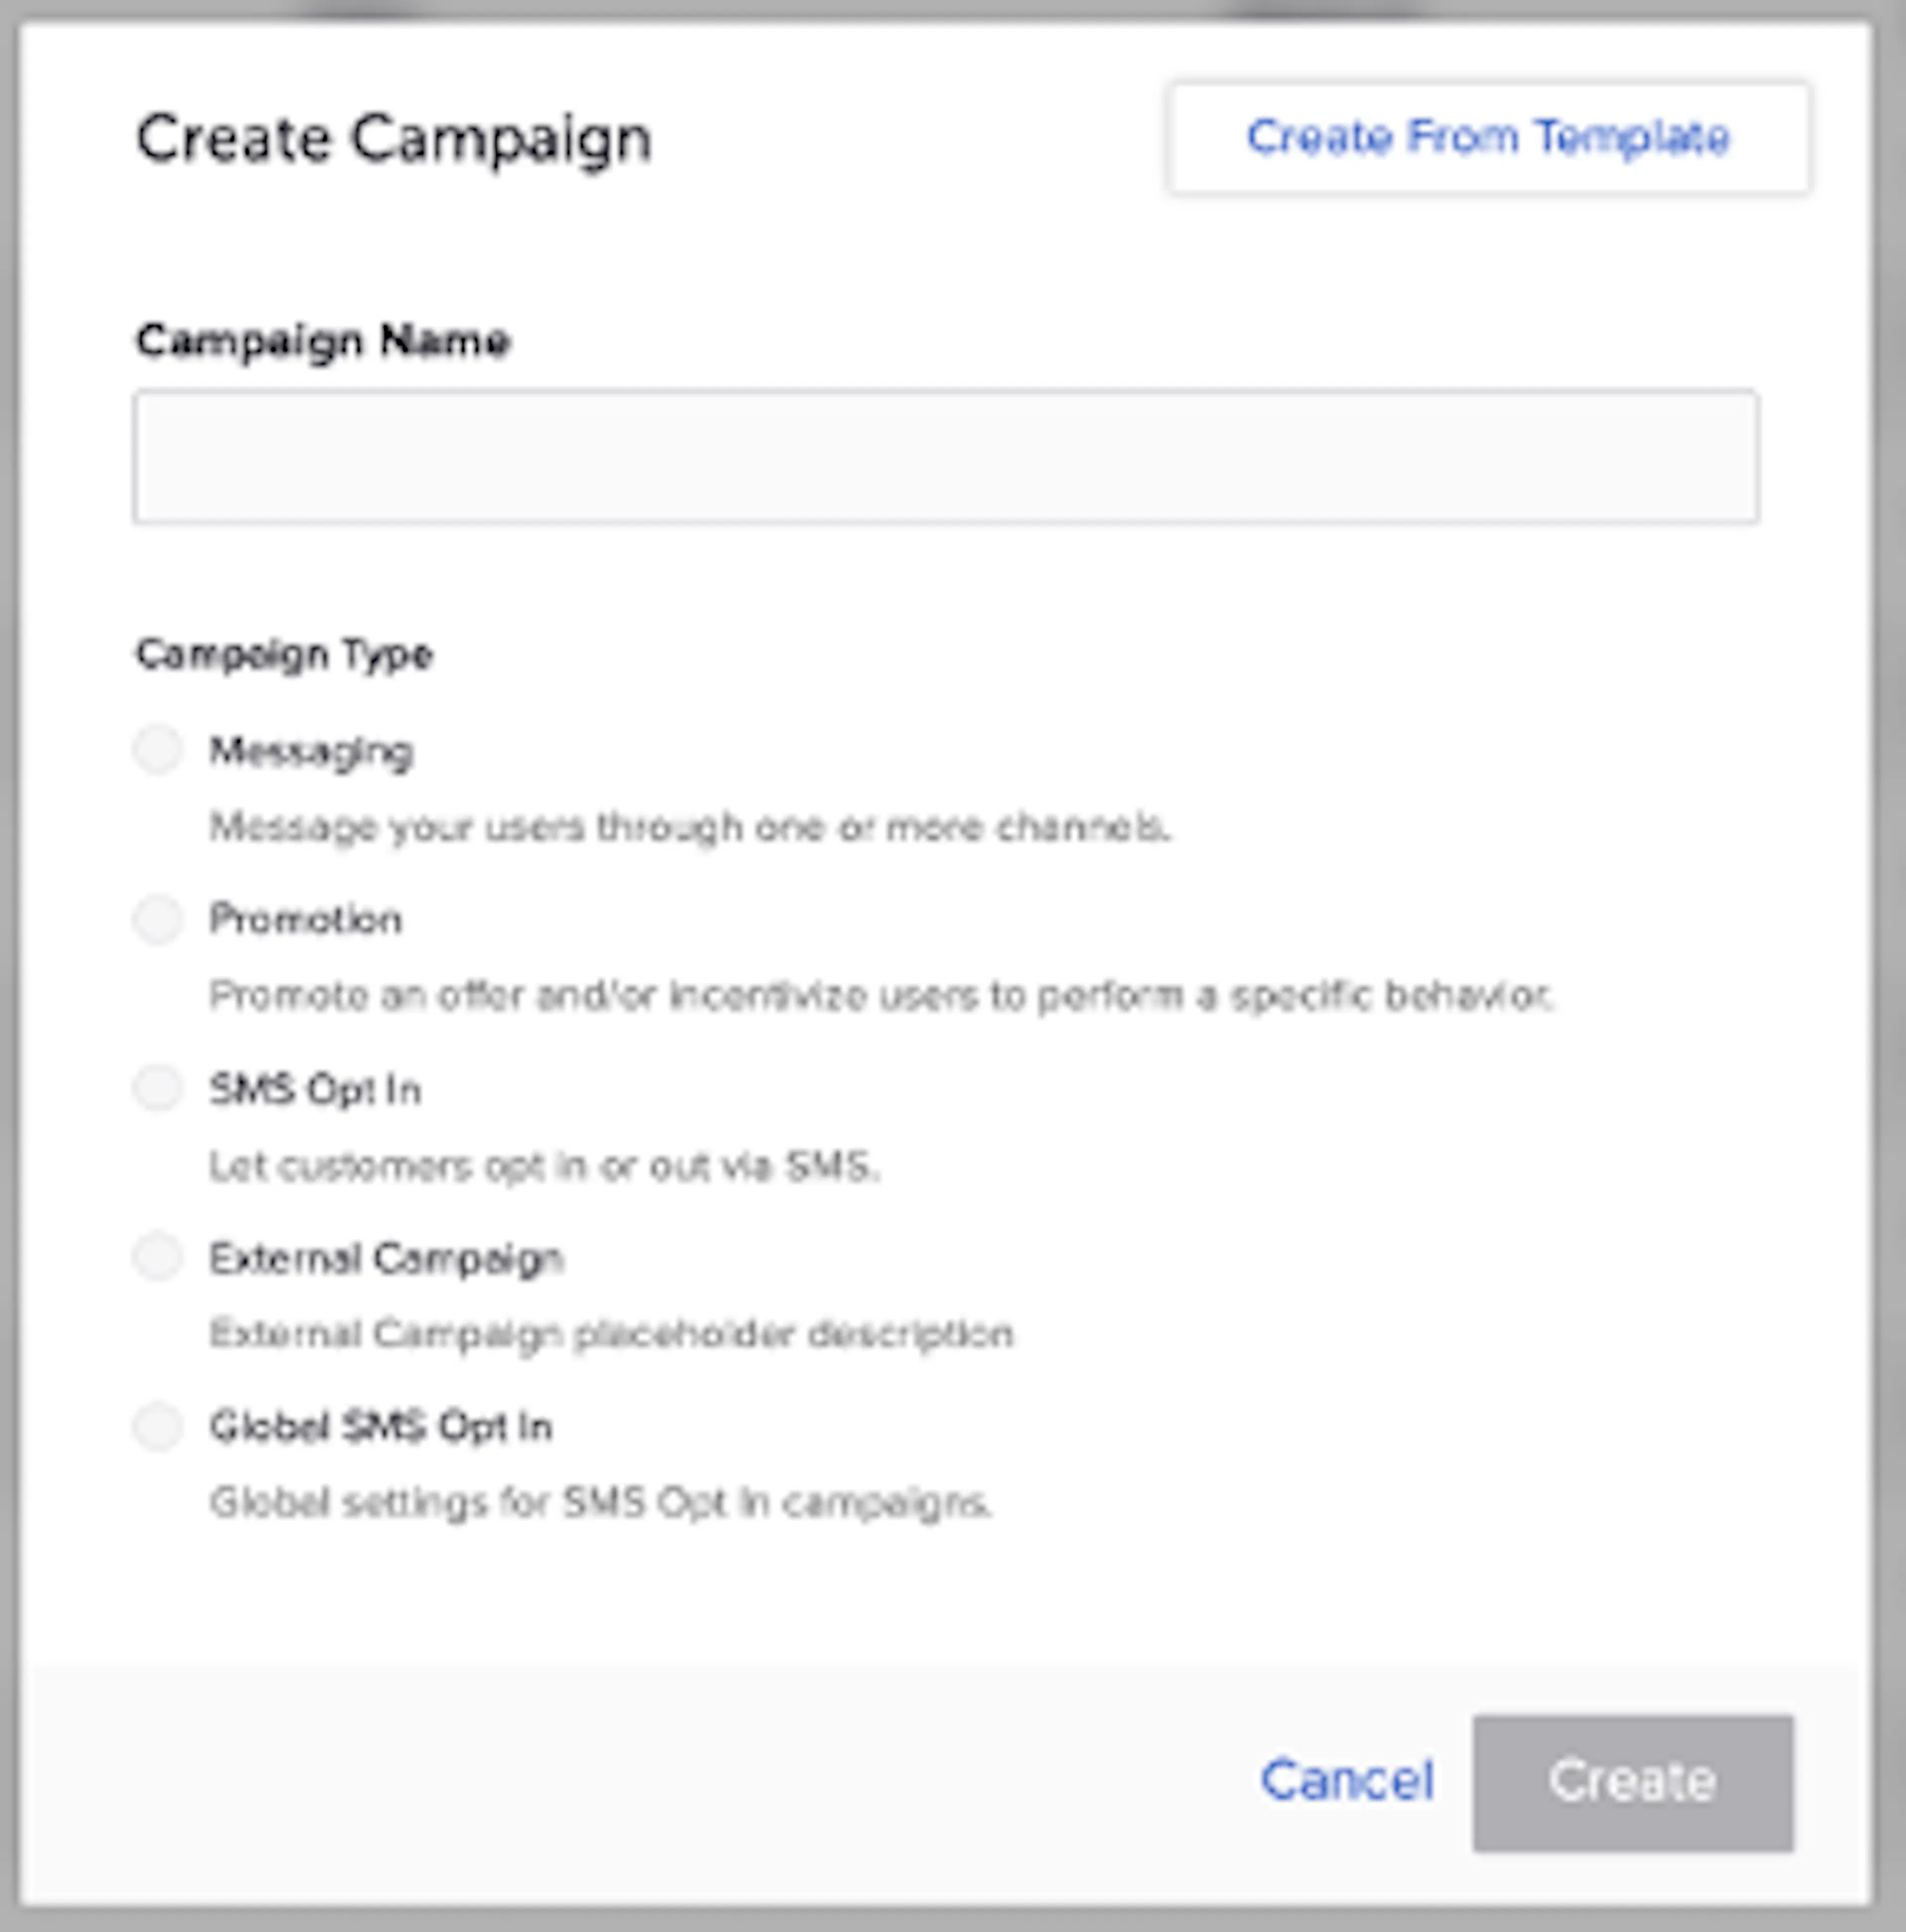
This feature includes three main functionalities:
-
Save a campaign as a template
To save a template, navigate to the “More Actions” dropdown and click “Save as Template.” You will then be prompted to enter a template name and description and then click “Save.” This feature will only be available on the campaign detail page (not on the campaigns list view).
-
Create a campaign from a template
To create a new campaign from a template, navigate to the campaign creation modal and click “Create from template.” You will then be prompted with a template selection drawer, that includes the campaign type to make the selection process easier. Click “Use Template” and then you will be prompted to fill out the name and runtime of the new campaign. Click “Create” and make sure to fill out any remaining information and review everything generated from the template. You will only be able to apply a template from the campaign creation modal. After a campaign type is selected (e.g. existing campaign), you won't be able to apply a template but you can duplicate that campaign (more information below).
-
Duplicate a campaign
To duplicate a campaign, navigate to the “More Actions” dropdown and click “Duplicate.” You will then be prompted to fill out the name and runtime of the new campaign. Click “Create” and make sure to fill out any remaining information and review everything generated from the template. This feature will only be available on the campaign detail page (not on the campaigns list view).
Campaign Achievement Data in Timeline
Feature Description for Campaign Achievement Data in Timeline
The events sent to Timeline when customers achieve Campaign behaviors have been improved. The existing event, loyalty_rule_achieved has had its payload updated to include:
- Name of the Campaign
- Name of the Campaign behavior that was achieved
- ID of the Campaign behavior that was achieved
This data exposed in the Customer's module activity log allows you to easily understand the Campaigns achieved by customer's transactions and event activities. The Timeline API will also include these new data attributes so that you can display Campaign activity to customers on your website or mobile app.
Example API Response (new fields highlighted):
"event_stream_payload": {
    "action": "composite:achievement:earned",
    "ad_campaign_name": "[E2E]Test_Camp1_1046b119-f3d0-4a7b-8508-4e85f1d94051",
    "created_at": 1716562067,
    "event_category_name": "LOYALTY",
    "event_category_slug": "LOYALTY",
    "event_type_name": "Loyalty Rule Achieved",
    "event_type_slug": "LOYALTY_RULE_ACHIEVED",
    "external_id": "240524023120536",
    "loyalty_rule_id": 2199,
    "loyalty_rule_name": "Behavior_3_PPD_1716561094224",
    "occurred_at": "2024-05-24T10:47:44-04:00",
    "outcomes": [],
    "request_id": "959e7d76-19dc-11ef-9315-12f1ac110008",
    "rewards_system_id": 343,
    "user_id": "49f0d394-19da-11ef-8045-a72cac110007",
    "user_name": "John_Test E2ETest"
}
An additional event type has been created that will also be sent for every Campaign behavior achievement, loyalty_goal_achieved. Historically, this event had been sent under the loyalty_rule_achieved event name causing an appearance of duplicate data. By splitting it into its own event, you can now avoid redundant records by excluding the loyalty_goal_achieved event type out of stream views. loyalty_goal_achieved has the same properties as the loyalty_rule_achieved event.
Sample API Response:
"event_stream_payload": {
    "action": "goal:achievement:earned",
    "ad_campaign_name": "[E2E]Test_Camp1_1046b119-f3d0-4a7b-8508-4e85f1d94051",
    "created_at": 1716562066,
    "event_category_name": "LOYALTY",
    "event_category_slug": "LOYALTY",
    "event_type_name": "Loyalty Goal Achieved",
    "event_type_slug": "LOYALTY_GOAL_ACHIEVED",
    "external_id": "240524023120536",
    "loyalty_rule_id": 2204,
    "loyalty_rule_name": "E2E_achievement_fixed_pts_1716561096792",
    "occurred_at": "2024-05-24T10:47:44-04:00",
    "outcomes": [],
    "request_id": "959e7d76-19dc-11ef-9315-12f1ac110008",
    "rewards_system_id": 343,
    "user_id": "49f0d394-19da-11ef-8045-a72cac110007",
    "user_name": "John_Test E2ETest"
}
How it Works for Campaign Achievement Data in Timeline
- Navigate to Admin & Rights > Timeline Series Config
- Update Loyalty Rule Achieved event template to include new fields you want to display in the Customer’s module Activity Log.
- Create Loyalty Goal Achieved event type and add fields you want to display
- Optional: Create Rendering Template for Loyalty Goal Achieved in order to see it in the Activity Log.
Campaign module updates
We've focused on clarity and simplicity with the goal to allow you to accomplish tasks efficiently. As part of this effort, ongoing modernization and streamlining of functionalities in the Campaigns module are underway. Key improvements for this release include:
Define outcomes with tags during campaign creation
Initially, attaching a tag to a customer’s profile when the customer completes a defined behaviors, was in the format of a text string: tag_name;;seconds, where seconds was the number of seconds after which the tag is removed from a customer's profile. We've replaced this text string with a feature that allows you to simply select the tag expiration:
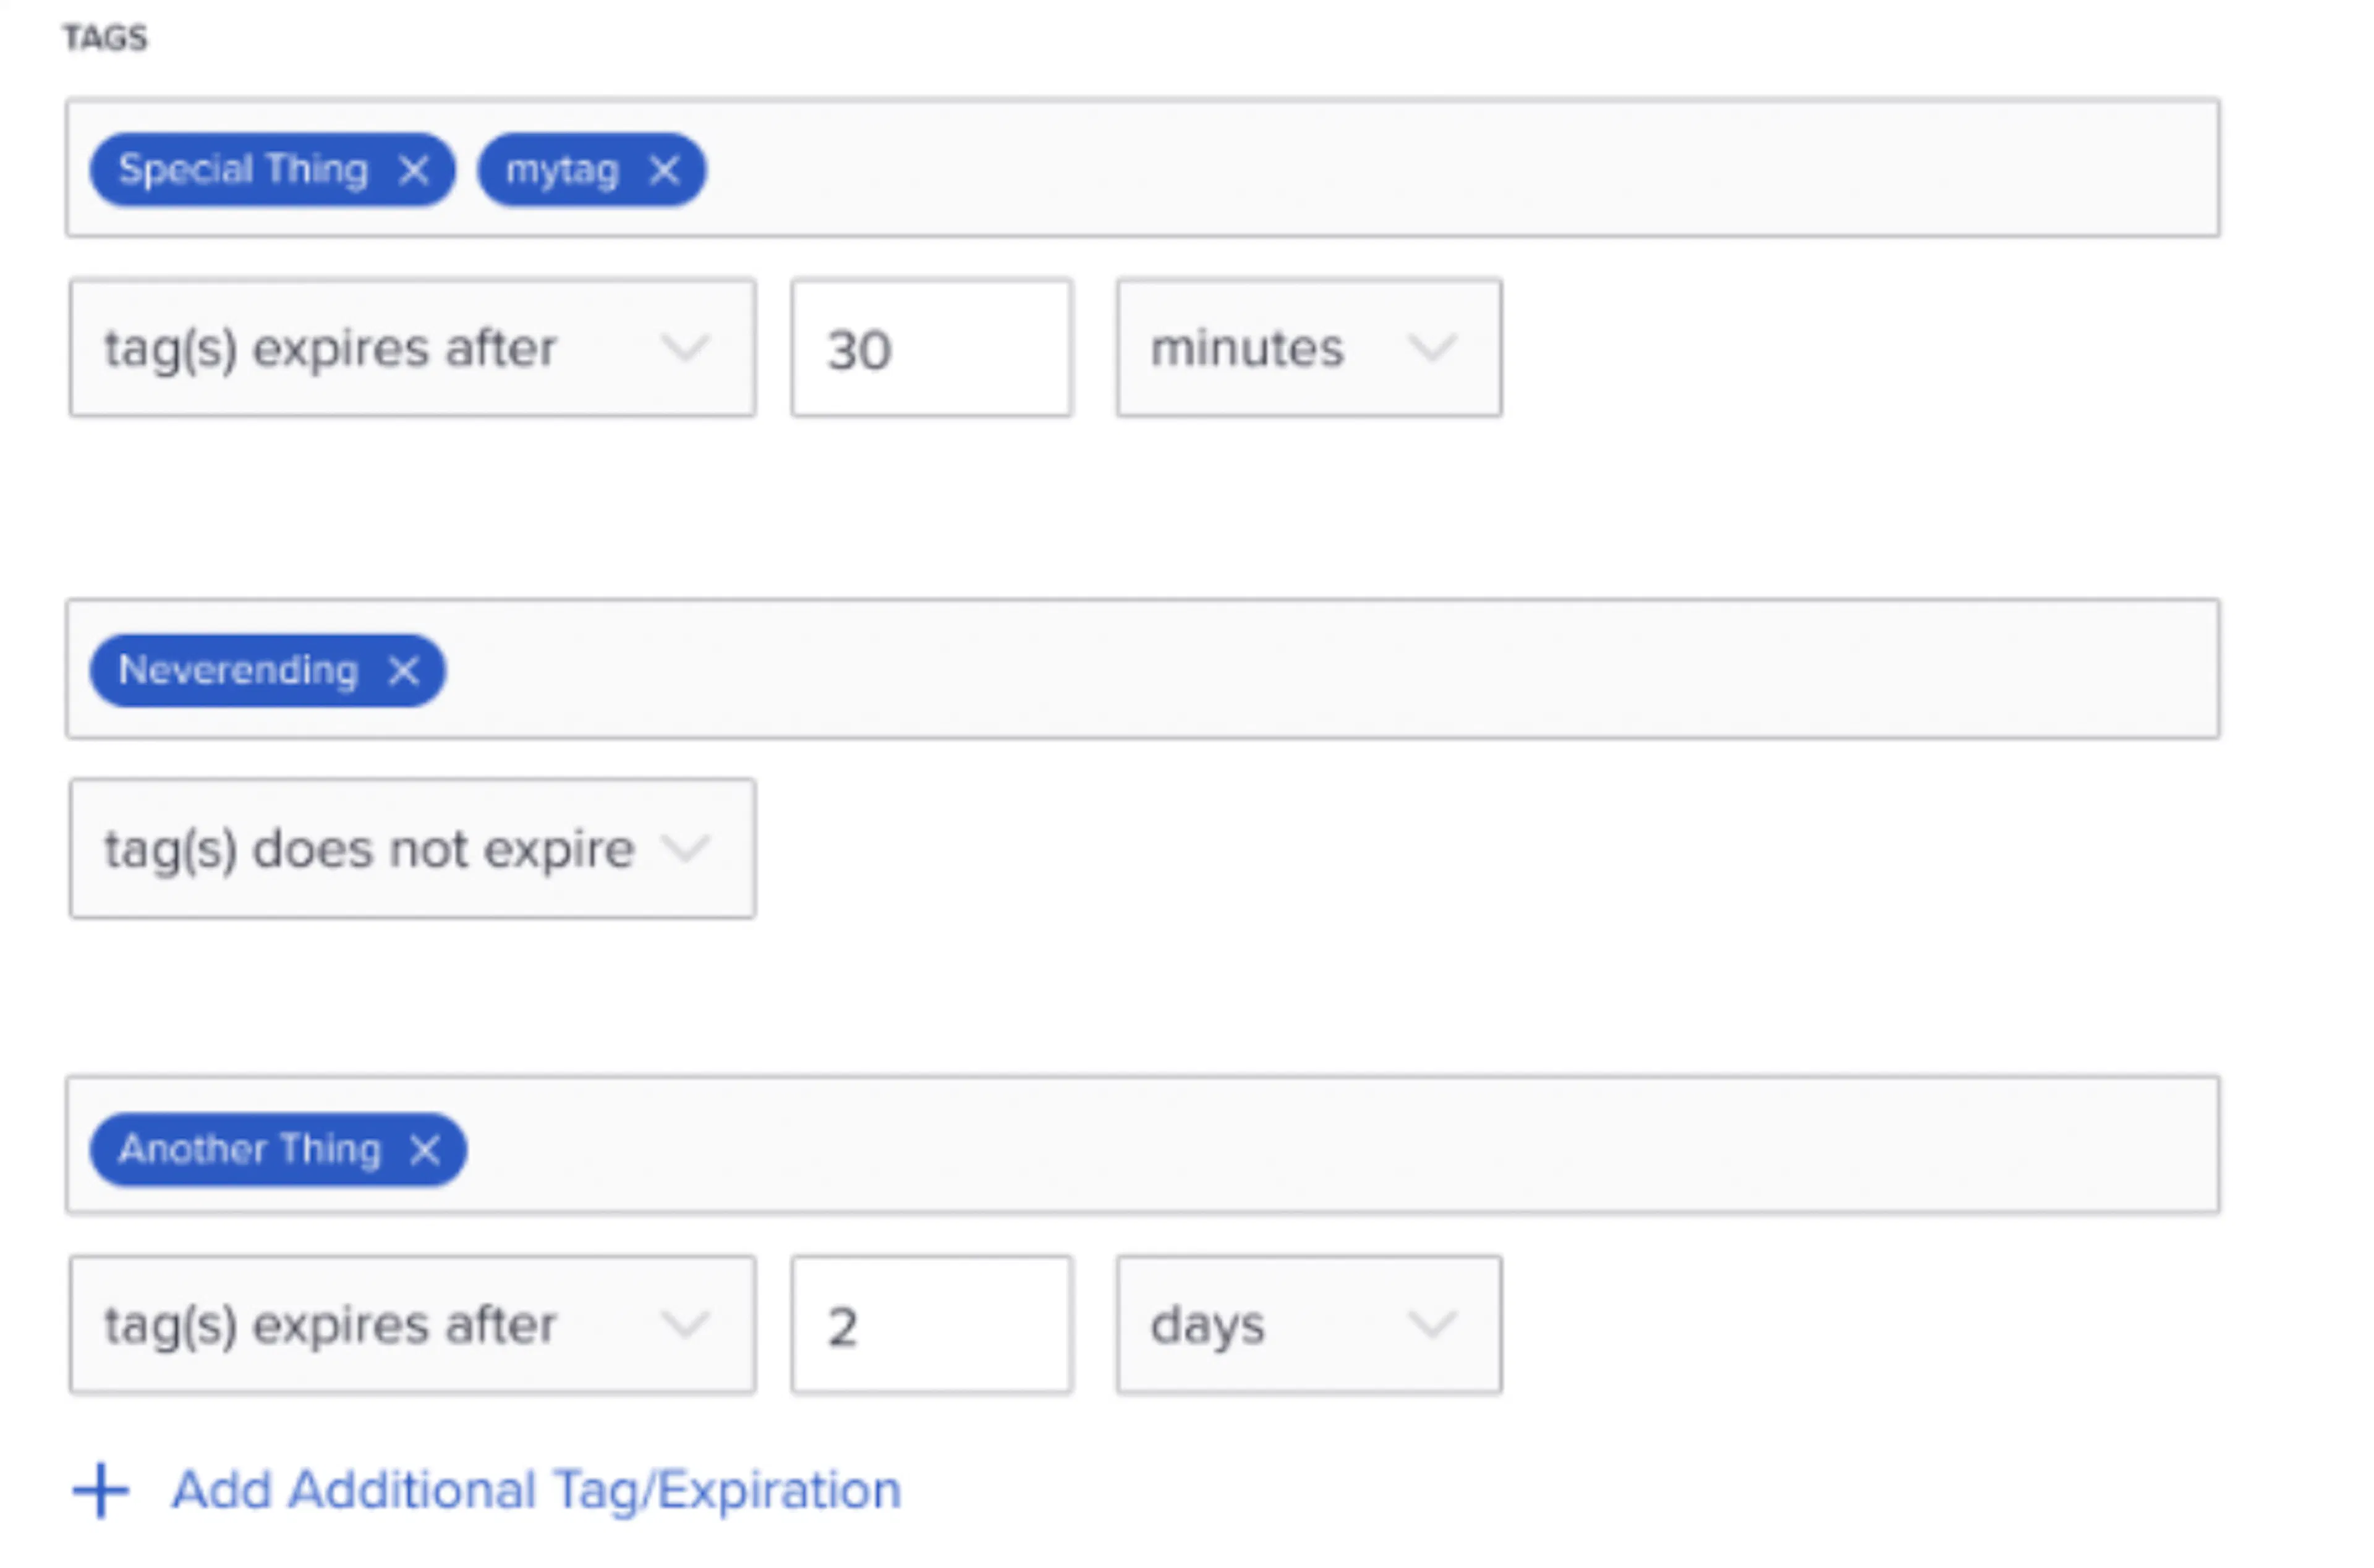
Please note: The default setting has been changed from "No Expiration" to "1 Second." To configure a tag with no expiration, select "Tag(s) Does Not Expire" from the dropdown. This enhancement will not change the expiration of existing tag outcomes.
Confirmation modals
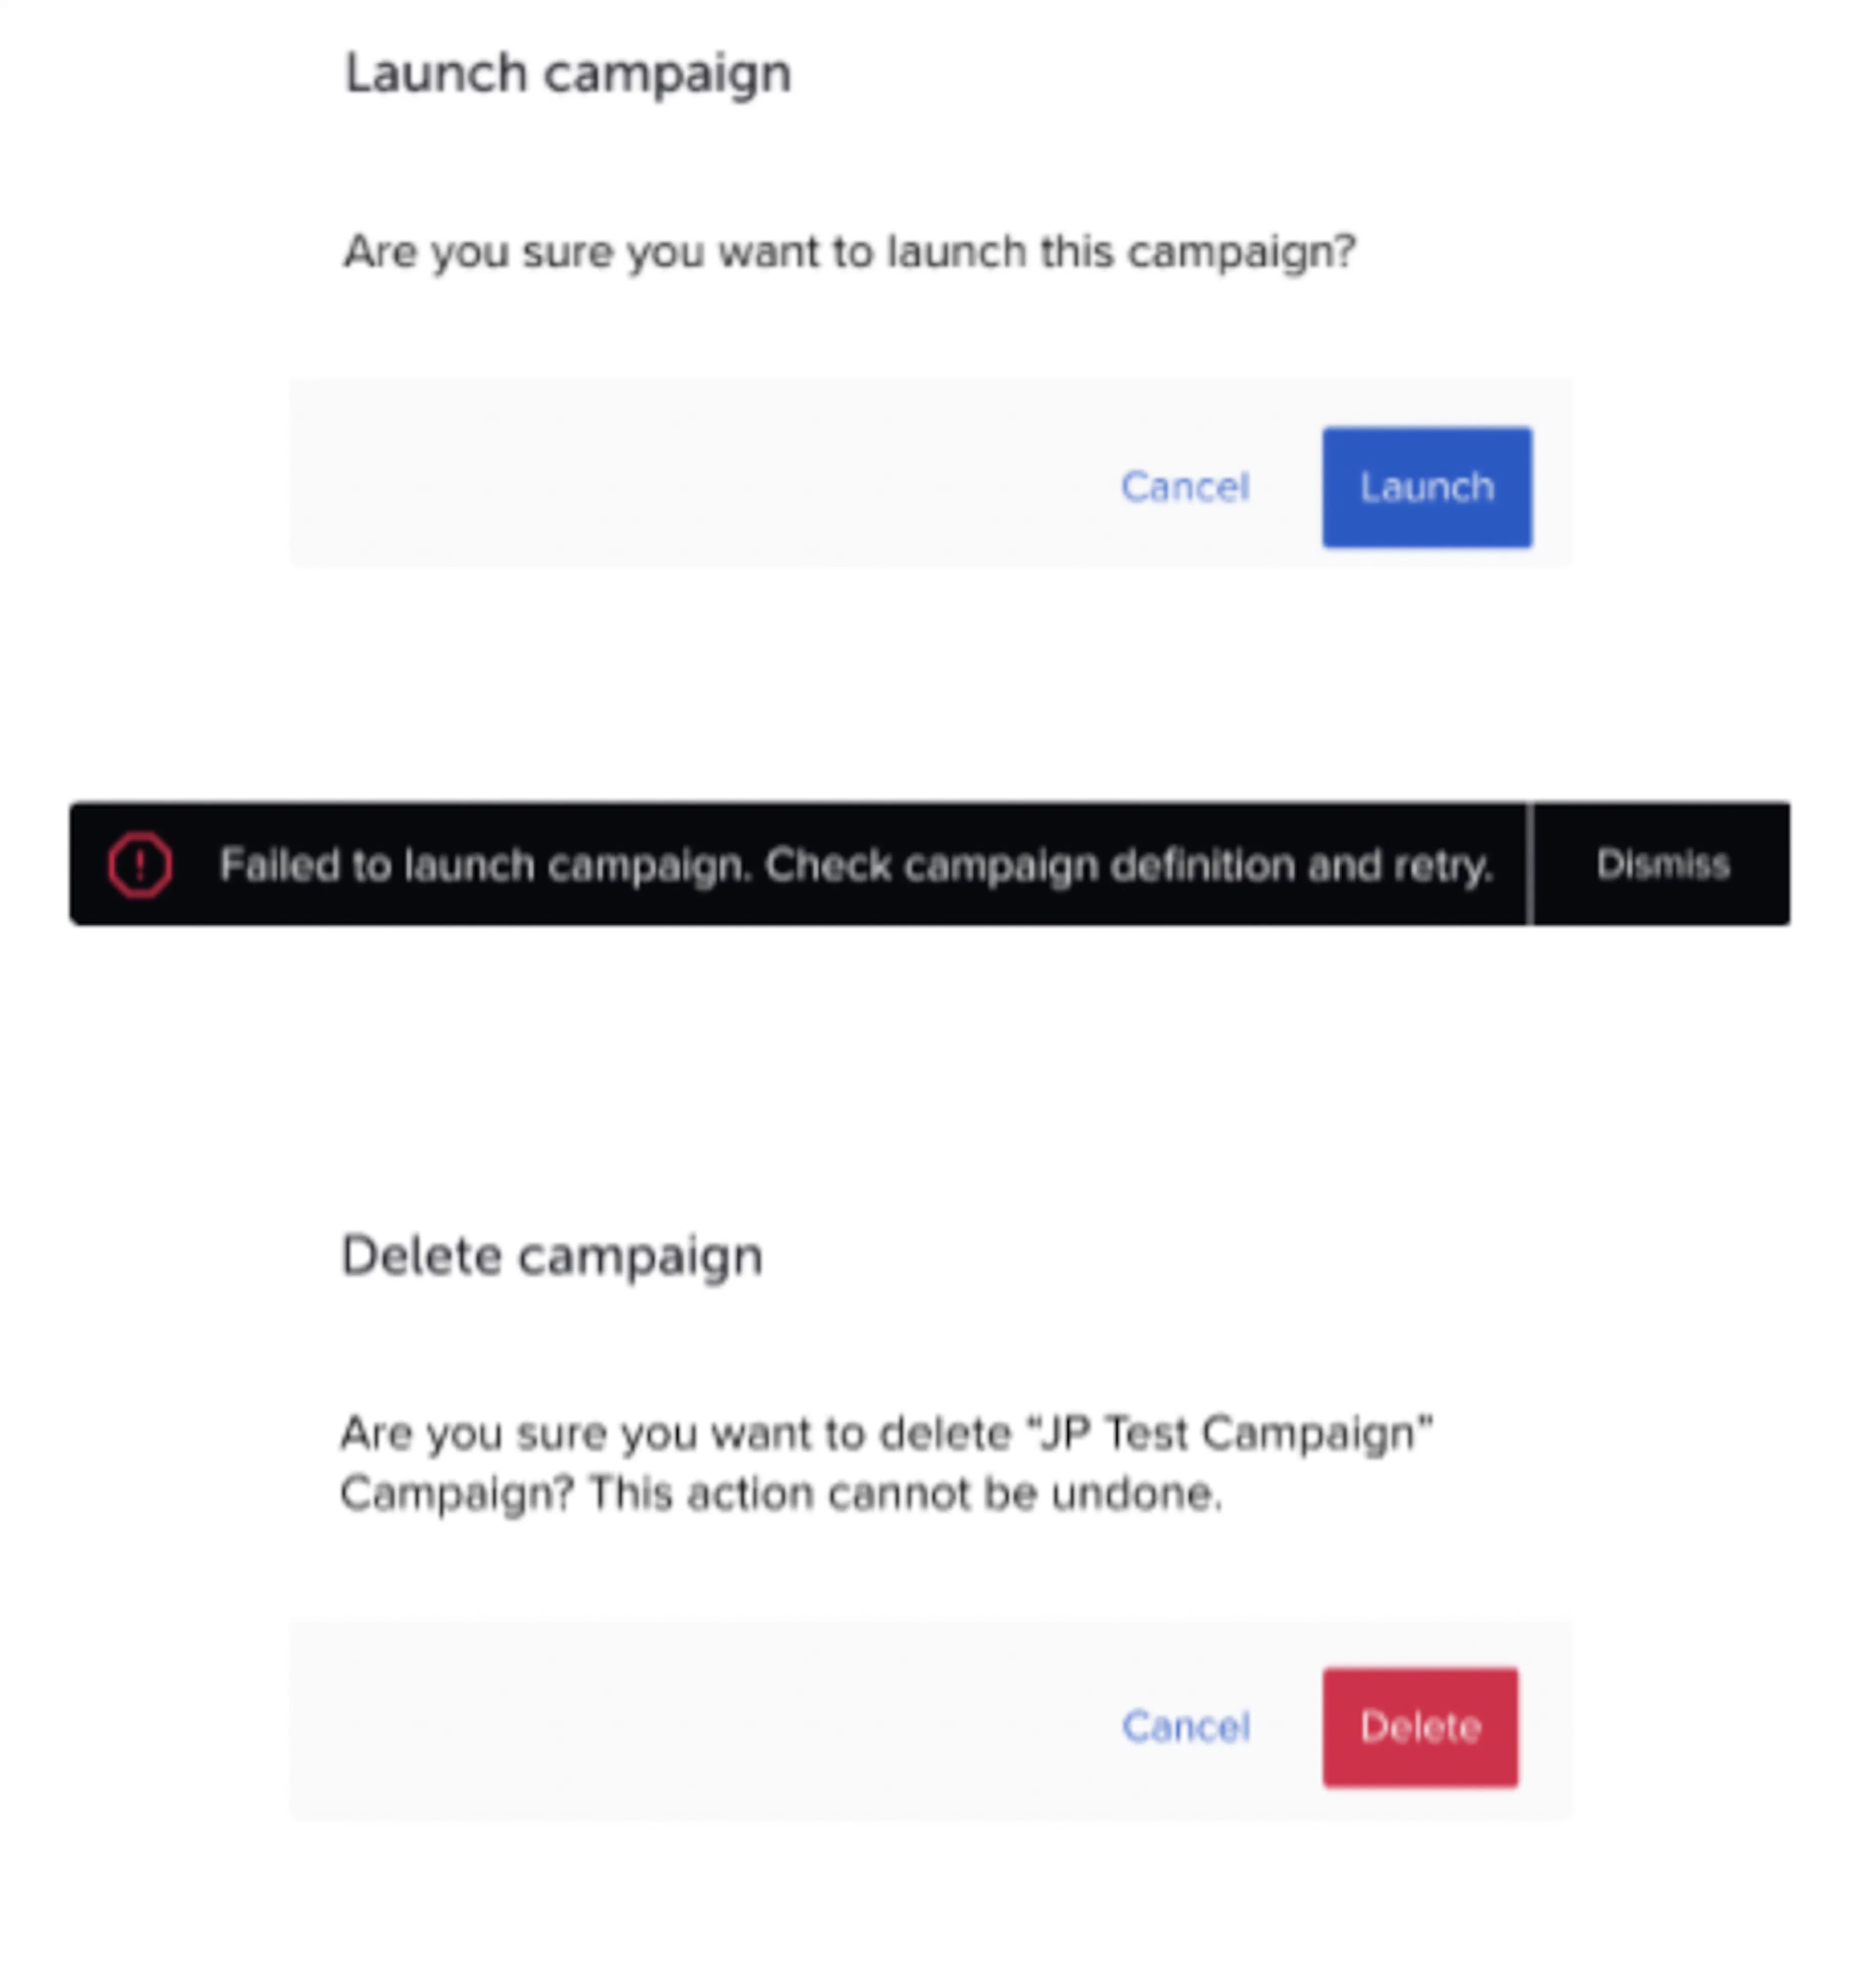
Currently, there is no campaign status confirmation after the campaign is launched, deleted, unsaved, and so on. Without confirmation, clients might accidentally perform actions multiple times, thinking the first attempt didn't work due to lack of feedback. New modals and alerts have been added to confirm actions such as launch, delete, failure, and many more.
Examples of modals and alert:
Faster navigation between audit log records
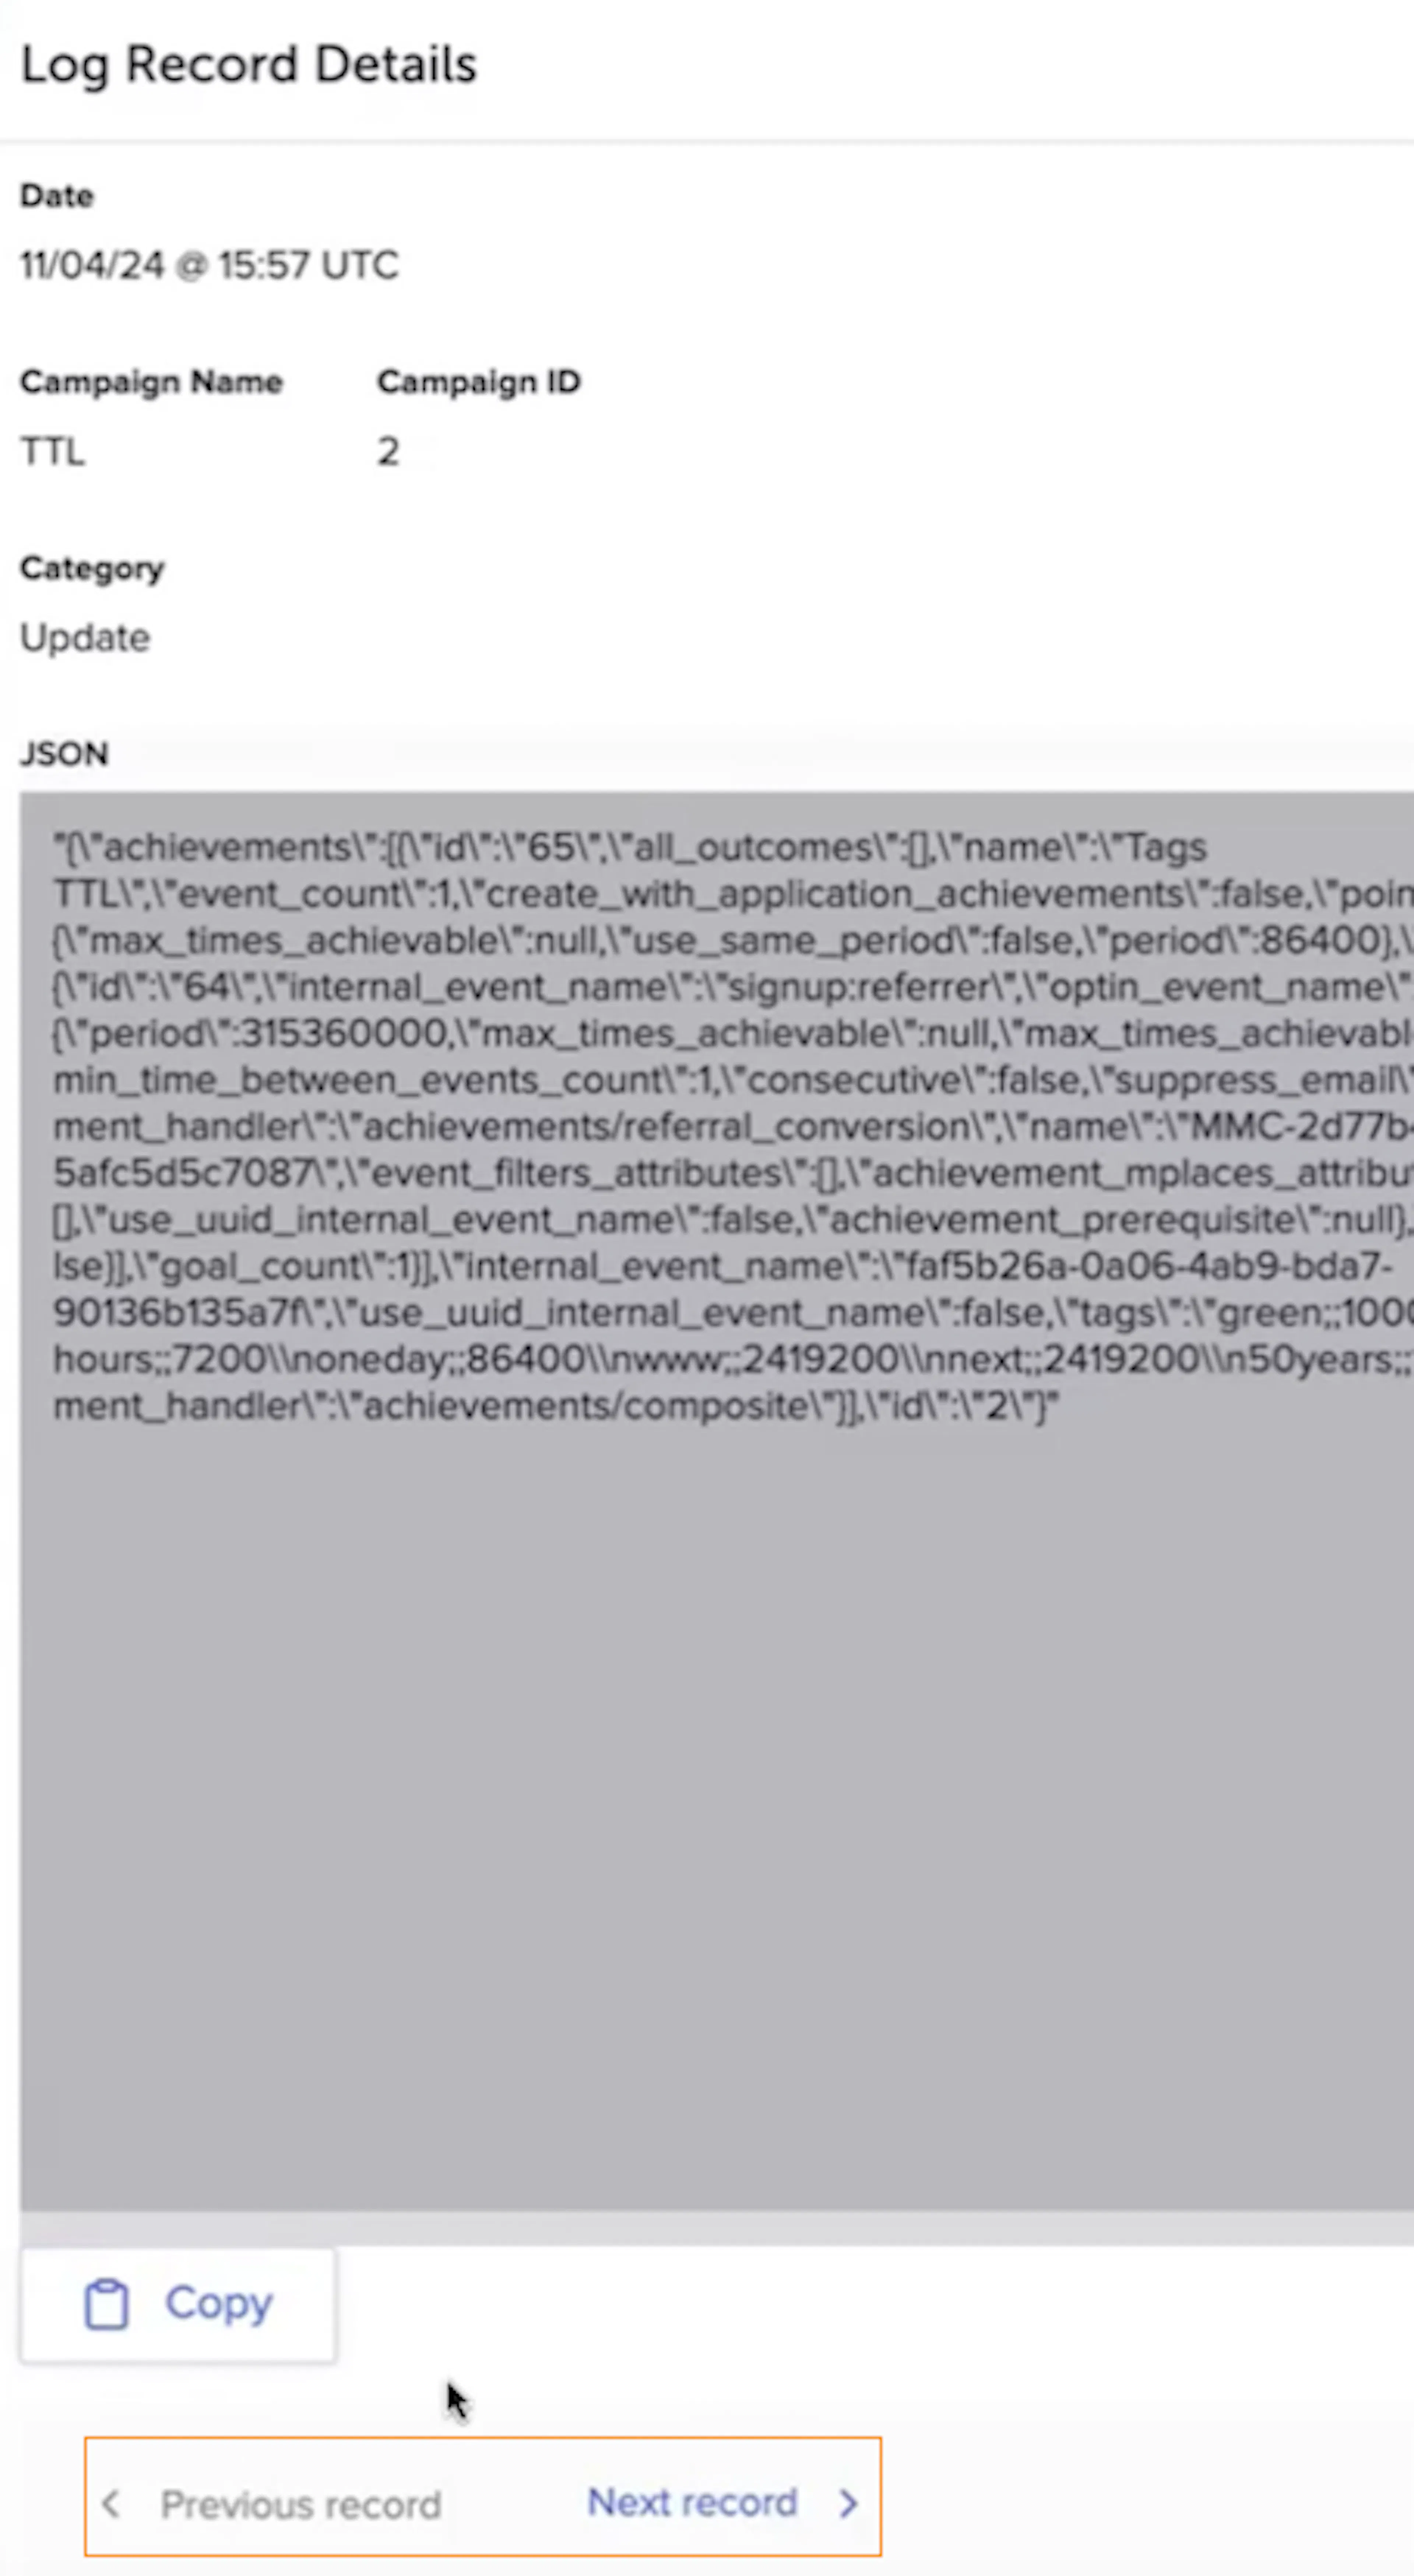
Navigation between audit log records needed improvement in the Log Record Details section. Simple "Previous records" and "Next records" buttons were added to eliminate the need to close the Log Record Details and manually track which event was last clicked.
Removed Restriction From Dropdown
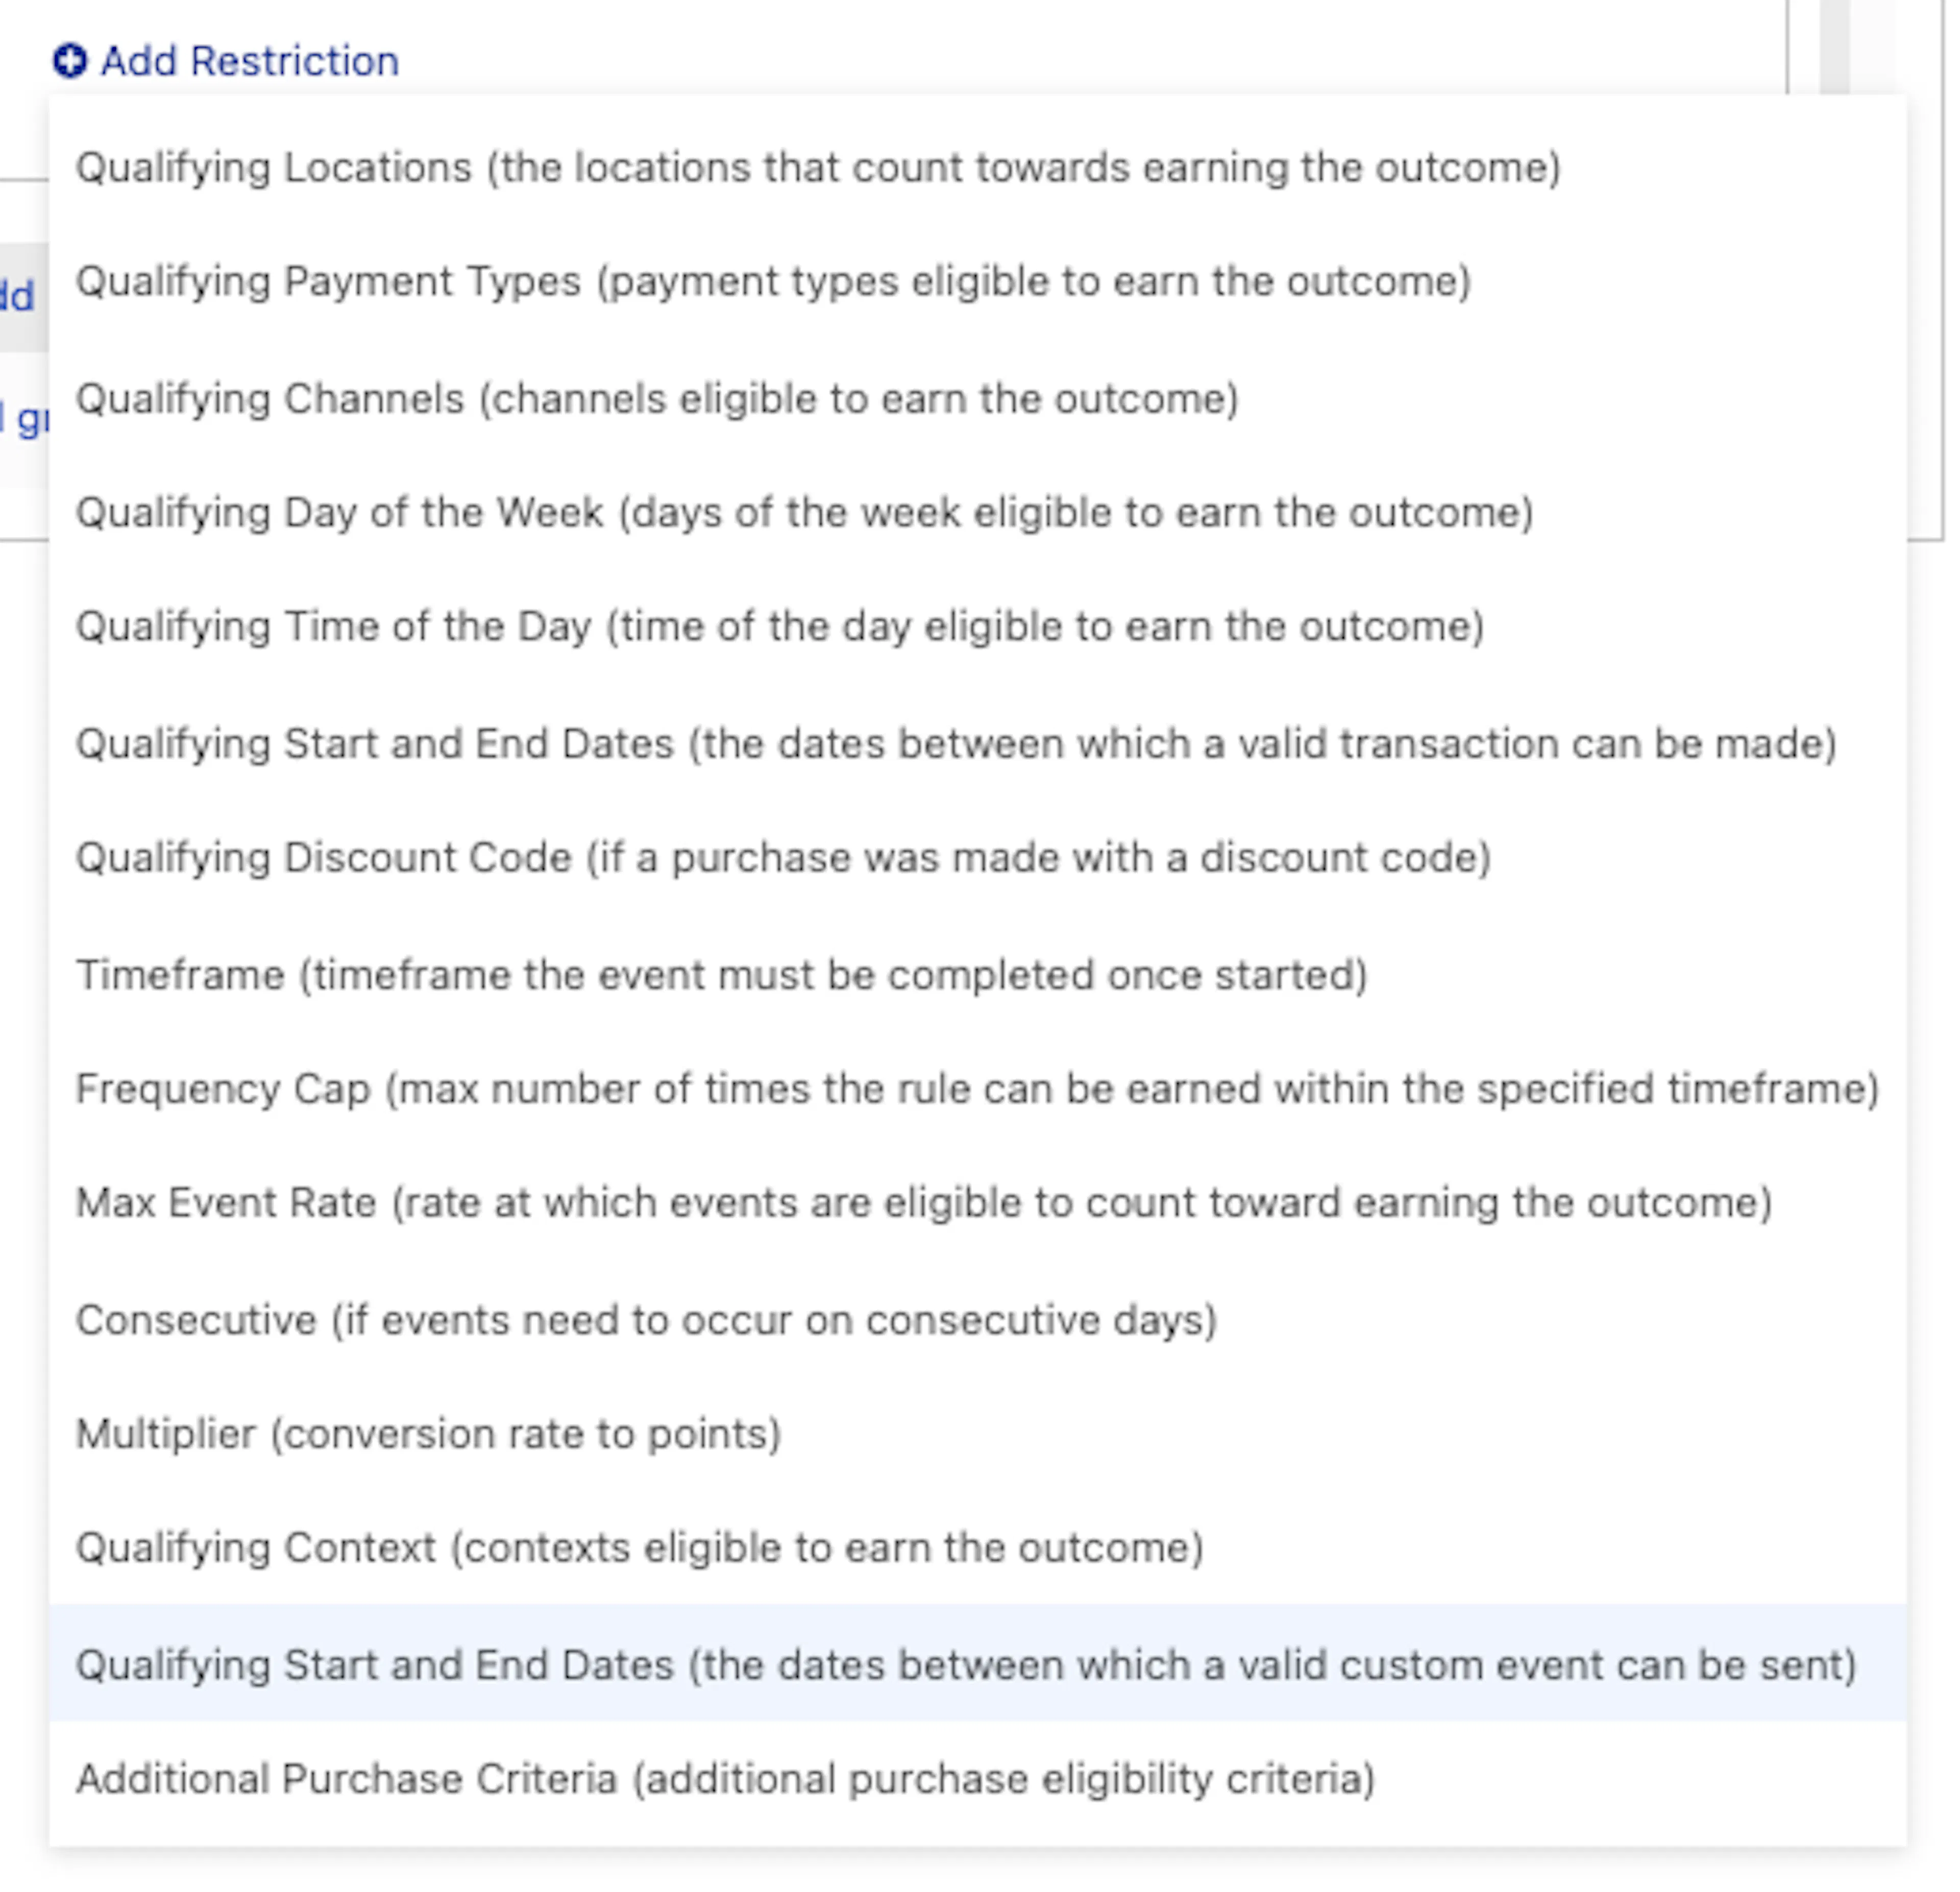
Previously, all purchase behaviors had two versions of the Qualifying Start and End Dates restriction. One of these restrictions was only compatible for custom event behaviors (highlighted in the screenshot below). We have removed this restriction for all purchase behaviors. It will remain as a restriction for custom event behaviors.
Updated Language on Behavior Restriction
For campaign behaviors referencing item counts over multiple transactions, the Total Number of Times restriction measures the number of items purchased. However, the language in the UI did not accurately reflect this and has caused incorrect campaign setups. We have updated the language to the following to make it clearer:
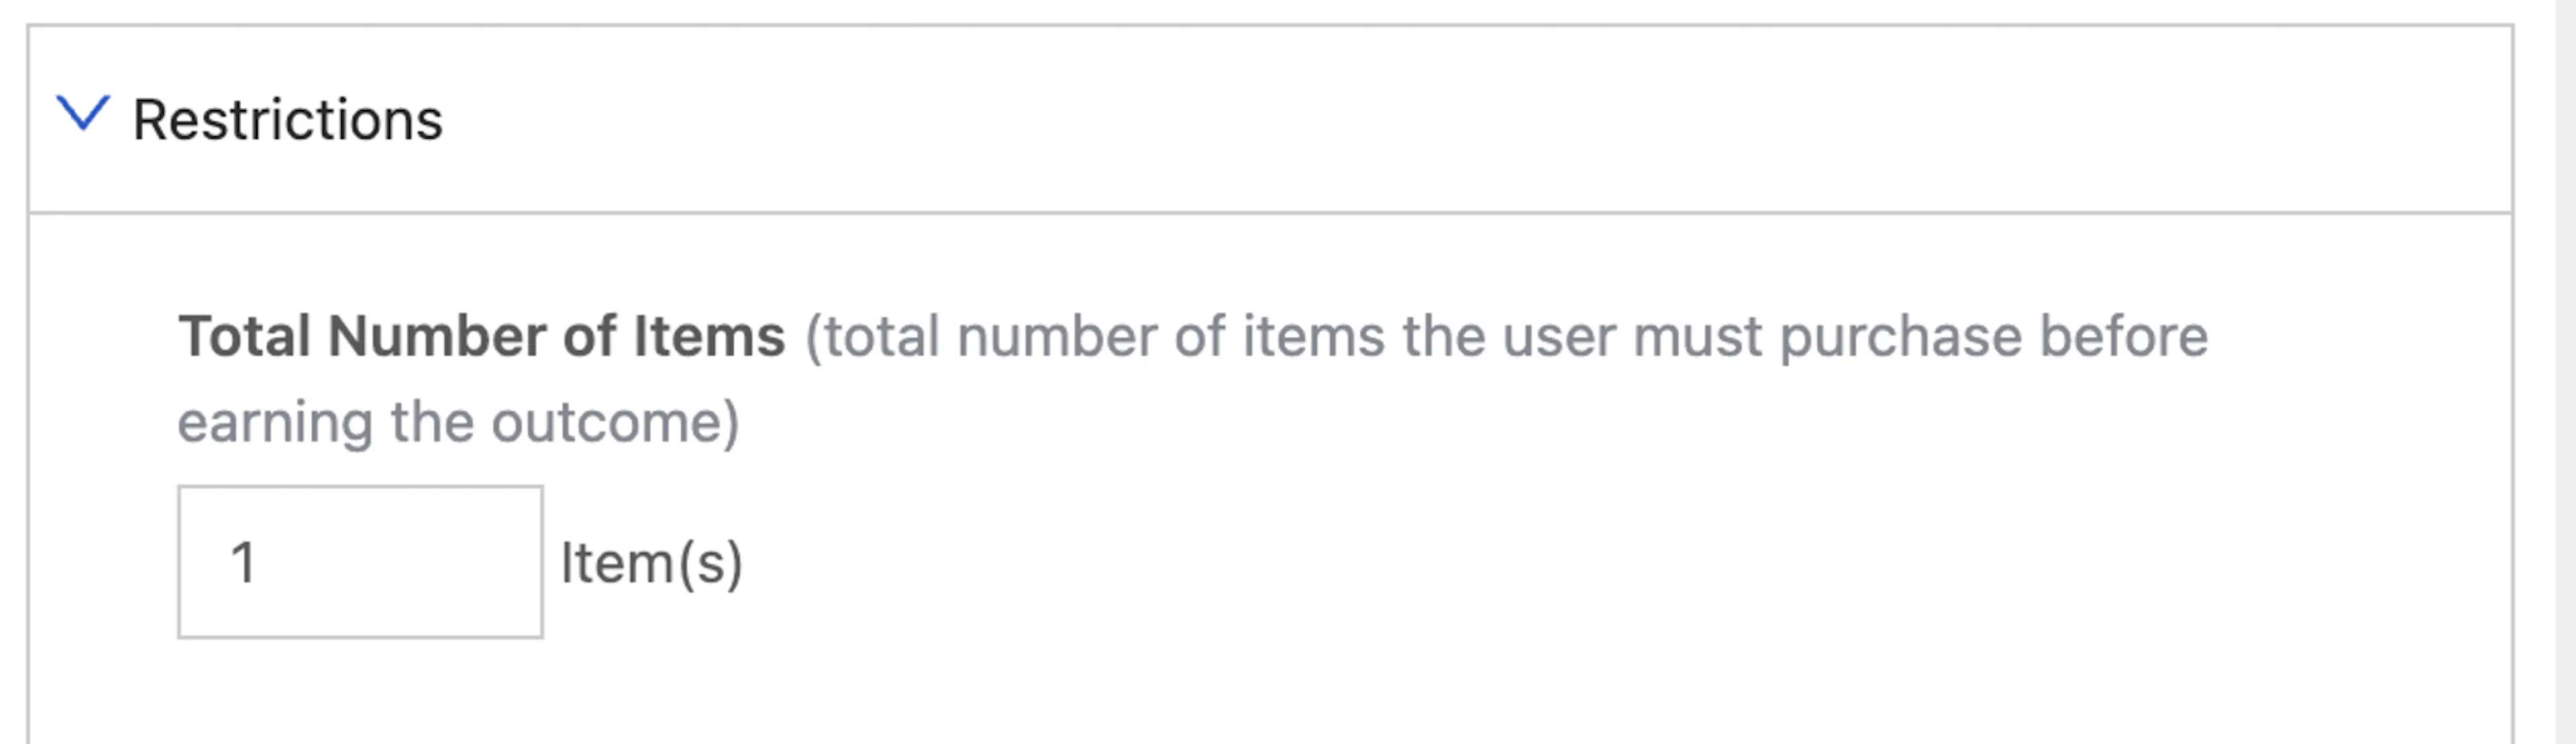
This change will impact the following behavior types
- Purchases -> Quantity
- Purchases -> Specific Items
This is a UI-only change, so it will have no impact on Campaign evaluation.
Added Restriction for Purchase Behaviors
Feature Description for Added Restriction for Purchase Behaviors
The following behavior types will now display the Total Number of Times restriction:
- Purchases -> Any Item
- Purchases -> Specific Items
This will allow clients to control the number of times the above behaviors should be completed by each customer before receiving the outcome.
How it Works for Added Restriction for Purchase Behaviors
- Navigate to the behavior builder and create either behavior:
- Purchases -> Any Item
- Purchases -> Specific Item
- Total Number of Times will now appear with a default value of 1. If you want a customer to complete the behavior more than once before receiving the outcome, update the value of the restriction accordingly
- If you change the Transaction Variety restriction, the text of this new restriction will change accordingly. Please see the Updated Language on Behavior Restriction description above for more details on this
Existing behaviors will continue to work the same unless the value of the restriction is updated.
For example, a sandwich shop is running a promotion that gives customers an offer if they purchase a specific sandwich in three separate transactions. To accomplish this, you can now set up a Purchases -> Specific Item behavior and set the Total Number of Times = 3.
Upgrade to Newest Catalog Picker Version
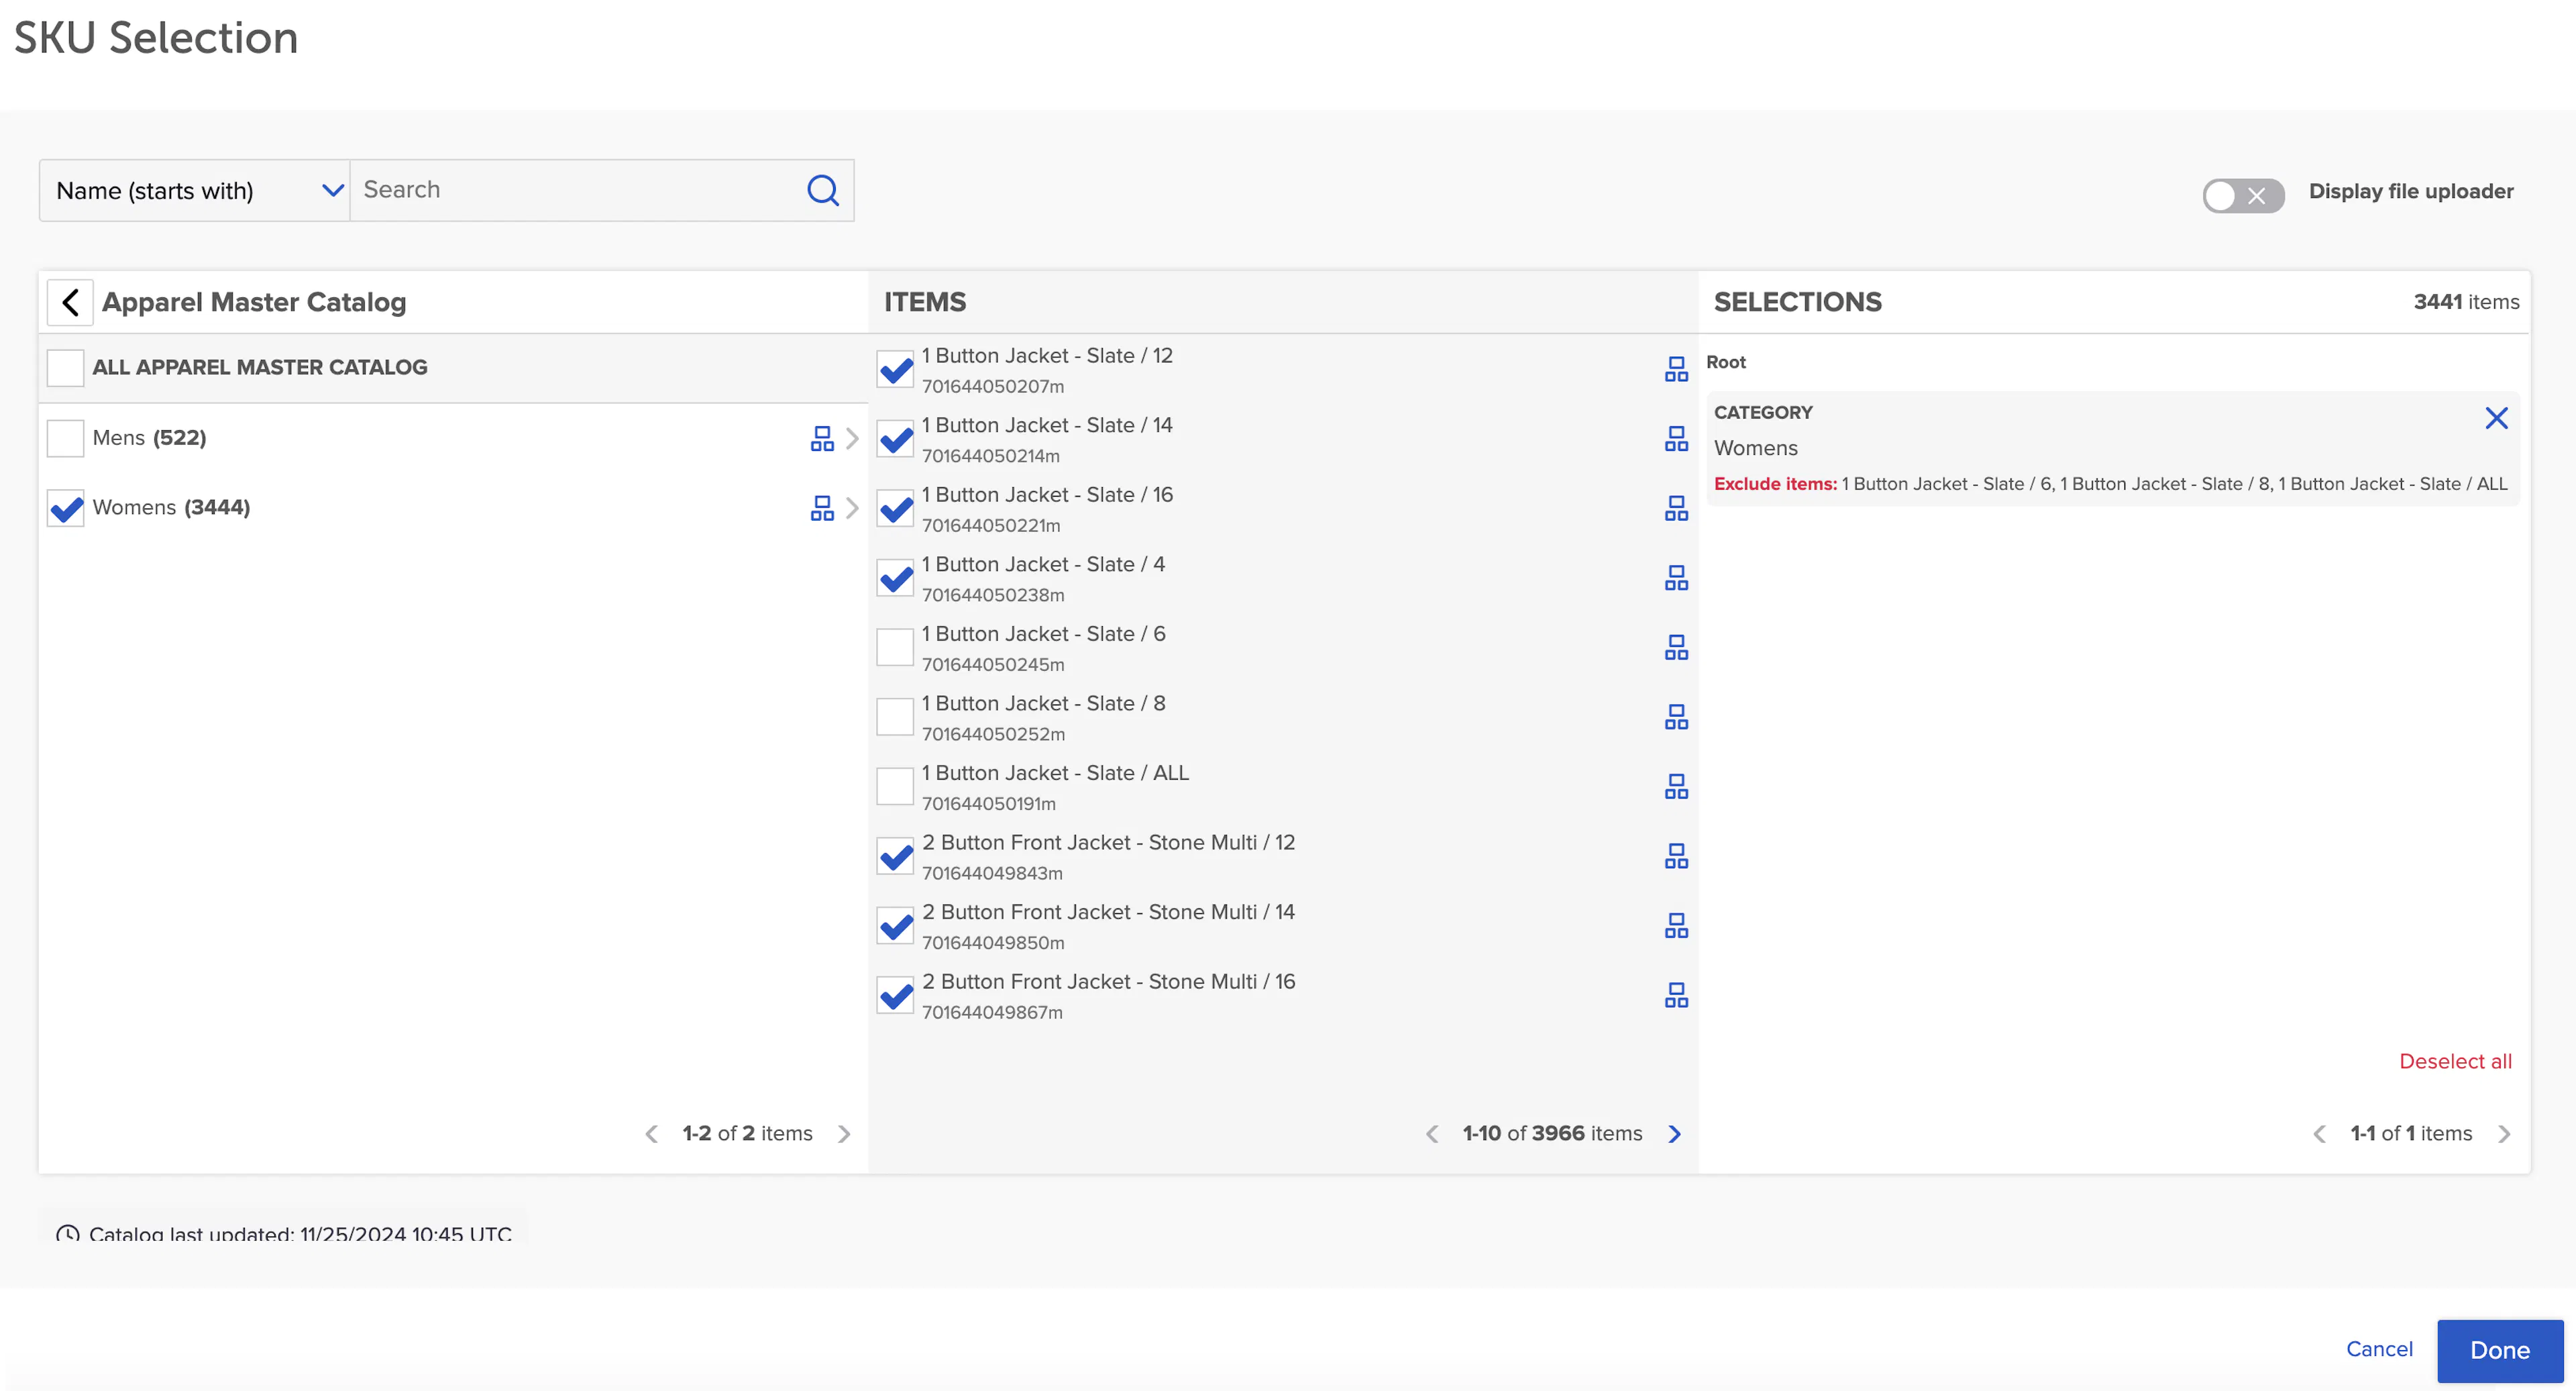
As part of this release, all customers are being brought up to the newest version of the Catalog Picker component in the Campaigns module. If you were on an earlier version, you’ll notice a change from the prior experience:
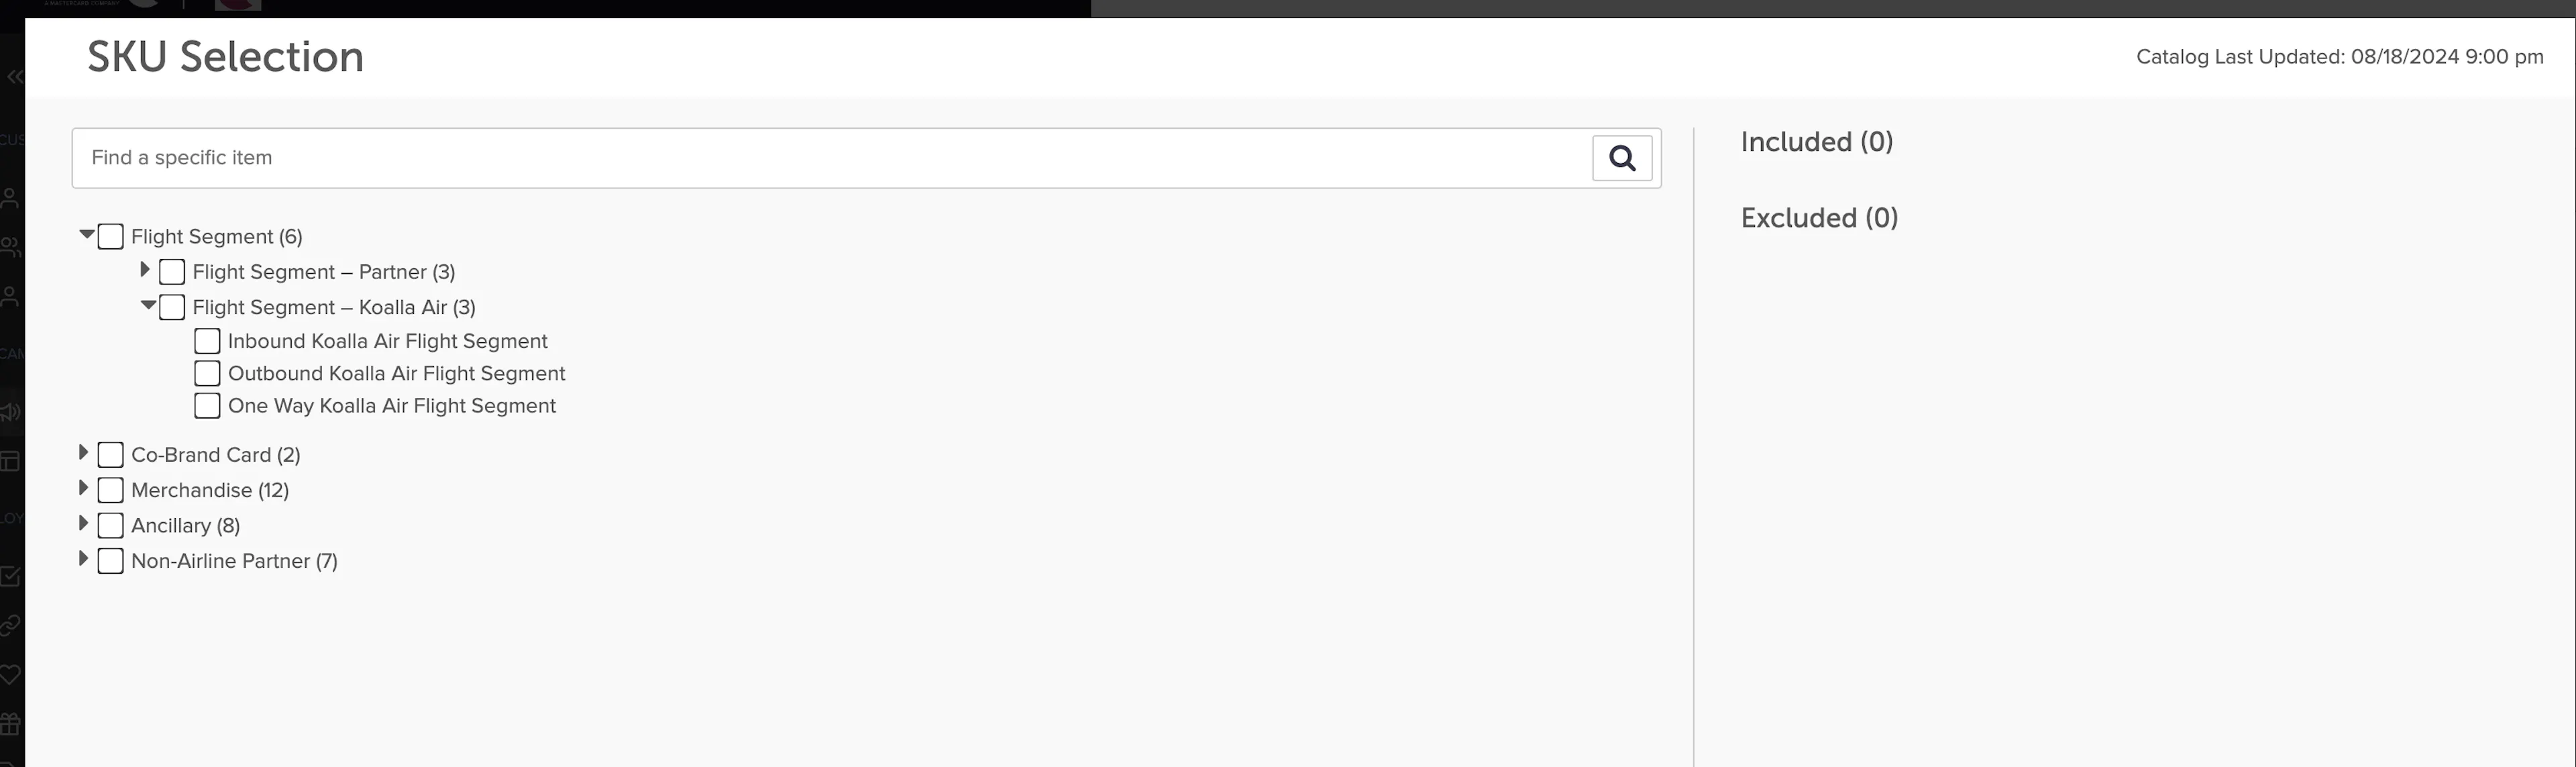
to the new and improved experience:
Refer a Friend General Availability
Please reach out to your Customer Success representative if you are interested in using this feature.
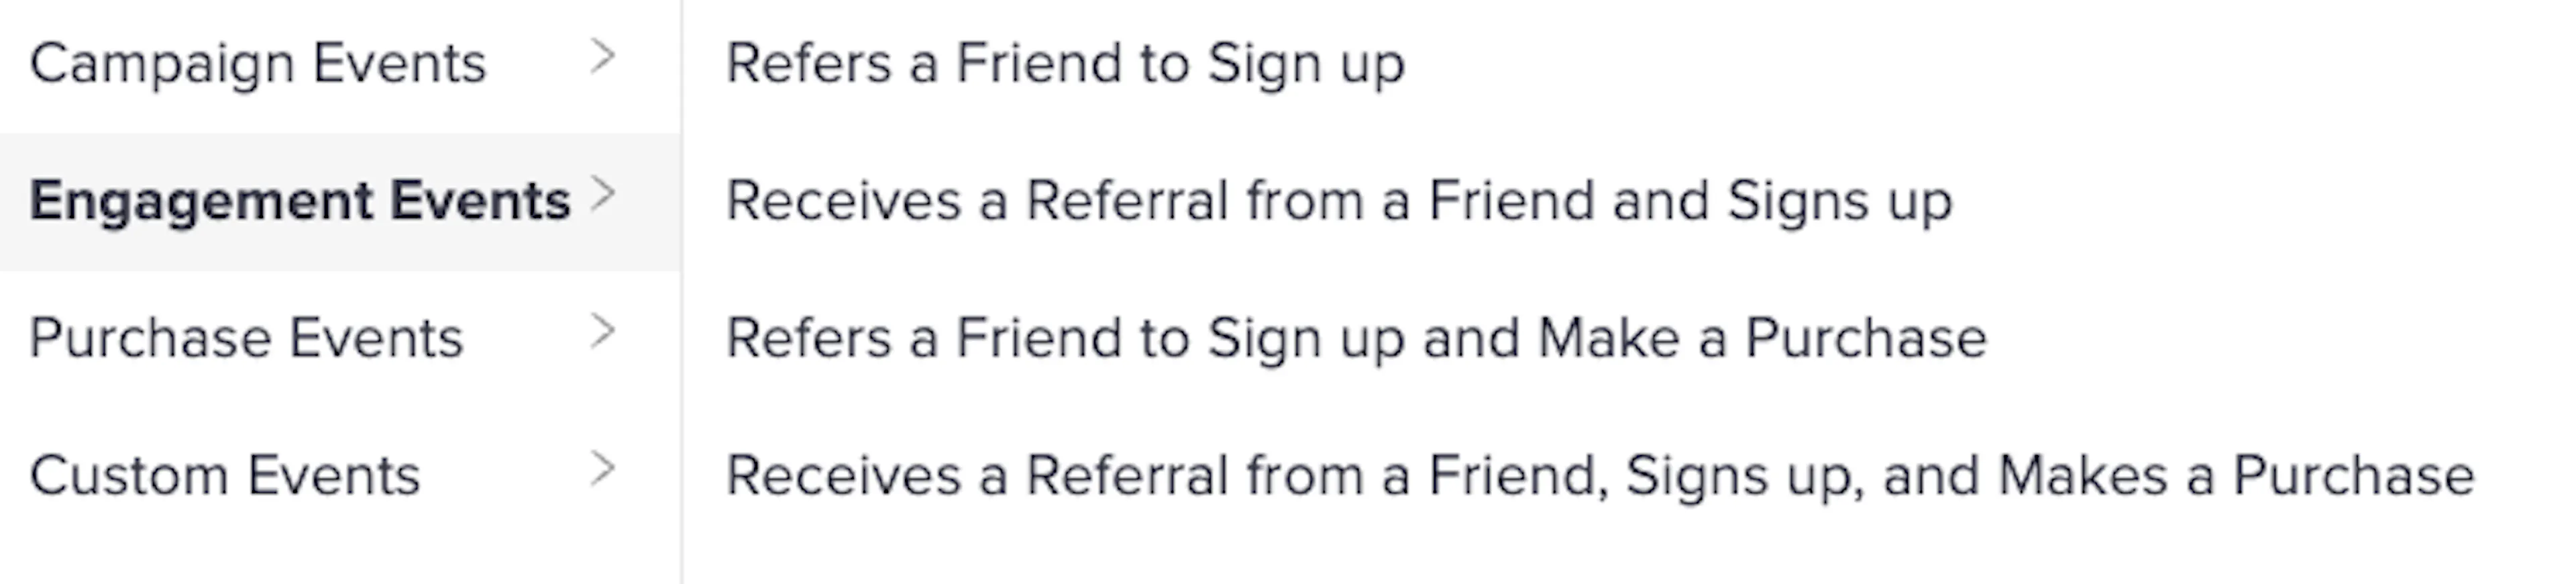
Refer-A-Friend behaviors are now supported for all clients. The behaviors constructs allow for both referrer and referee awarding for their actions with optional purchase gate requirements. This updated behavior category supports the following 4 activities:
Loyalty 2
Store Constraint Picker
Feature Description for Store Constraint Picker
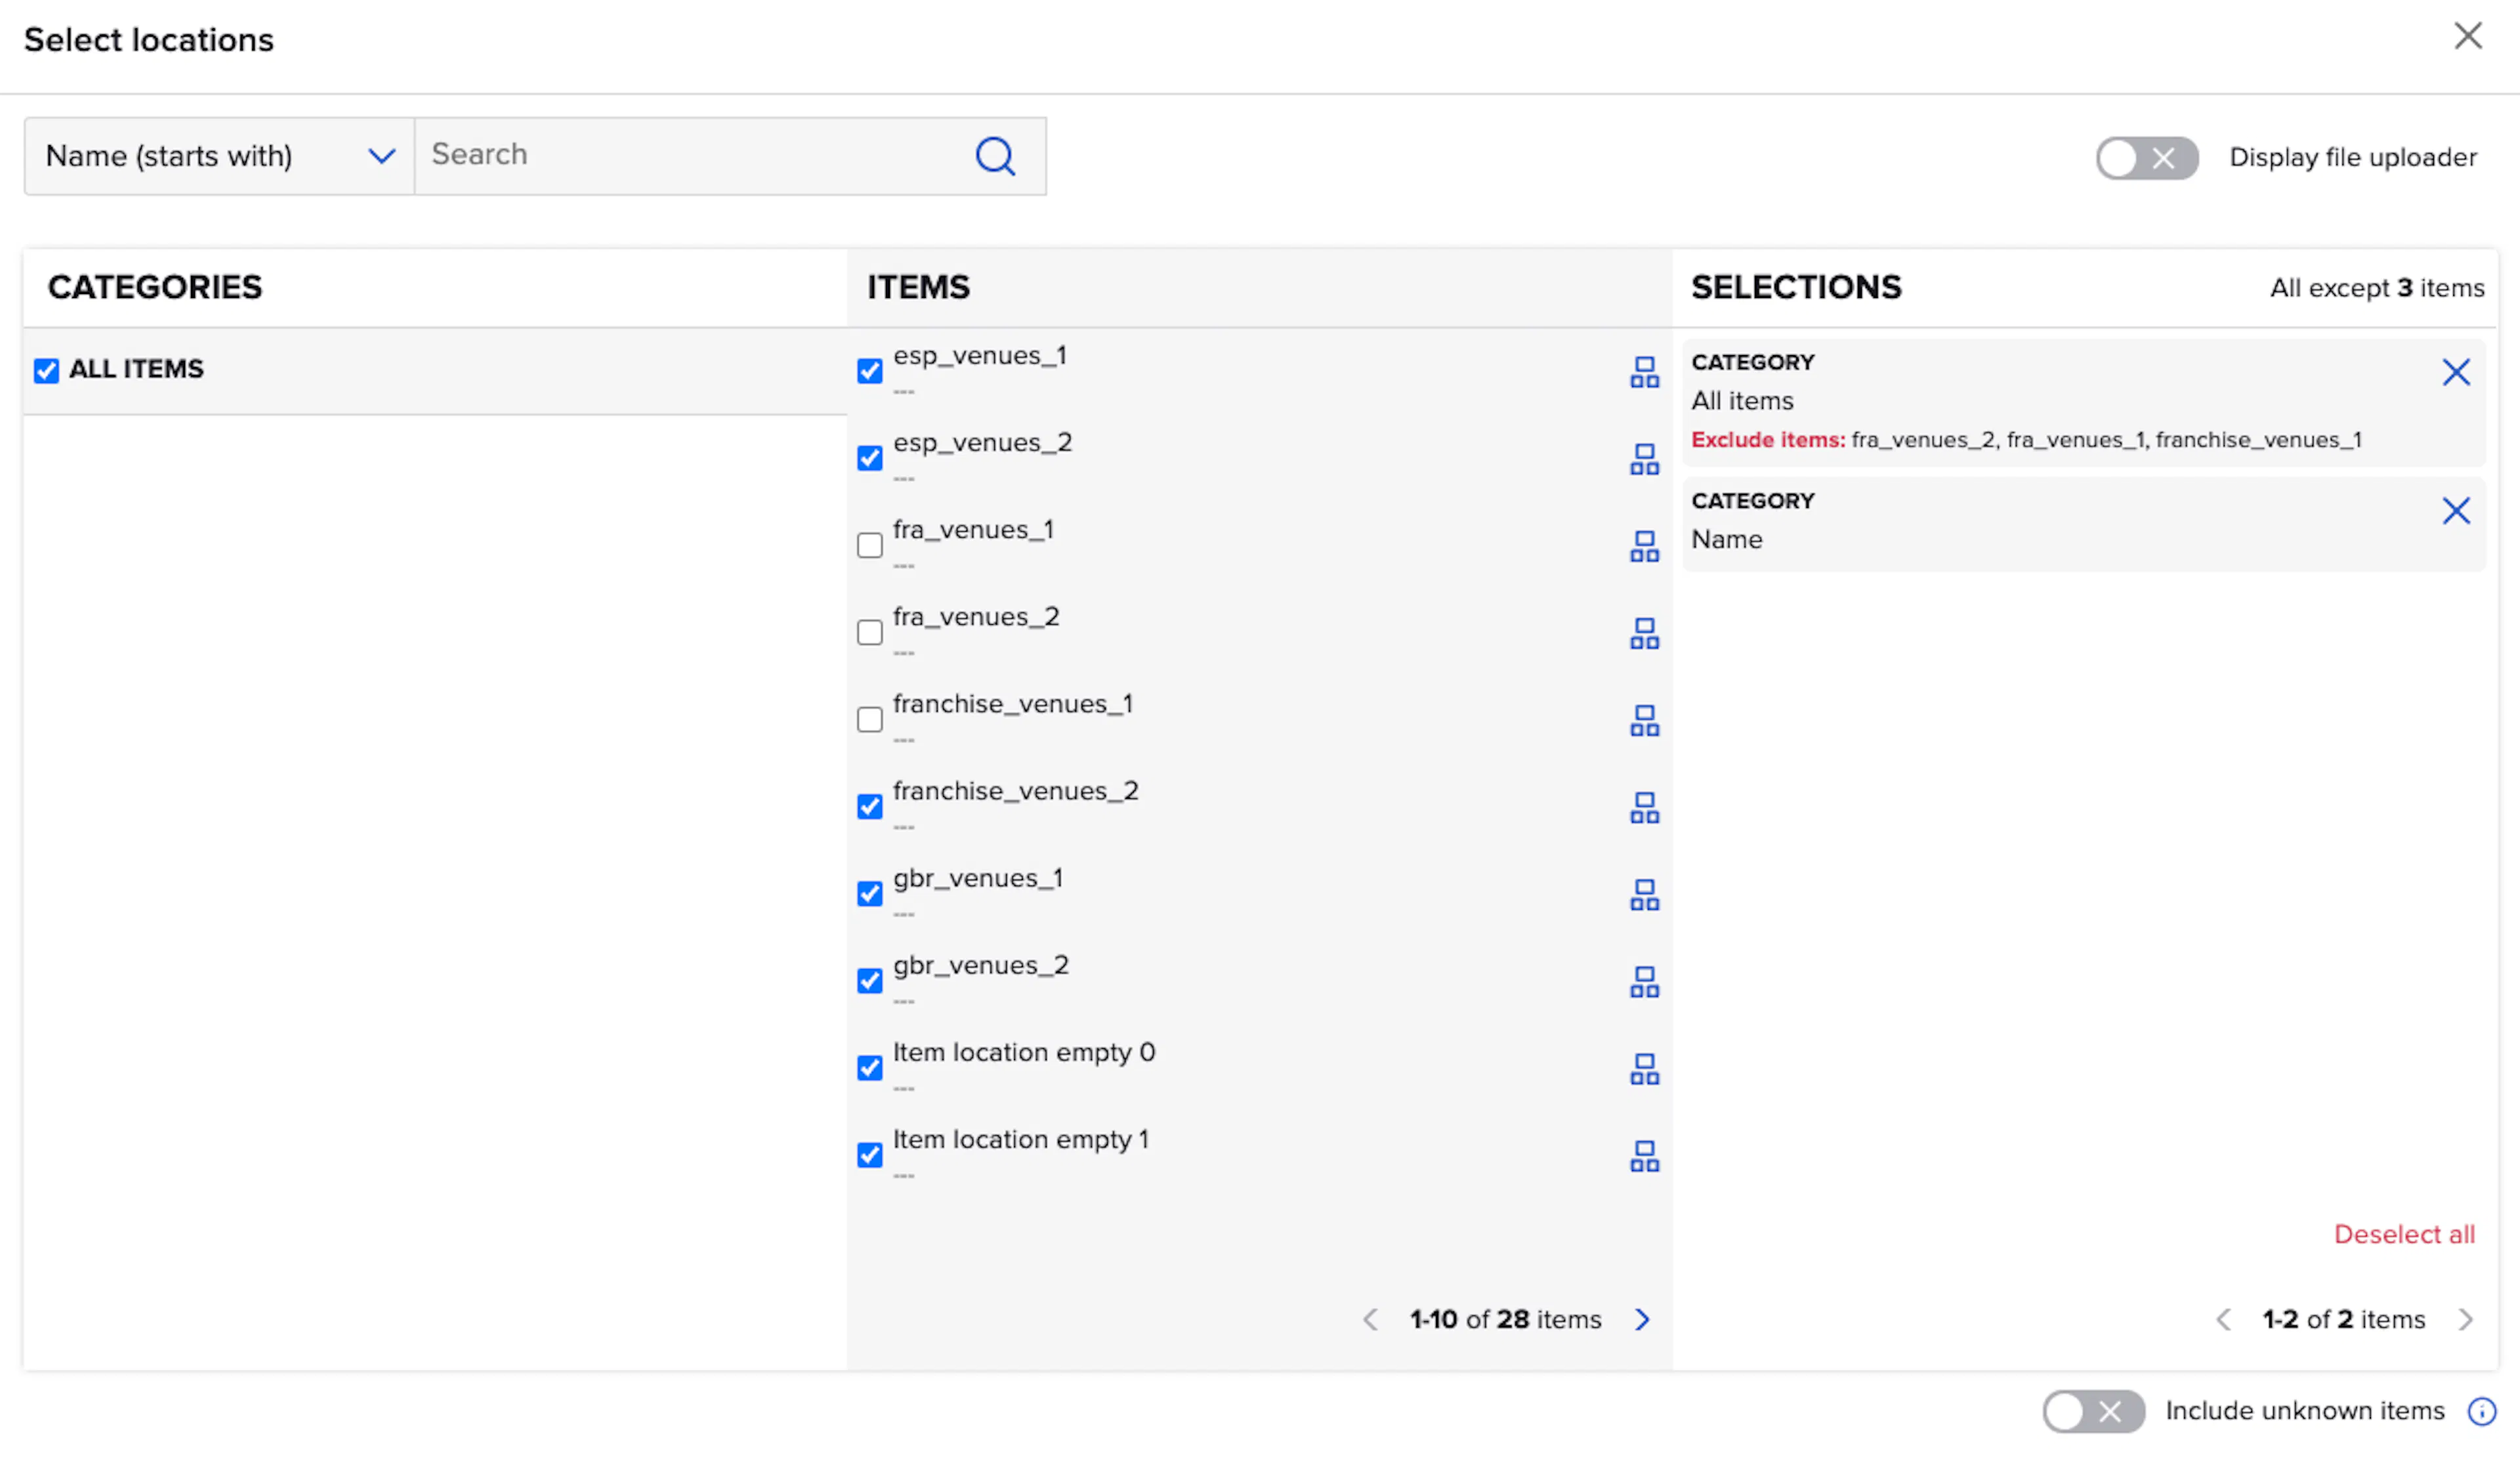
Loyalty Management has an improved Store Selector. When you make Store Restrictions you'll now have a new and improved component for navigating through your Stores and making selections.
How it Works for Store Constraint Picker
- Navigate to the rule builder model and create a rule
- Select add constraint and from the drop down select store
- Click on the “No Selections” for the picker to popup to choose stores from
Historical Point Rules
Feature Description for Historical Point Rules
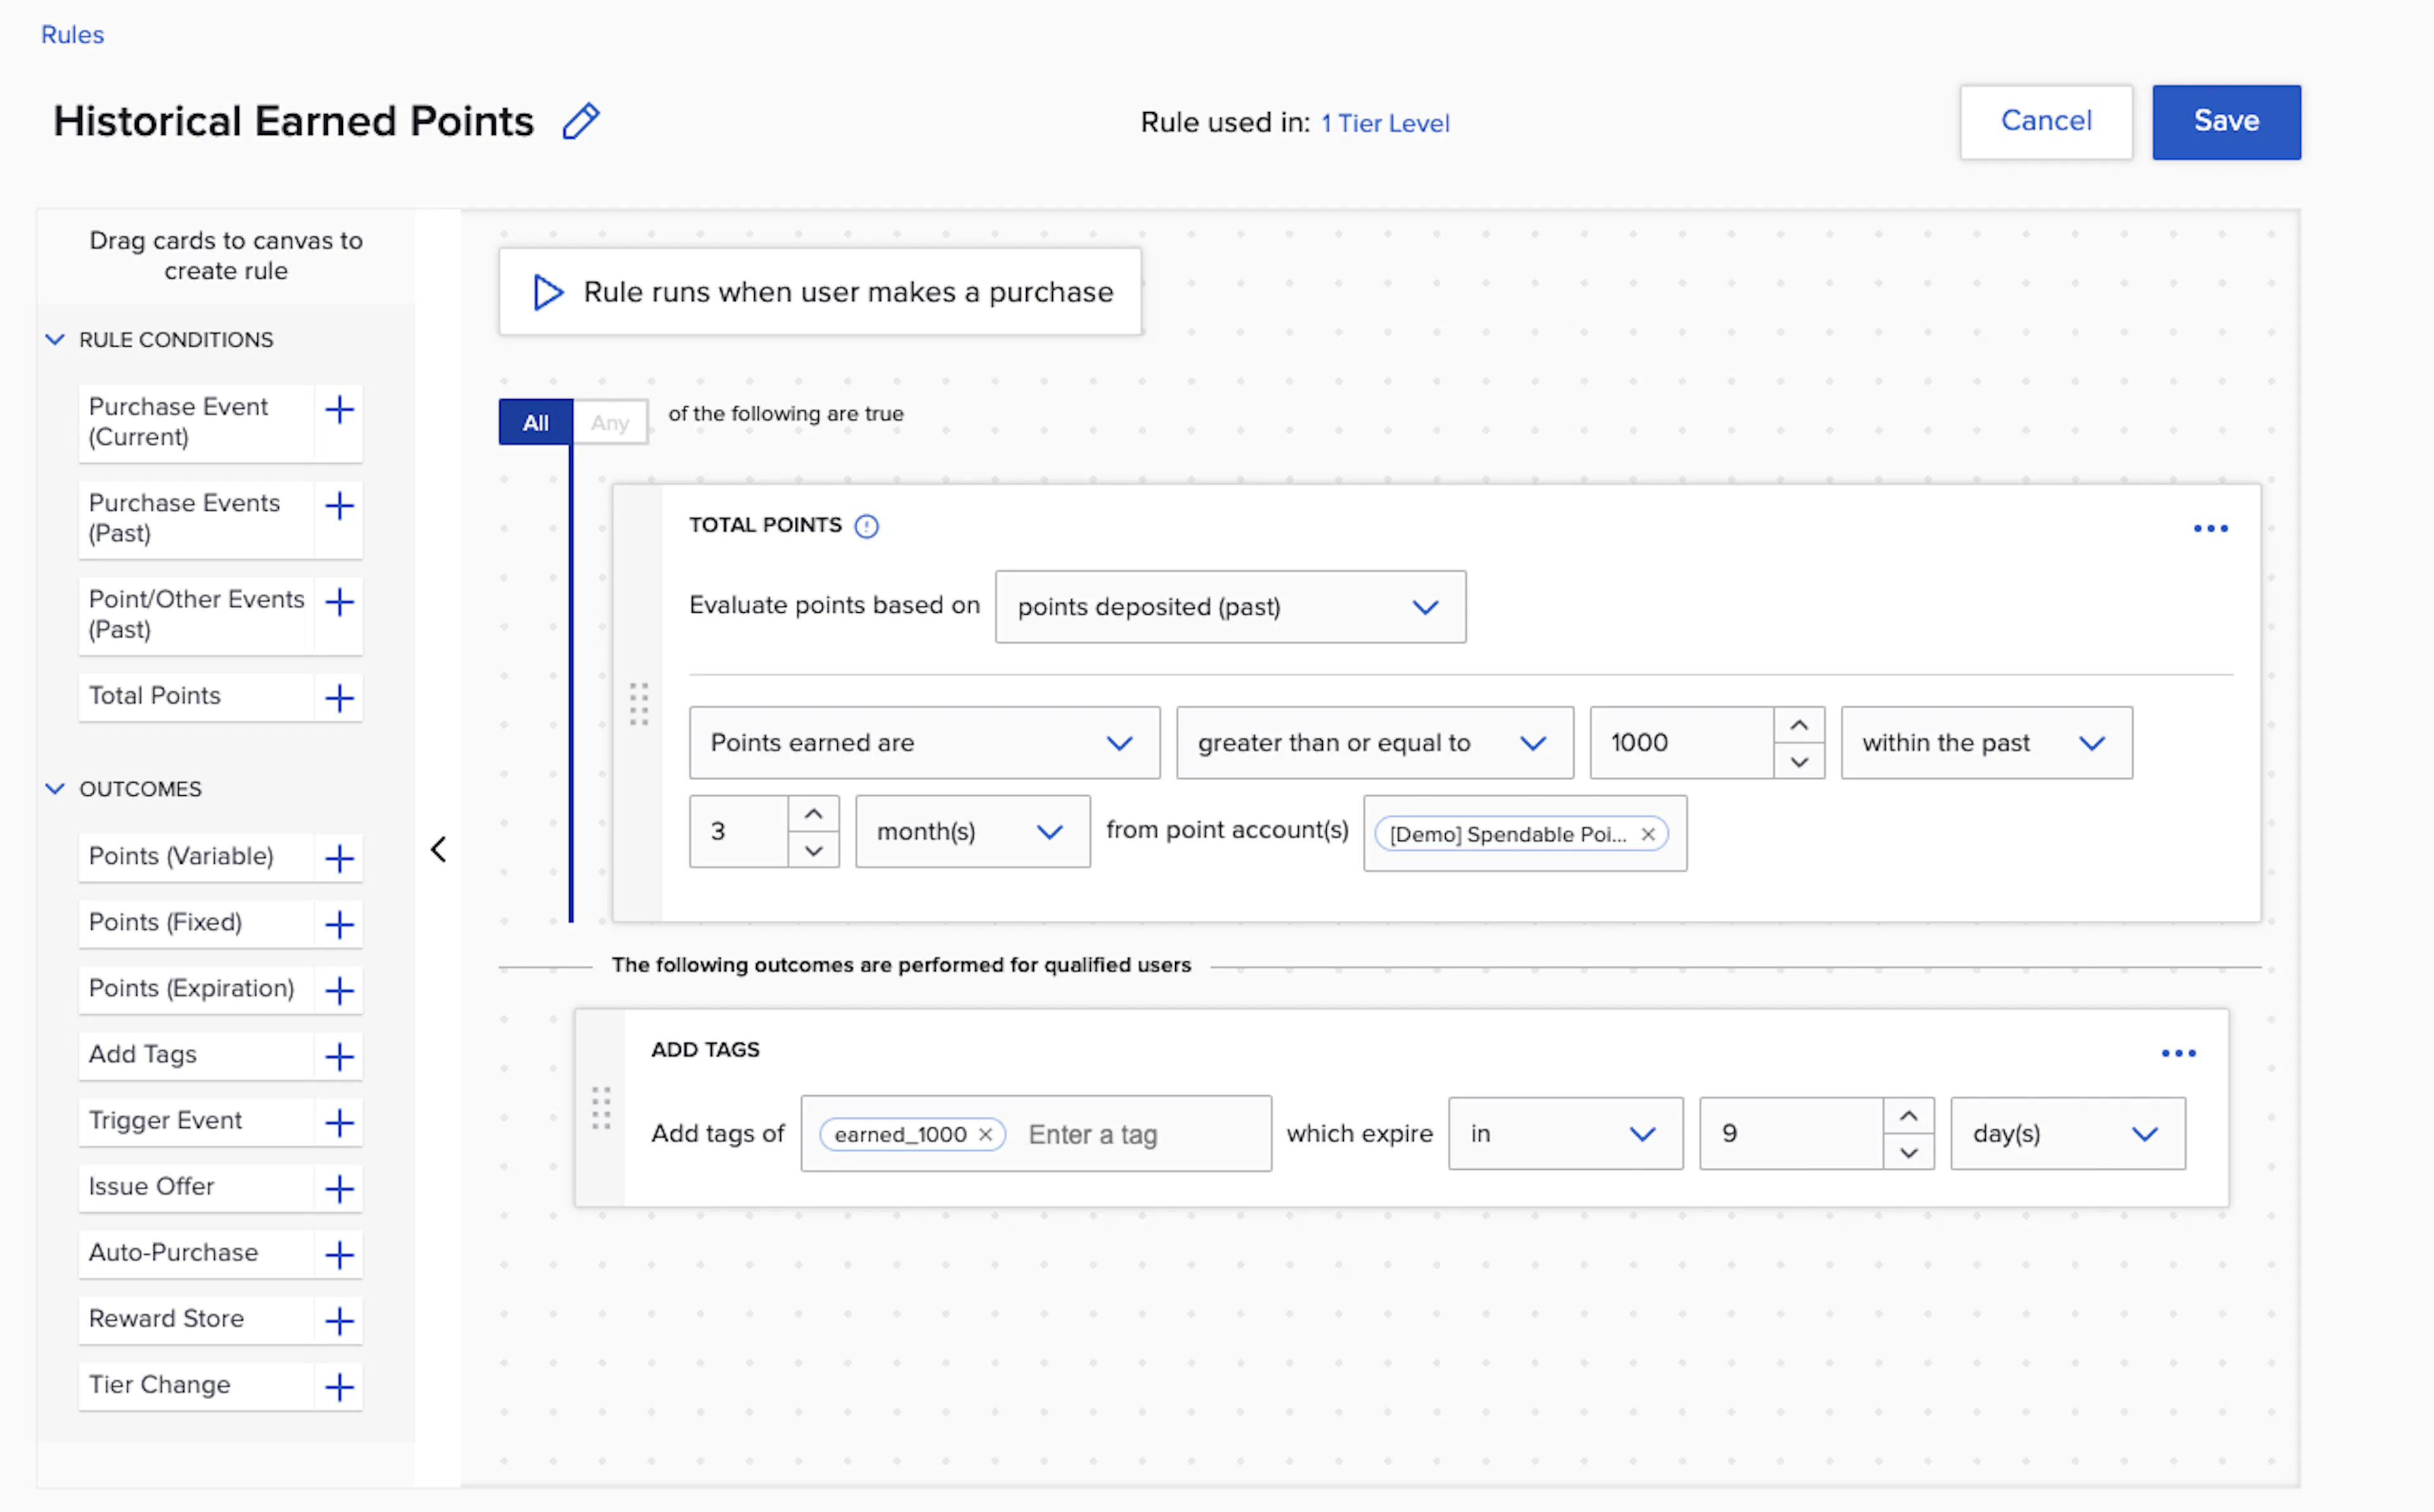
Loyalty Management has a new rule card type for historical point behavior.
- You can reward users based on the past amount of points they have earned or spent in a set period of time.
- This rule can have any loyalty rule outcome applied. A common use case would be to drop a tag or reward an offer as an outcome. Dropping a tag would allow you to target the users in campaign audiences.
- Be aware that Past Point Deposit rules are different than the current balance rule. The current balance rule is evaluating the current point balance within an account. Point accounts can have points spend from them, therefore a historical point earning rule will look at all points earned in a set time period versus what is currently available in a point account.
- Historical point rules and current balance rules can not be used in the same rule tree.
How it Works for Historical Point Rules
Note: changing loyalty program rules can affect point issuance. Due to this, we recommend consulting with your Customer Success representative when interested in new rule enhancements
- Navigate to the rule builder
- Select Total Points on the left within Rule Conditions
- In the dropdown select point deposit (past) for earned points or point spent (past) for spent points
- In the next dropdown select the template prompt related to point deposit/spend
- Select the point threshold, time constraints and the point account
- Point accounts that have expired points rolled over into them can not be used in this rule type. Only point accounts that are deposited in through earning behavior can be used.
Check Amount in Rule Templates
Feature Description for Check Amount in Rule Templates
check_amountis a SessionM-calculated value that will be available within rule templates. It is calculated fromtransaction.tax_total+transaction.subtotal- Reduce rule template complexity when you want to include tax within eligible spend by selecting
check_amount, instead of aggregating multiple properties. tax_totalandsubtotalare still available as individuals fields to use with in rule templates
How it Works for Check Amount in Rule Templates
Note: changing loyalty program rules can affect point issuance. Due to this, we recommend consulting with your Customer Success representative when interested in new rule enhancements
- Navigate to the rule template module (this is an admin level module)
- Create a new template
- Select check amount
Continue to configure the template based on your use case.
Reporting & Analytics
Insights reports available at all organization levels
Feature Description for Insights reports available at all organization levels
Insights is now available within all organizations on a multi-org setup. The content of each dashboard caters to the hierarchical level of the organization, focusing on higher-level metrics for parent organizations and day-to-day operations for children organizations.
How it Works for Insights reports available at all organization levels
Clients in multi-org setup will see standard dashboards (Summary, Campaigns, Offers, Incentives) available in Insights for all organization levels. The reports are made available by default, without the need of a specific request. The metrics and UX are similar to the existing reports for leaf-level organizations.
Configurable CLV ranges
Feature Description for Configurable CLV ranges
Customer Lifetime Values scores can now be calculated at configurable intervals, catering more closely to your specific use cases. You can define up to five custom ranges for which CLV score are calculated across all the customer base. The scores can be leveraged for segmentation.
How it Works for Configurable CLV ranges
You can define up to five new date ranges for which CLV scores are calculated. This information is provided to your account team, who transfers it to SessionM’s Data Science team. The scores are made available in Data Cloud, within the usual CLV table, and can be leveraged via custom SQL queries in the Composer model.
To obtain a list of customers who have expected CLV higher than 10 USD at the 60-day mark, for example, you would use a query such as this:
SELECT user_id
FROM user_clv_hx
WHERE prediction_period = 60
AND expected_clv > 10
Product Recommendations for groups of items
Feature Description for Product Recommendations for groups of items
Both user-product and user-group of products affinity scores are available in Data Cloud. The scores can be used for segmentation, enabling you to enhance the relevance of your engagement with customers.
How it Works for Product Recommendations for groups of items
You can provide to your account teams a JSON or CSV file containing a list of items and categories for which you want affinity scores to be calculated. The file structure is quite simple, as shown on the sample below:
{

"Shirts": ["12G93N4", "34M91B3", ...],

"Jackets": ["76K92L2", "98T24F7", ...],

"Dress shirts": ["34M91B3", ...]

}
SessionM’s Data Science team ingests that shortlist into the model pipelines and calculates scores for each individual item and for each of the categories. These scores are subsequently made available in Data Cloud and can be used for segmentation through Composer SQL queries.
To obtain a list of customers who have affinity score higher than 0.8 (the full range is 0-1, 1 being the highest possible affinity) to the “shirts” category, for example, you would use a query such as this:
SELECT user_id
FROM v_user_prod_rec_categories
WHERE category = 'shirts'
AND score > 0.8
Platform Wide: Organization Management
Sharing Controls for Audiences, Campaigns and Promo Codes
Feature Description for Sharing Controls for Audiences, Campaigns and Promo Codes
Currently, all Audiences, Campaigns, Campaign Templates and Promo Codes that are assigned to Root- or Branch-level Orgs are automatically inherited by descendent Orgs in the hierarchy. In some cases, this is useful because it allows a configuration to be done once and used across Orgs. In other cases, you want the configuration to exist at a higher level in the Org but not expose it or make it available for use at lower levels.
Introducing: Locked and Unlocked status! Now, when you create a new Campaign, Audience or Promo Code it will default to a “Locked” state, which means it will not be inherited by lower levels of the hierarchy. “Unlocking” a configuration will allow it to be cascaded down the hierarchy.
How it Works for Sharing Controls for Audiences, Campaigns and Promo Codes
From now on platform users will be presented with the following new components on Audiences, Campaign, Campaign Templates and Promo Codes screens:
Padlock:
Toggle:

By Default all new items will be locked, and users will be able to toggle it on (padlock is locked, toggle is enabled) or off (padlock is unlocked, toggle is disabled). The state of the component dictates what happens to the created items:
- Unlocked objects will continue to be visible to any platform users that are active in child Orgs of the Org the object is assigned to, however they will not be able to act on it (view, edit, delete, duplicate) .
- Locked objects will only be visible to platform users that are active in the Org that the object is assigned to or active in a Parent Org
The state of each object can be changed at any time by the platform user with permissions for the Org the object is assigned to.
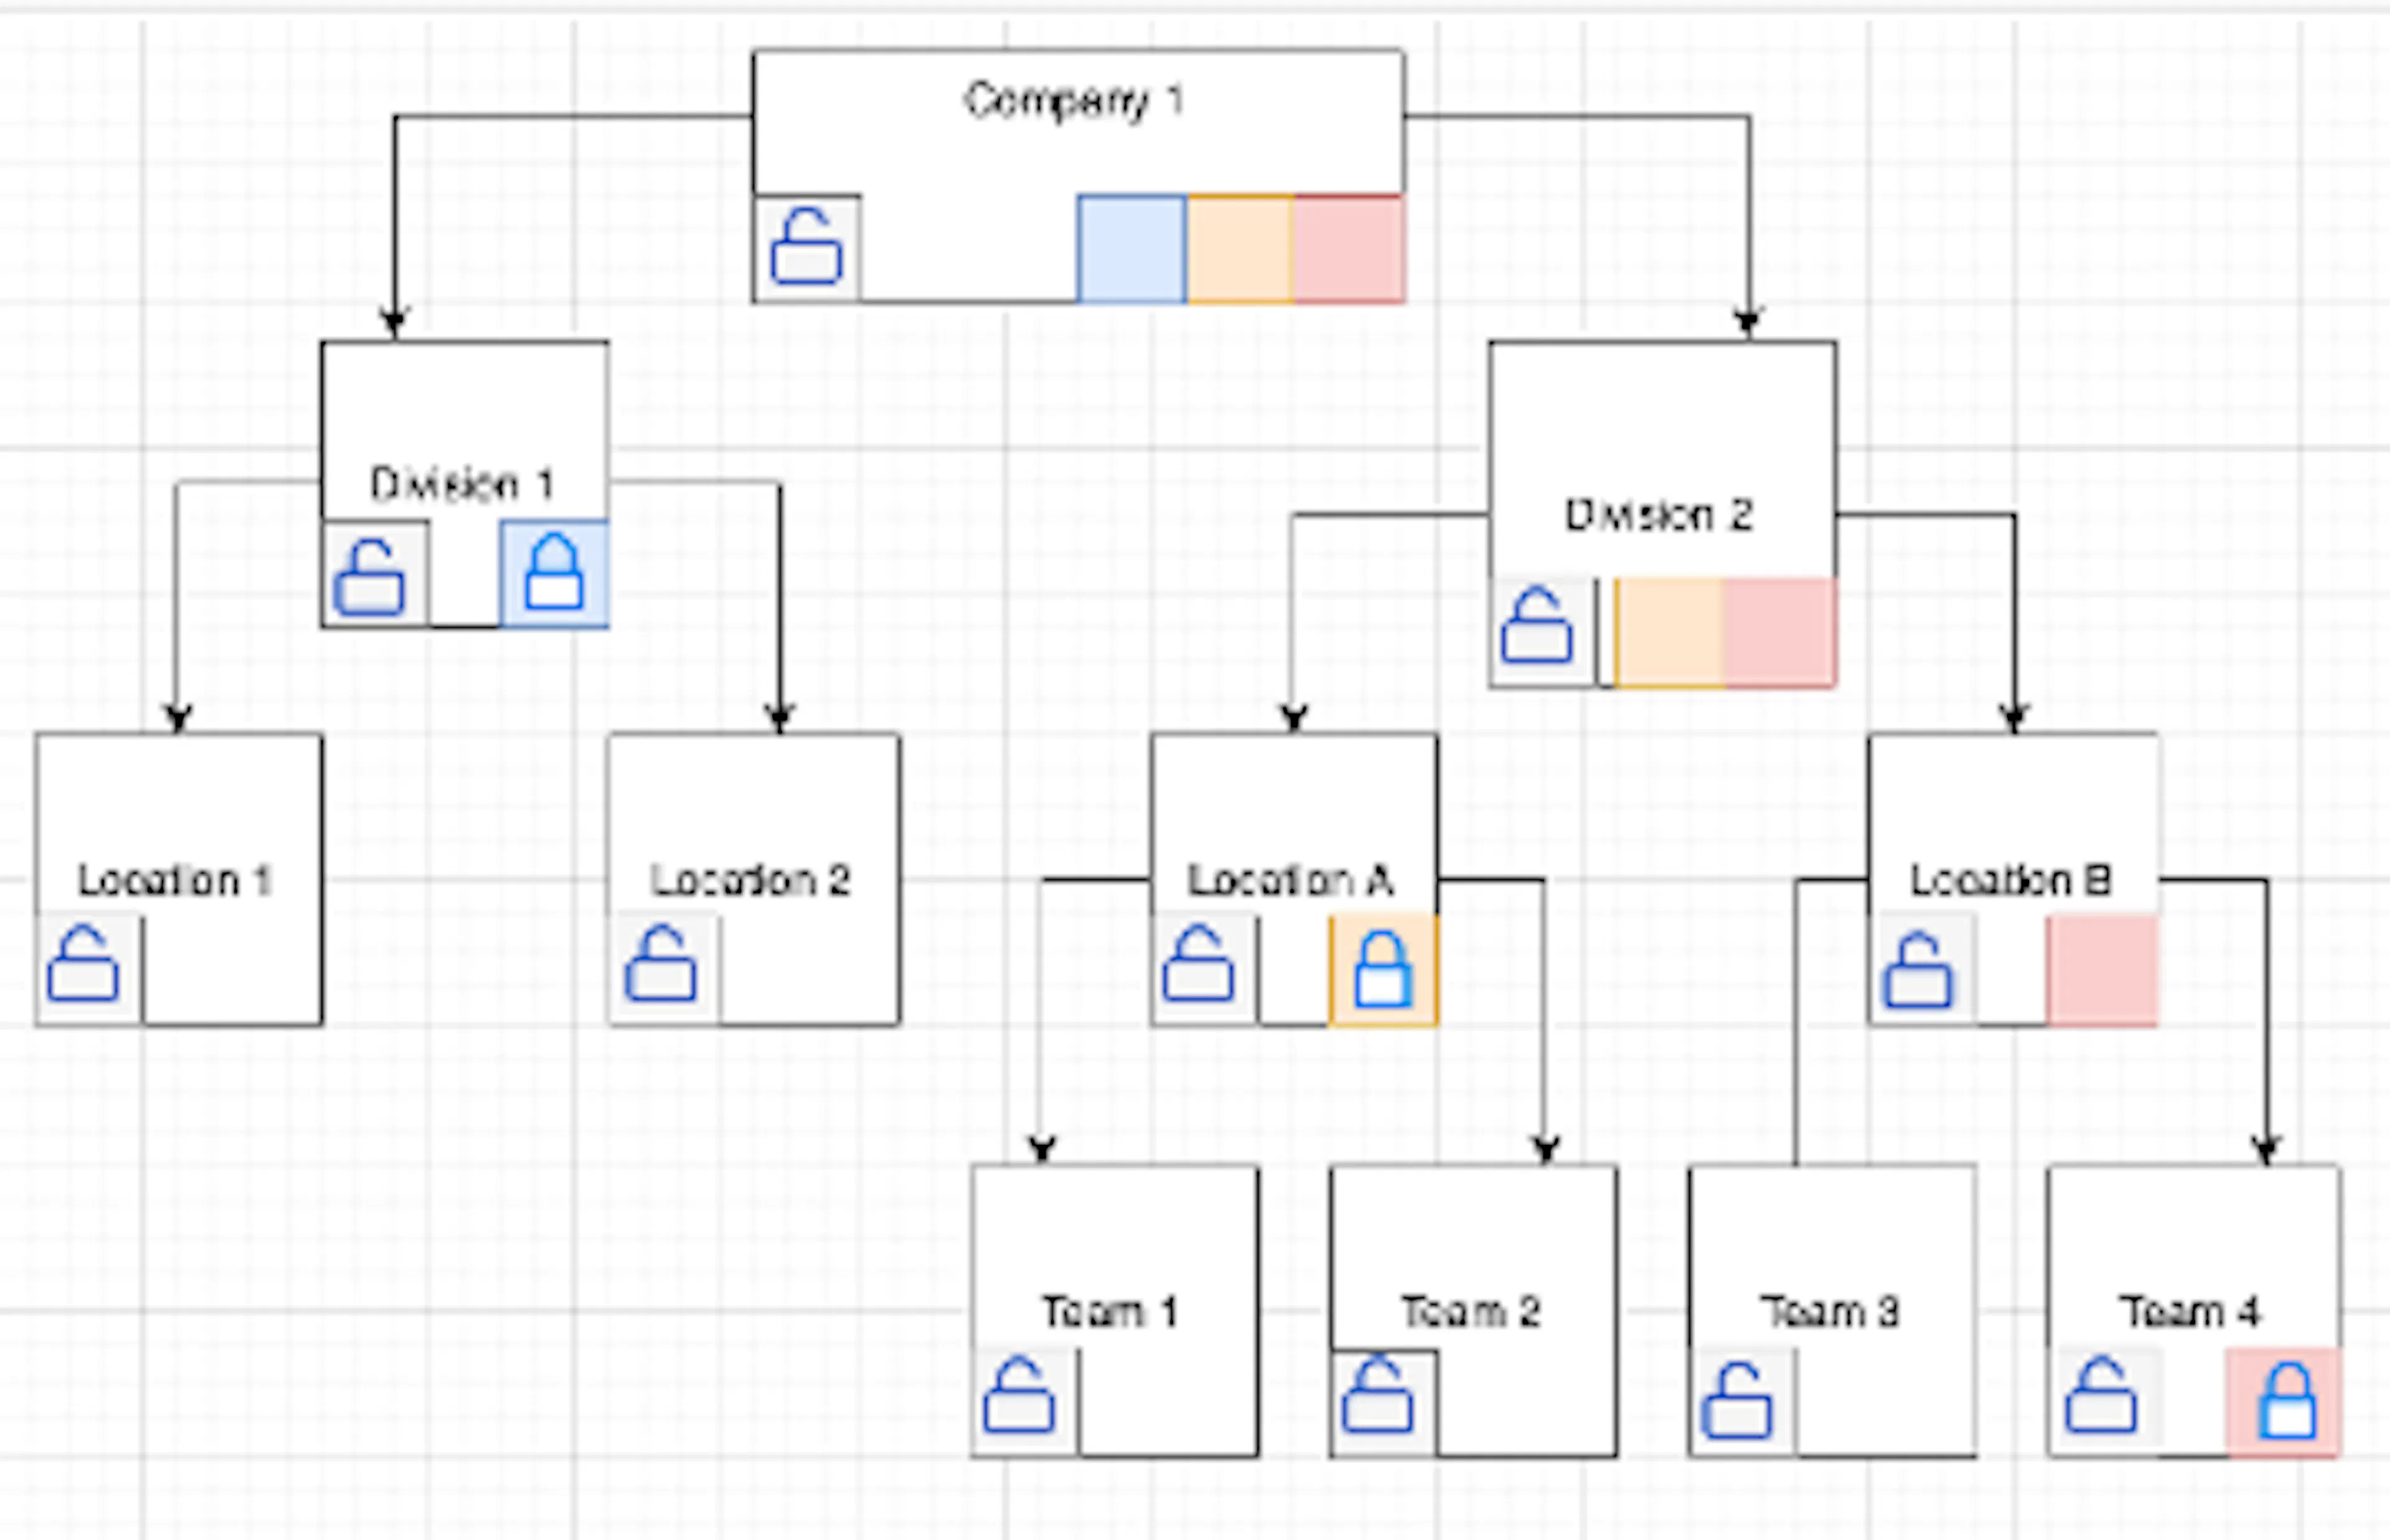
The below diagrams represents the locked and unlocked states.
Currently any Audience, Campaign, Campaign Template or Promo Code created at any Org is visible to all other Orgs and they are allowed to act on them.
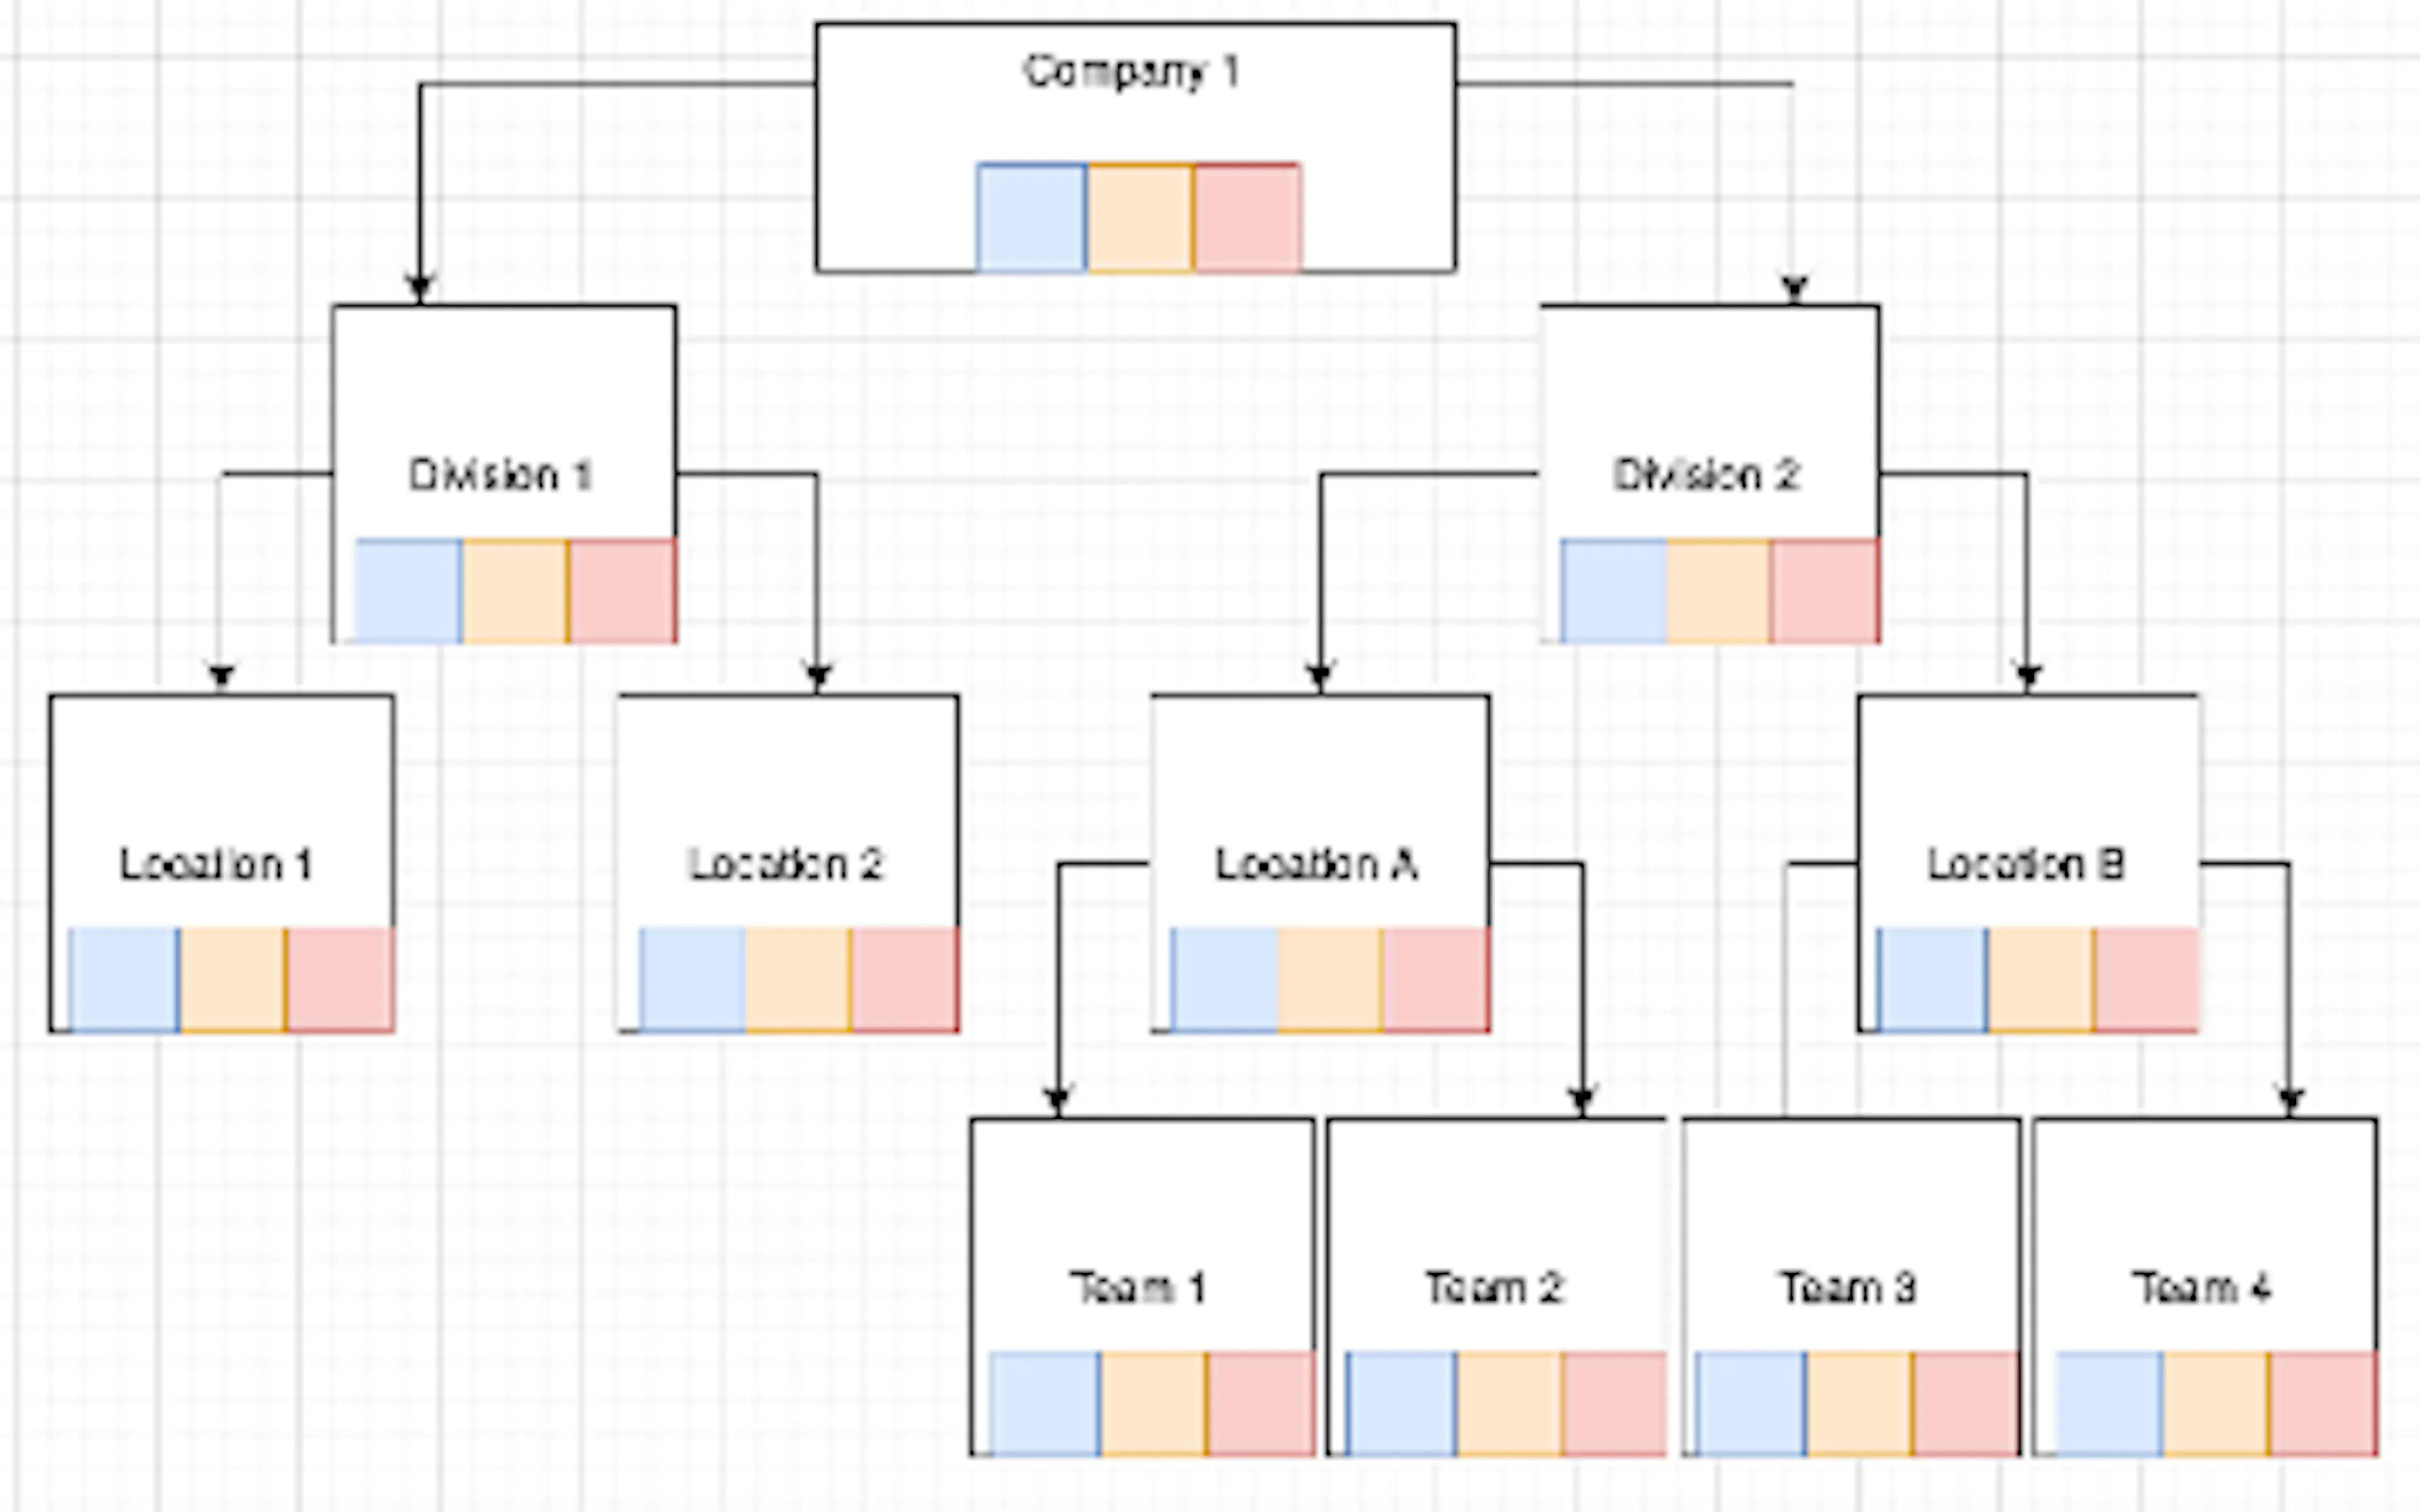
From now on Unlocked items will be visible by the lower level divisions but they will not be able to act on them, and the Locked items will not be visible.
For example Division 1 below has one locked item and one unlocked item. The unlocked item is visible in 2 lower level divisions: Location 1 and Location 2. However the Locked item is only visible by Division 1 and its parent Division: Company 1.
Assign Customer to an Org when creating new profiles in the Customers module
Feature Description for Assign Customer to an Org when creating new profiles in the Customers module
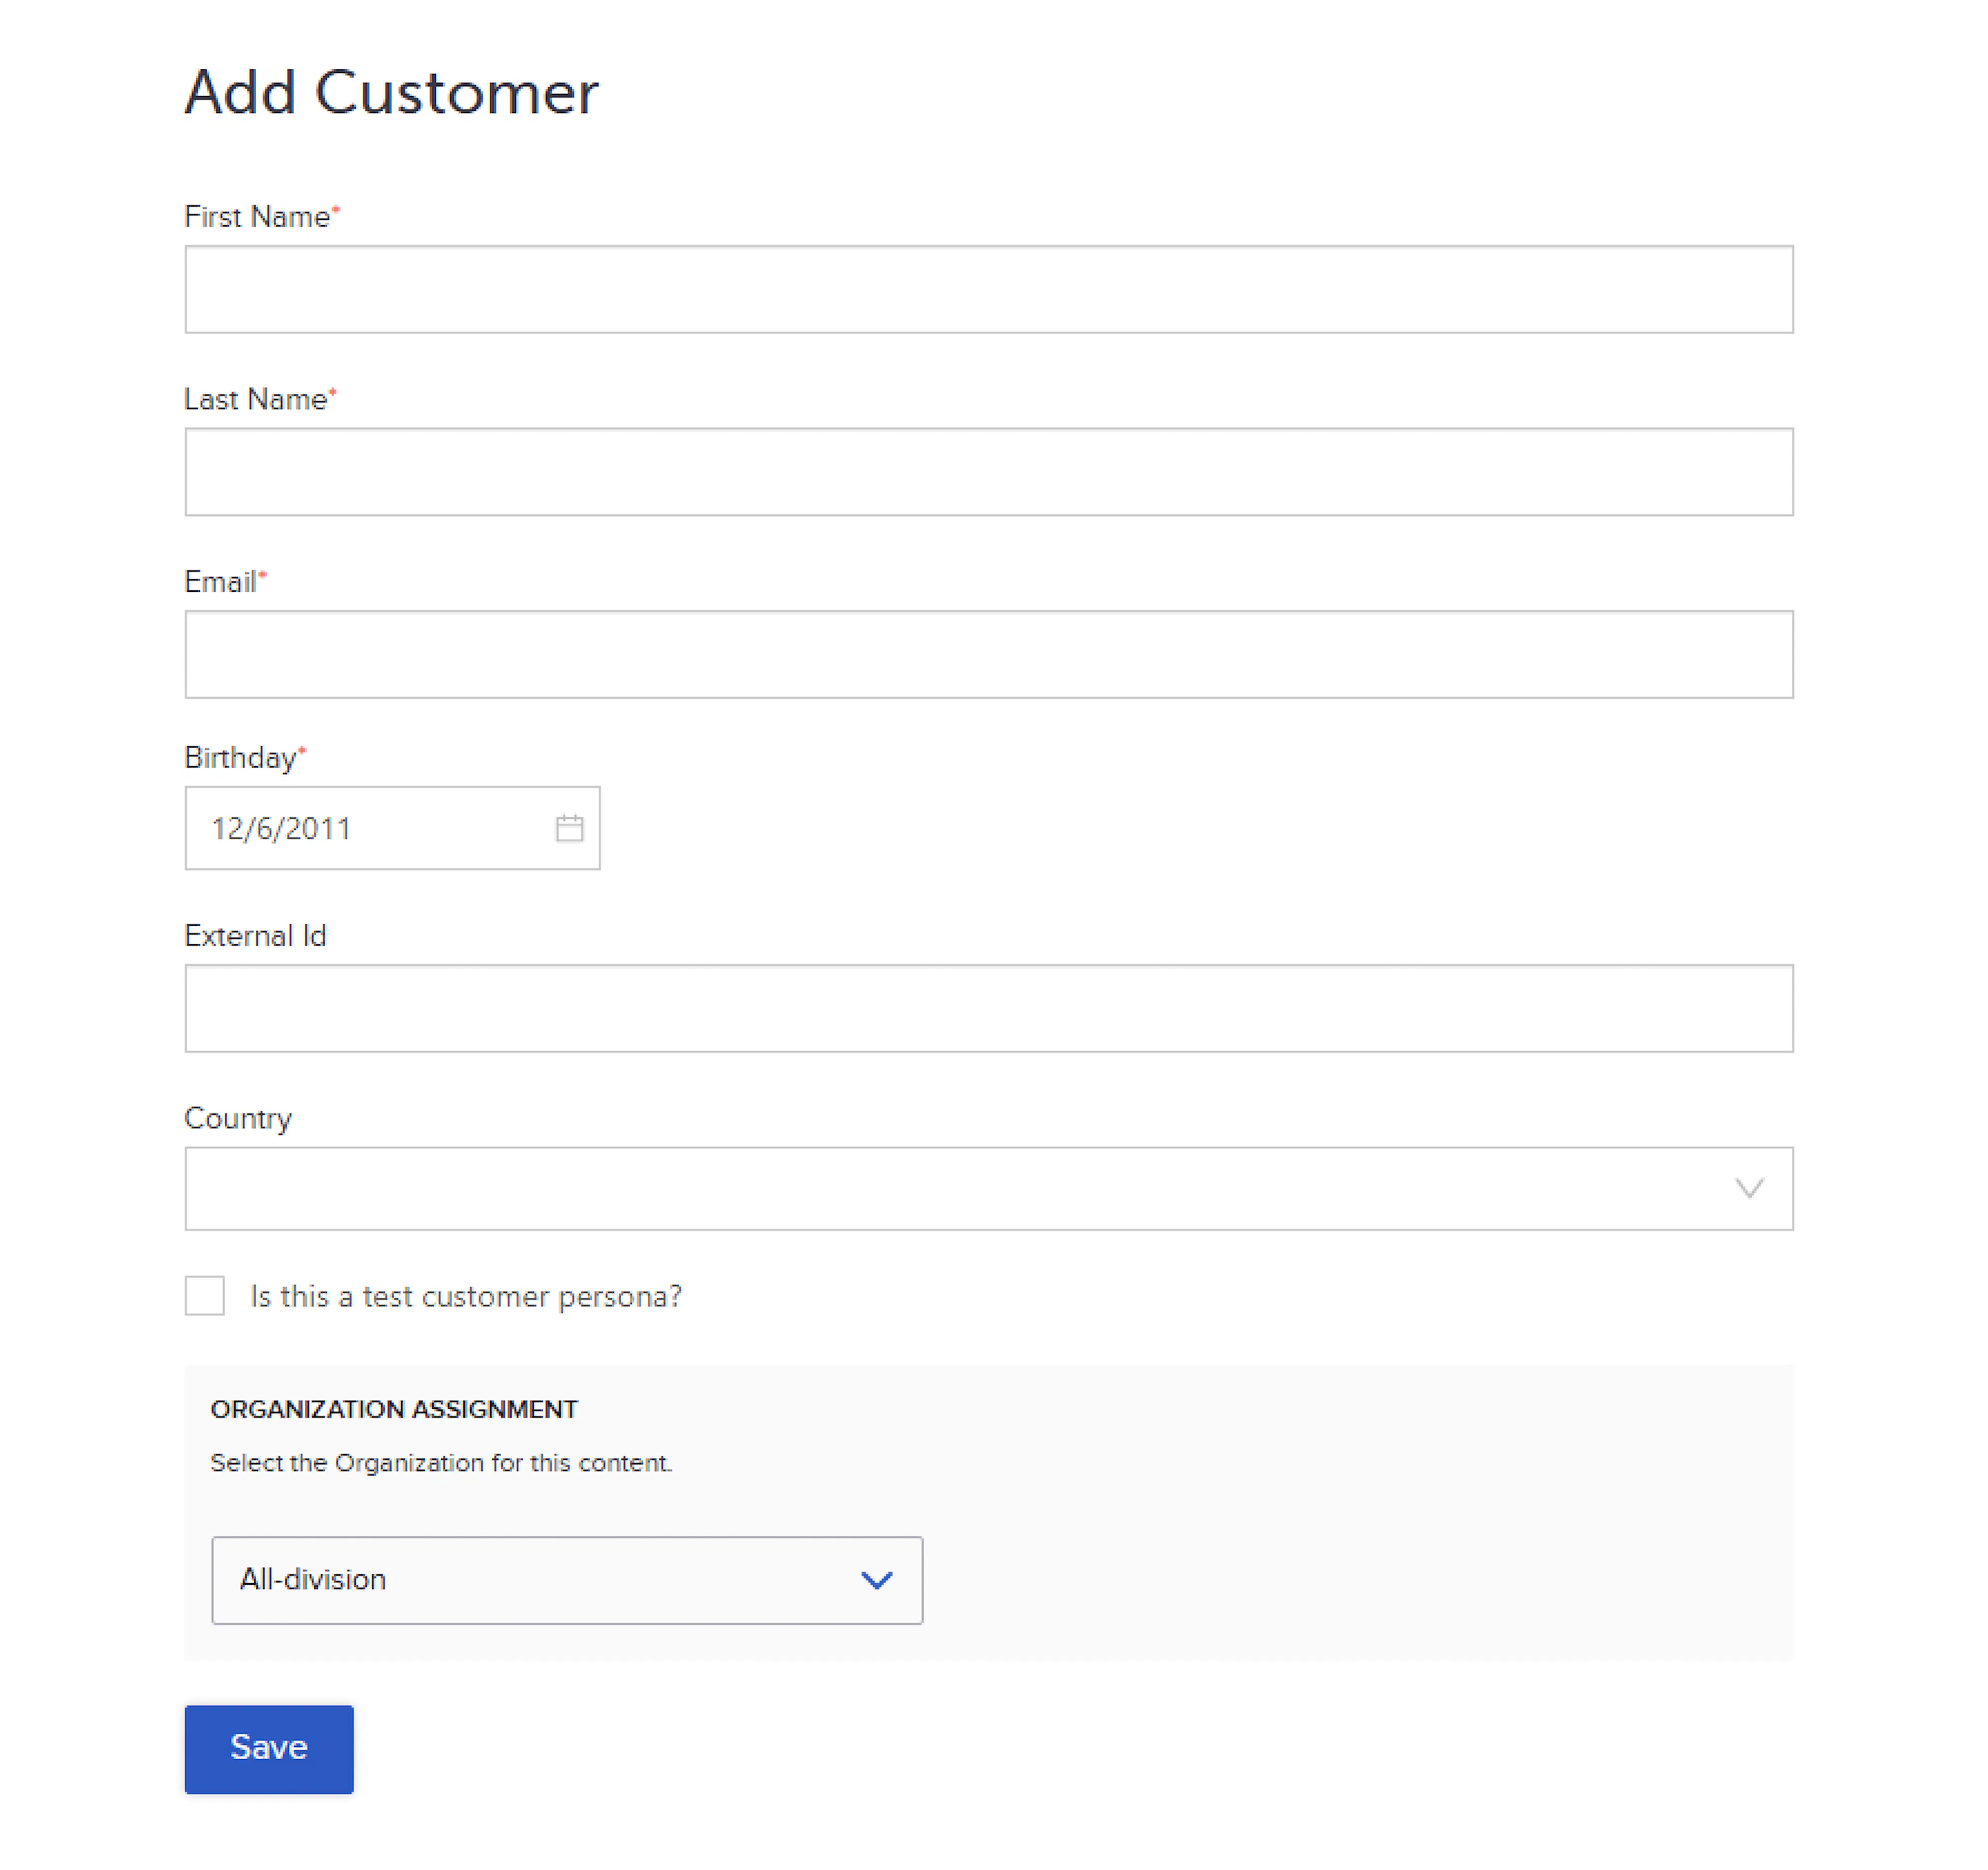
The Customer’s module “Add Customer” function now natively supports Org assignment in the creation form. With this new feature, you now have the ability to assign new customers to a specific Org at the time of creation. A new selector has been introduced, allowing you to choose from the Orgs you have permission for, regardless of the Org you are currently active in. This provides greater flexibility and ensures that customers can be properly aligned with the appropriate Org from the outset.
How it Works for Assign Customer to an Org when creating new profiles in the Customers module
A new selector has been added to the Add Customer screen in the Customers menu option. Creator will be able to assign New Customer to one or more Orgs.
Expanded Support for Offers API
Feature Description for Expanded Support for Offers API
Last release, SessionM introduce native Multi-Org support for the Offers module, including enhancements to the SessionM user interface, data cloud and Offers API. An additional, final Offers API route has been enhanced to support a “division_ids” request parameter and include a division_id attribute per offer object in the API response:
/api/2.0/offers/user_offer_history
These improvements allow your developers to easily fetch the User Offers they need depending on the Market, Brand or Business Unit that they’re building for.
As a reminder, this feature requires activation to be enabled. For environments with Multi-Org enabled, existing Offers will be migrated to the appropriate Org as part of feature activation in partnership with your SessionM Account team.
How it Works for Expanded Support for Offers API
Fetching Offers for one or more Orgs using the API
- Make a request to
POST /api/2.0/offers/user_offer_historyand in the request body, include a new parameter:division_id - To make the request for a single org, pass a single ID in the array
division_id: [“org1”] - To make the request for multiple orgs, pass a list of IDs in the array
division_ids: [“org1”, “org2”] - SessionM will validate the IDs are valid and if so return all matching offers with a new
division_idskey in each user offer object in the response, populated with the ID of the Org its assigned to.
For more information on the Offers API, visit the Offers API documentation.
Organization Column added to Offers and Campaigns Tabs in Customers module
A new column has been added to the tables containing customer profile’s Offers and Campaigns in the Customers module. This column contains the Org assignment of each record so that you can easily understand the relationship to Orgs without having to leave the Customers module.
SM Sync Module Improvements for Product Catalog Ingestion
In the last release, SessionM introduced support for Product Catalogs per Org for Multi-Org customers. To clarify file naming convention requirements and make errors more transparent the following improvements have been made.
Expected File Naming Convention Warning
In an environment with Multi-Org enabled, the following will now appear when selecting the Product Catalog file template in the SM Sync module. This helps to remind you of the file name requirements to successfully ingest a product catalog file.
Error Message Display for Multi-Org Product Catalog Ingest Jobs
When a product catalog file ingest job is initiated but fails for some reason, like the wrong file naming convention being used or an invalid division_id passed in the filename, the SM Sync service returns an error. This change allows those errors to properly flow to the user interface and made visible to end users so that they can understand problems with their ingest job and make corrections.